Editing Subtitles with Aegisub

Aegisub Subtitle Editor Workflow

Aegisub Logo

You start with a transcript of the audio. Always. If you do not have a transcript of the audio, read this quick article on how to get a transcript, and then come back and join the party.

BASIC Aegisub Workflow

Begin with your transcript saved in plain text file (.txt), or in subtitle file (.srt) format:

      1. Open Aegisub.
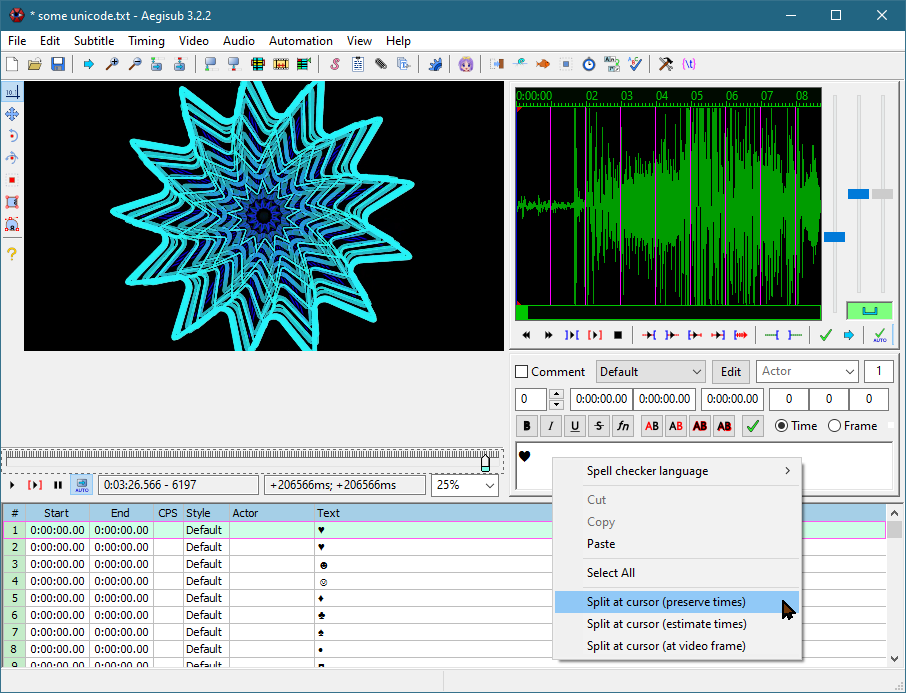
        Aegisub loading screen
      2. With the Aegisub editor open, select “File\Open Subtitle” to import a subtitle file or plain text file.
      3. Navigate to the location your transcript is saved, select the file and click “Open”.
      4. The Text Import Options window prompts you for characters to separate different actors, and a character to denote comments in the subtitle file (comments do not appear onscreen). Enter characters if your transcript is formatted with them, otherwise ignore.
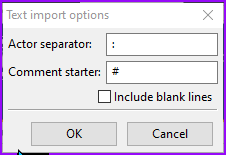
        Aegisub text import options
      5. Click “OK” and the file loads.
      6. The text grid populates with the contents of your subtitle/text file.
        Aegisub Text Grid
      7. Select the first row, and that subtitle will appear in the Subtitle Edit window.
      8. Edit the subtitle as appropriate for grammar and line length.
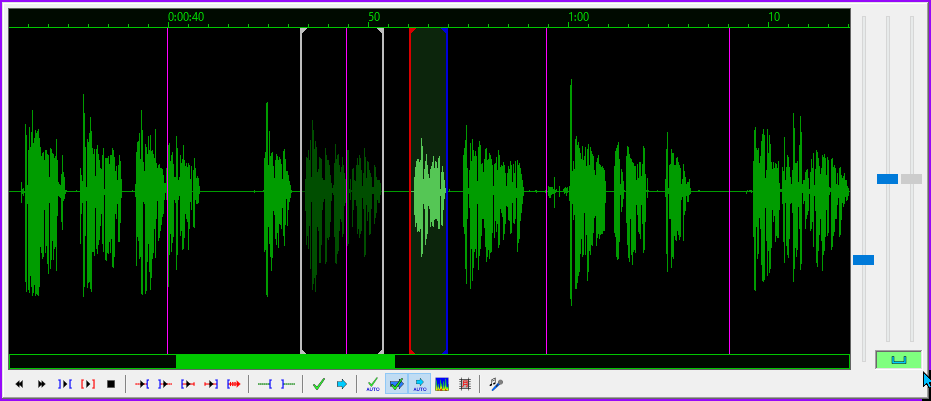
      9. Adjust the timing for the subtitle by moving the blue and red lines within the Audio editing window. Blue is the beginning, red is the ending. Other subtitles are represented with gray lines.
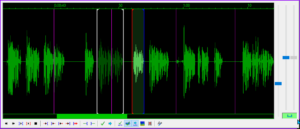
        Aegisub audio window
      10. Press ENTER when the subtitle is formatted and the timing is set. Aegisub will register the timing for your subtitle and move to the next subtitle line in the Text Grid.

Repeat this process until all of the subtitles have been formatted and properly timed to appear on screen.

That’s the essential workflow, continue reading to learn about optimizing your workflow, setting preferences, and how to format your subtitles so they are easier to read and understand.

Set Your Aegisub Options

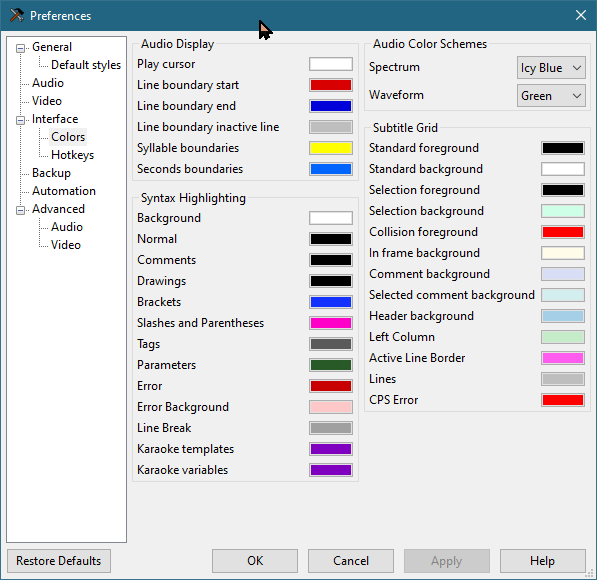
Aegisub Preferences window.

Goto “View\Options…” and select the “Interface” option to set the preferences for how many characters per line, characters per second warning threshold, and characters per second error threshold.

I set my preferences to 42 characters per line, 15 characters per second warning threshold, and 30 characters per second error threshold.

Click “Apply” when you are finished.

Colors

From the Options menu, click the “Colors” option under “Interface” and adjust the different colors used within the Aegisub interface.

When finished adjusting your preferences, click “Apply” to activate your settings.

Click “OK” to close the Options panel.

Video Window

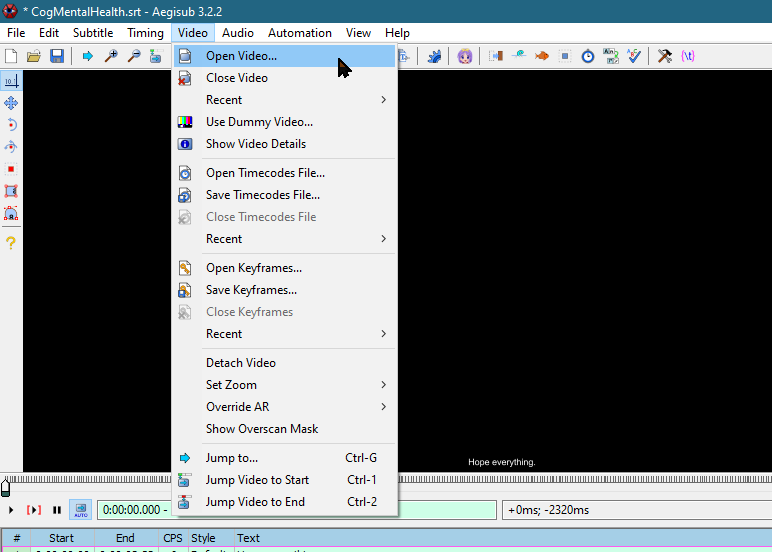
Go to the “Video” menu to open the video you are subtitling.

You can enlarge or reduce the size of the video window by hovering the mouse over the video and using the mouse scroll wheel.

There are multiple playback modes. Playback can be limited to the current subtitle line, or playback can proceed through the remainder of the video from the current subtitle line forward.

Audio Window

The Audio window displays the waveform for the audio. The area of the waveform between the red and the blue lines is the audio content corresponding to the current line of subtitles.

You can easily adjust the timing of each subtitle line by dragging the start or end lines within the audio window.

Editing Audio Timing

Within the Audio Window:

      1. Move the BLUE line to the beginning of your subtitle audio.
      2. Move the RED line to the end of your subtitle audio.
      3. Press SPACEBAR to play the audio for the current subtitle.
      4. Ensure the display time for the current subtitle corresponds with the selected audio.
      5. Press ENTER when you are satisfied with the timing.

Text Editing Window

Immediately beneath the Audio Window is the Text Editing window.

When you select a line of subtitles in the Text Grid, that subtitle will be displayed in the Text Editing window for editing.

Right click within the Text Editing window to access options for adjusting line length and splitting subtitles.

Use NUMPAD 5 to play the audio currently associated with the subtitle being edited.

Editing the Captions

Edit the subtitles according to the rules for editing captions, as described in the “Captioning Key” resource from the Described Media and Caption Program (DCMP).

Use the Captioning Key for full details of how to format different types of information, as well as how to style your captions for maximum readability.

Captioning Key: https://dcmp.org/learn/captioningkey

Formatting Language

There are many considerations for formatting subtitles to enhance their readability and understandability. Check out the Captioning Key for a complete explanation of how to format different types of information. In general, the following guidelines should always be followed:

      • Never split a prepositional phrase when breaking a line of subtitles.
      • Do not split a descriptor from the object it is describing when you break a line of subtitles.
      • Do not mix numerals with numbers spelled out in words. Choose either numerals or words and maintain consistency.
      • Do not separate a person’s title from their name when breaking a subtitle into two lines.
      • Include sound effects in brackets, such as: [car tires screeching],
        or [gun firing] BANG! BANG!…
      • Audio occurring offscreen should be italicized.

Maximum Line Length

It is important to format your subtitles so they do not form excessively long lines of text.

It can be difficult to read long lines of text and also pay attention to the video that is being shown. Best results are achieved when subtitles are around 42 characters per line. It is OK to exceed this by a few characters, but try not to go over 50 characters per subtitle line.

The Text Grid displays each line of subtitles with a column that displays the Characters Per Second (CPS). This column turns red when the characters per second meets or exceeds the levels you set in the Interface options, making it easy to see at a glance where you need to make adjustments to line length.

Using the Characters Per Second column, you can quickly identify any lines of subtitles that are too long for the amount of time they are being displayed. The Characters Per Second warning color and the characters per second error color can be set in the Options pane under “Interface\Colors”.

Displaying Two Lines of Subtitles

If you want to display two lines of subtitles on the screen, you can manually split the subtitle line into two lines by pressing SHIFT + ENTER.

Pressing SHIFT+ENTER will place a new line code(\N) in your subtitle file, indicating where the line breaks. The new line code will not be displayed on screen with the rest of the subtitle.

If you break a line of subtitles using the new line code (\N), the Characters Per Second displayed will reflect whichever subtitle line is the longest.

Splitting Long Lines of Subtitles

If you want to break a long line of subtitles into two separate lines of subtitles, use the Editing Window.

Place your cursor within the subtitle where you want the second line of subtitles to start, and click the right mouse button.

Choose “Split at cursor (estimate times)”, and the text spanning from your cursor to the end of the subtitle will be moved to a new subtitle line.

Conclusion

Follow the workflow at the beginning of this article until each line of subtitles has been formatted and optimized.

Save your .srt file, and use it with your video when you share it online or use the video in the classroom.

You can also download this job aid for the Aegisub Workflow for editing subtitles.

How to Create a Transcript

How to Get a Transcript

cartoon of woman in a flutter of documents, carrying a giant pencil and creating as she moves.

There are many ways to get a transcript of your video.

As an employee, my number one preferred solution is to contract with a professional to do my captioning.

However, as an independent business owner, I do not want to spend the money for captioning when I can do it myself and spend that money on something else. In fact, I’m even happy to take on your captioning chores for a small fee if you’re seeking help.

So I understand that for many small businesses the cost of paying someone else to caption your videos is a non-starter. There is a reason so many videos on YouTube have the “auto-craptions” instead of polished and helpful captions.

But I’m here to tell you there’s a better way than throwing the fate of your subtitles to the whims of YouTube.

As a wizened old nerd who has been playing with video since the days of VHS and video toasters, I can appreciate the amazing progress that has been made in the area of captioning support. There are many ways to get captions, including the aforementioned “auto-craptions” which are better than nothing, most of the time.

Even so, the work must continue, as the quality and accuracy of “auto-craptions” still leaves something to be desired.

Fortunately, captioning is not so much difficult, as it is a time-consuming task. However, one of the traditional bottle-necks in the process, transcribing audio, is being resolved by robots.

Path of Least Resistance

With the explosion of AI, it is no wonder that we have many options for transcribing audio. Many offer a “free” tier, but as is always the case, when a web-based service is “free” – you are the product being exploited – as in, your data.

Be aware of the fact that what you feed into any of these AI systems will likely be used to feed their training algorithm, and be used for who knows what. So choose wisely.

Personally, I like Otter.ai because I first encountered them in the Education technology space many years ago, long before AI became a “thing”. They do a remarkably good job of recognizing what is being said.

If you do not have a subscription to the Adobe Creative Cloud, then Otter.ai would be my next choice for automated transcript creation.

Premiere Pro

Even with the ease of Otter.ai, I can’t deny the immediate ease of using Premiere Pro’s new transcription capability.

Adobe has some impressive  speech recognition capability, and since I have already sold my soul in order to have the Creative Cloud subscription, I can rationalize the feeding of the Adobe AI.

Adobe, my toxic valentine, co-dependency is the mask for your vile exploitation and my despicable lust for your bright shiny broken things…

Anyway – please excuse my venting, and let’s get back to the regularly scheduled programming…

I find that getting a transcript from Premiere Pro is a simple and powerful way to begin the captioning process.

Premiere Pro Workflow

Getting a transcript in Premiere Pro starts at project creation when you import your source clips. Set the ingest settings to automatically transcribe your clips at project creation, and Premiere Pro will create transcripts of all audio and video clips.

So far, it does a better job than YouTube. YouTube has flat-out refused to process several recent videos, I suspect due to the length of the videos.

After Premiere Pro finishes processing your clips, you can open the Transcription window to edit the results.

You can easily create captions/subtitles with your transcripts within Premiere Pro, and you can export the subtitles as an .srt file for uploading to YouTube or editing in Aegisub (see below).

Aegisub Subtitle Editor

If you are working on a long video, you will probably find the process of editing your subtitles to be a lot more enjoyable and efficient when working in Aegisub, the free subtitle editor.

I don’t receive any financial compensation for recommending Aegisub, I just like the program enough to recommend it.

Check out my tutorial on using Aegisub to take your audio information from transcript to powerful and perfect captions.

Aegisub Advanced Subtitle Editor

Aegisub logo
Visit aegisub.org to download the application.

Aegisub Advanced Subtitle Editor is an open source tool for editing and creating digital subtitle/caption files. Providing support for editing, styling, and positioning subtitles, Aegisub supports many different subtitle file formats.

Aegisub provides an interesting way to assign the start and stop times of subtitles, with an audio waveform display that makes it easy to visually find the points in the timeline where sonic information is happening. This allows you to click in directly where the audio is happening instead of listening in real time.

There are Aegisub versions for both Windows and MacOS, with different versions written in 27 different languages.

Aegisub can produce subtitles in most languages in use today, across a range of character encoding that enables Asian and Cyrillic fonts as well as traditional western fonts.

In addition to being used by professional media production companies, Aegisub also has a huge user base in the fansubbing community, where it is used to create unofficial subtitles for videos.

Aegisub also features styles for creating karaoke videos.

Getting Aegisub

Aegisub startup window.

You can download Aegisub at http://www.aegisub.org/downloads/#current.

It is recommended to use the 32 bit version, as the 64-bit version is slower and does not provide the same range of supported technologies as the 32 bit version.

Using Aegisub to Create Captions

Aegisub is a powerful tool that allows for advanced workflows that include automation and sophisticated styling.

Fortunately, it is also easy enough to use that hobbyists and educators alike can use it for simple subtitling.

Start Aegis

After you’ve downloaded and installed Aegisub, start the Aegisub application.

The Aegisub application will open.

Aegisub application window immediately after opening.
Aegisub Application.

Open Subtitles

To begin, we will open your subtitle file.

Go to the File menu and select “Open Subtitles”You can also use Aegisub to transcribe your video, if you prefer (choose “New Subtitles” if you are going to transcribe your video in Aegisub.

Aegisub will open subtitles in the following formats:

  • .txt
  • .srt
  • .sub
  • .mkv
  • .mka
  • .mks
  • .ass
  • .ssa

Choose your Text import options, and click OK.

text import options, select and Actor separator, Comment starter, or include blank lines.
Leave unchanged and click OK for simple productions.

Your subtitles will be loaded into the text grid.

Aegisub text grid.
Aegisub text grid.

Open Video/Audio

Go to the Video or Audio window and choose the option you prefer for determining the timing for each line of captions.

In either case you will notice the wave form editor will display the audio information on a timeline.

Aegisub with subtitles and video file loaded.

Audio Display

Go to the Audio menu and select “Waveform display” if it is not already selected. This makes the audio information more distinct and easy to identify the start and stop points.

Aegisub audio display.

There are fader controls at the right of the audio display to control the horizontal and vertical zoom of the audio display.

Adjust the display so you can easily see when audio is beginning and ending.

Font Styling

Within the Line Editor window, you can format the font face and size, as well as the colors for outline, fill, and shadow (if you’re making karaoke, you can also format the karaoke timing colors).

Aegisub line editor.

It is recommended you do not use smaller than 20 pt fonts. Depending on the format of your video, you may want to use larger font sizes.

For best results, it is recommended you test the playback of your subtitles and be sure you are able to easily read them.

From within the Line Editing window, you can also format subtitles from multiple speakers, as well as create comments.

Edit Text to Size

Edit your text to make sure none of the lines are excessively long.

Aegisub provides a wide range of keyboard commands for editing text, splitting, and adding lines.

Aegisub will highlight in pink the field next to the Effect pull-down menu when a line of captions has too many characters.

Associate Timing

You need to assign a presentation time for each line of subtitles that defines a starting and ending time.

In the text grid, select the line of subtitles you want to assign a start and stop time for.

In the audio window, left-click where the subtitle begins, and right-click where the subtitle ends.

Editing subtitle presentation timing with the audio display.

Aegisub will place a red line at the starting point in the audio window, and a blue line at the end time.

Press “R” to play the currently selected range of audio to make sure you are capturing the correct portion of the audio waveform.

When you are satisfied with the timing, press ENTER and Aegisub will commit the time values and move to the next line in the text grid.

Proceed through the audio/video and text grid until each line of subtitles has a presentation time assigned.

Save or Export

When you have finished formatting and timing the subtitles, you can use Aegisub to preview your work and make sure the subtitles are properly synchronized with the spoken audio.

When you are satisfied, you can save the subtitles as an Advanced Alpha Substation (.ass) file, or else you can choose the Export option from the File menu to generate an .stl, .sub, .ssa, .ttxt, .txt, encore .txt, and .translation.txt.

Additional Resources

Aegisub is supported by an in-depth online manual that includes tutorials for getting started and delving into the advanced uses if you choose to go there.

Access the user manual for the latest version (3.2) at: http://docs.aegisub.org/3.2/Main_Page/

Find out more at the Aegisub project website: aegisub.org.

Now you can create and edit captions and subtitles for your instructional videos (and karaoke) with Aegisub for free.

Thanks for reading!