Accessible PDF

There are a lot of different PDF’s in the world.

Those of us who were around back when the Internet was invented can tell you horrible tales of how random and unpredictable digital information once was.

The advent of a file format that could provide a consistent layout across different computers, monitors, and printers – that was a huge deal.

illustration of three characters apparently celebrating  the same design appearing on 4 different screens.
PDF brought consistency to the early Internet.

Funny how quickly we can get used to something – but in the case of PDF, it is almost spooky how it gained such overwhelming dominance. There are so many ways to make a PDF that it is impossible to guess what the source might be for any unsolicited PDF file.

The PDF file format is one of the most powerful and popular digital containers around. I have found that the percentage of PDF files in any online course is usually higher than the percentage of HTML files.

Value of the Source Document

Most PDF documents tend to start as another form of information, such as an MS Word file, MS PowerPoint file, MS Excel file, Google Doc, Google Sheet, InDesign, Pages file, Photoshop, Illustrator, Chrome, Firefox, your copy machine in the corner, my flatbed scanner, your cellphone, and somebody probably has a toaster or refrigerator that can make a PDF.

I would not be surprised…

The tricky part is, if you don’t have the accessibility solutions in place within your original content, the PDF you create will also not have any of the access solutions you need.

Worst of all, it can sometimes be very challenging to apply the access strategies in Acrobat – assuming you own it.

Which reminds me, you need to own a Professional version of Acrobat to address the accessibility of your PDF documents. Get your school to buy you a copy if they haven’t already.

While you can create a PDF from pretty much anywhere, you still need to own a full version of Acrobat in order to edit and ensure accessibility is possible. I wish there was some less expensive option, but to the best of my knowledge, Acrobat still wins that category.

Access Strategies in Acrobat

Just like all the other digital formats in the world, our basic challenge is applying the access strategies for different types of digital content:

MEDIA TYPEACCESS STRATEGY
TextStructure (Headings, list styles, paragraph styles, etc.), clarity, legibility, contrast.
ImagesText descriptions and captions
AudioText transcript
VideoCaptioning and narrative description
InteractiveText labels, keyboard control, Section 508 & WCAG
Complex/CombinationAll of the above…
Digital Media Access Strategies

The easiest, most straight-forward and trouble-free approach is to start with a document that has all of the above access strategies in place before it was converted/saved to PDF.

Accessibility Tools

If this is your first time dealing with accessibility in Acrobat, it is most likely the case that your Accessibility Tools are not on deck.

Near the bottom of the toolbar at the right-hand edge of the program window, find and click the “More Tools” button.

More Tools button from Acrobat.

Acrobat will open the Tools inventory.
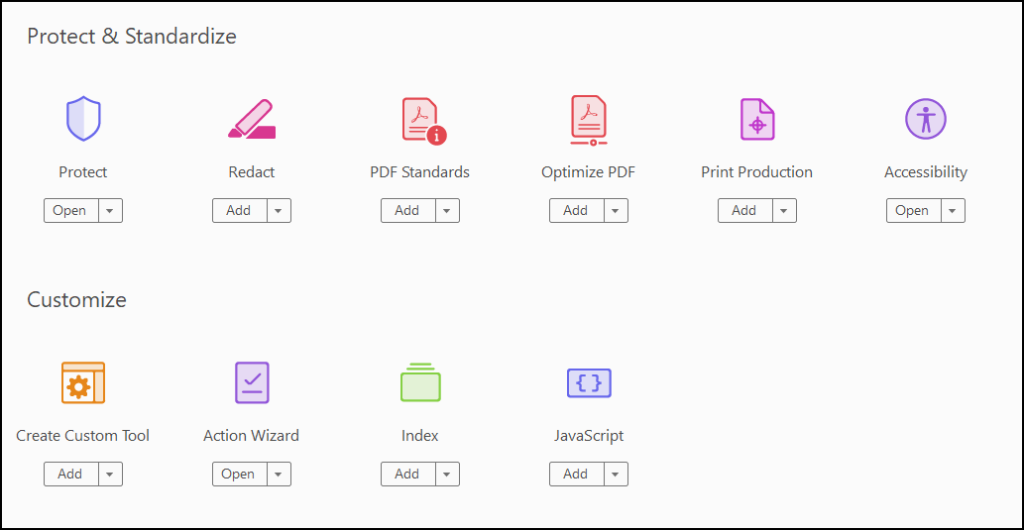
Acrobat Tools inventory.

Select Accessibility from the “Protect & Standardize” category and Action Wizard from the “Customize” category near the bottom of the list. You should now have the Accessibility and Action Wizard at the bottom of your toolbar.
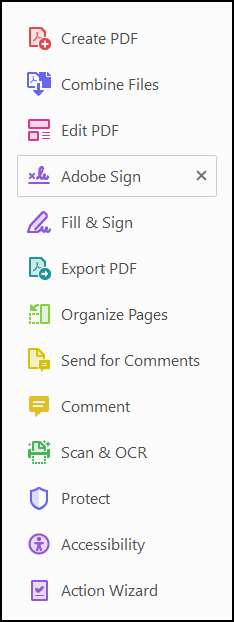
Acrobat toolbar with Accessibility and Action Wizard tool options.

Click on the Accessibility Tool and you are ready to begin.

Tags or No Tags?

Before you can do anything with your PDF, it needs to be tagged. To view the tags tool, we need to open the Navigation Panel on the left-hand side. Find and click the expander handle to reveal the Navigation Pane.
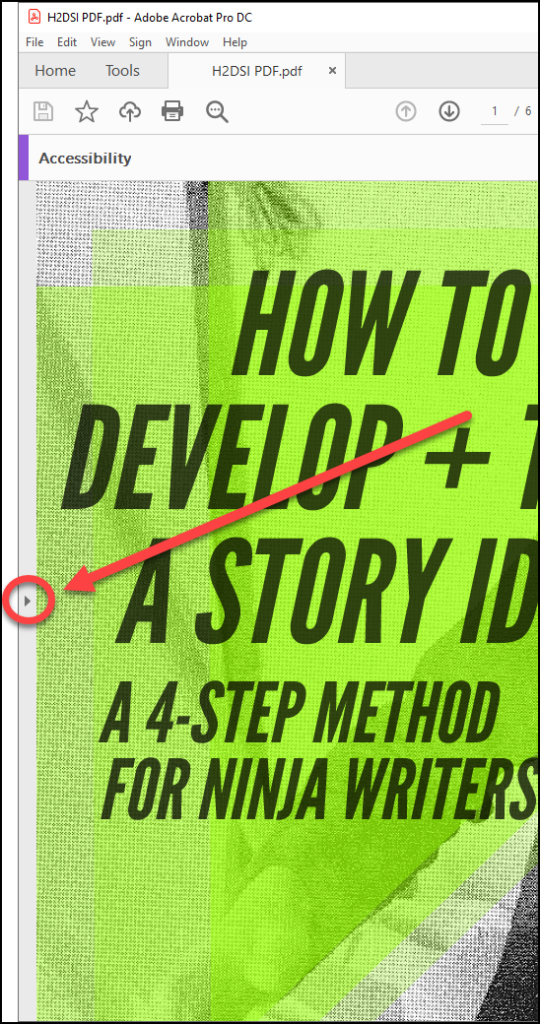
Navigation Panel Expander Handle,

If this is your first time checking accessibility with this document, you will probably need to load the Tags tool into the Navigation Panel. Go to the “View” menu and select “Show/Hide, Navigation Panes, Tags”.
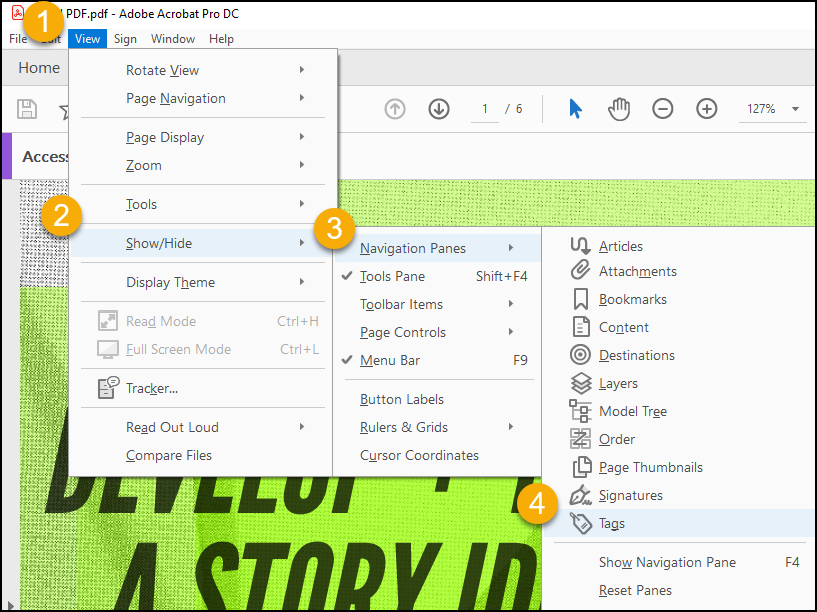
Menu path for adding the Tags tool to the Acrobat Navigation Pane.

Click on the Tags tool to reveal the Tags explorer.

If it says No Tags available, proceed to the next step.

Otherwise, if you’ve got tags, skip ahead to the last step: “ACTION WIZARD: Make Accessible”.

AutoTag Document

If you’re reading this step it is because your source document did not include the advanced formatting to tell Acrobat about your content.

But this is not a big problem!

illustration of woman sitting on orange sofa with laptop in a yellow room.
Acrobat will auto-tag your document if you need it to.

Now we will have Acrobat examine the document and do its best to figure out what kind of data the PDF is comprised of.

From the “Accessibility” tools on the right-hand side of the program window, select the first option, “Autotag Document”.
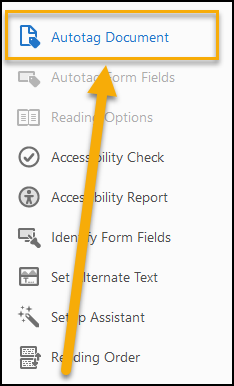
Autotag Document option from Accessibility Tools.

Acrobat will process your document and generate an “Add Tags Report” that typically includes any Accessibility concerns it could identify, such as images without Alt Text descriptions, questionable reading order, and various meta-information.

Issues such as discerning a logical reading order still require your attention to determine, as well as determining if alternate text descriptions are descriptive enough.

Now that your PDF is tagged, click the view control to make Acrobat display one page at a time. The Accessibility tools behave themselves better in single page view mode.

You are now ready to begin!

Illustration of man sitting with laptop, ready to get accessible.
Ready to begin!

ACTION WIZARD: Make Accessible

Choose the Action Wizard from the toolbar. An “Actions List” will appear.

The first action in the list is “Make Accessible” – click it and follow the directions to address basic accessibility issues, the sorts of things an automated testing algorithm can deal with.

The last process the Make Accessible routine will do is prepare an Accessibility Check of your document. Examine the parameters it is testing for, and then launch the check.

Once the Accessibility Check is finished it will create an Accessibility Report with any issues affecting the accessibility of the PDF.

You can click through the links for the different issues in the report and get individual instructions for any issues that need to be addressed.

Go ahead and see what you can figure out on your own. Run the test again after you have made the suggested adjustments and make sure you didn’t miss anything.

Save your PDF with a different name if you’re worried about making mistakes.

I’ll be covering the results from an Accessibility Checker scan of a simple document in tomorrow’s post, and show you how to resolve the common issues and how to do the human verification required for others.

Thanks for reading!

MS PowerPoint Accessibility

Microsoft PowerPoint is a powerful program for creating presentations that can be delivered to an entire class of students at once, or the same file can be accessed by the same class in an independent study session.

There are a variety of considerations for the accessibility of a PowerPoint Presentation being delivered to an audience, and there are some different concerns for when that file is going to be distributed to students for individual study.

Creating Accessible Presentations

When you start from scratch and are making a PowerPoint Presentation, there are a few simple things you can do to ensure maximum accessibility.

Themes

One of the most important considerations is the theme. Issues of legibility and clarity are exacerbated when a presentation is projected through a classroom in daylight, and they can also be a problem for individual viewing.

Pick a theme that has sufficient color contrast, and one without a background that is too busy. It can be difficult to distinguish the text in some cases where a PowerPoint background is too complicated or busy.

Default Layout

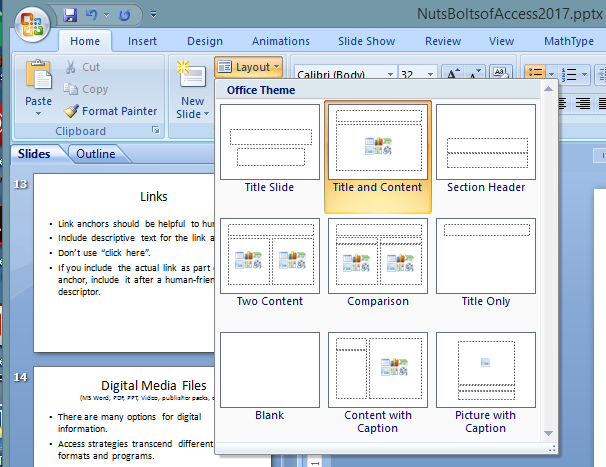
When you click inside the pre-defined slide layouts you are entering data that PowerPoint can track and structure in an accessible way.

Slide Layout options from MS PowerPoint
MS PowerPoint Slide Layout Options

If you click and create random zones for your content, PowerPoint doesn’t know what to do with the content.

There are usually several different options for slide layout that will allow you to accomplish what you need with your slide creation.

Alternate Text Descriptions

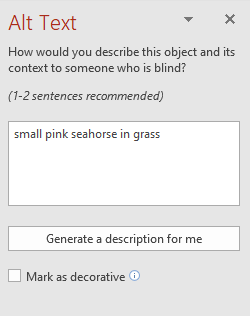
MS PowerPoint also allows you to enter alternate text descriptions for non-text content such as images and charts.

MS PowerPoint Alt Text field.
MS PowerPoint Alt Text Panel

To provide alternate text for non-text content in MS PowerPoint:

  1. Select the image.
  2. Right-click the image.
  3. Choose the “Edit Alt Text” option.
  4. Enter the alternate text description in the Alt Text window.

Graphs and Charts

A lot of presentations use graphs and charts. When you have slides with charts and graphs, make sure there is a textual explanation of the most significant points of the graph or chart. Draw attention to totals, trends, or conclusions that might be implied by the graphical information, but still need to be verbally stated for someone who can’t see the content.

Video Content

If you have a PowerPoint Presentation with an embedded video, you need to ensure the video is closed captioned. I will be covering some techniques for captioning your own digital video in following posts.

Links

When you place URLs into PowerPoint it automatically converts them into active hyperlinks.

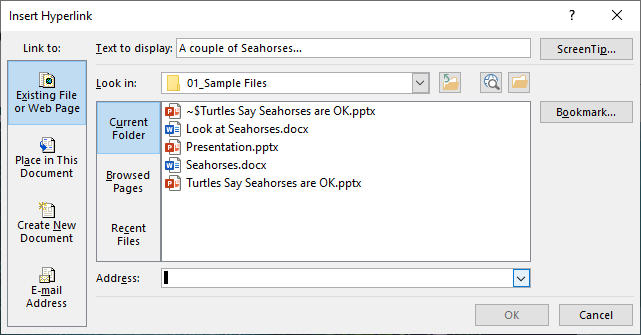
To format a hyperlink in PowerPoint, press CONTROL + K, and the Link Editing dialog will appear.

MS PowerPoint Link editing window.
Insert Link Window from MS PowerPoint.

Make sure your links are user-friendly by creating meaningful anchor text and then formatting it as a link and entering the URL through the link editing window.

Checking Accessibility of MS PowerPoint Presentations

Sometimes you have a PowerPoint Presentation that was created by someone else. Before you distribute that presentation to your class, check it to make sure it is accessible.

Check Your Outline View

One technique for quickly checking a presentation file is to switch the view to Outline.

In Outline view you can go through the presentation and see what information is being preserved as accessible text from your slides. If you use the pre-defined slide layouts you can expect to see the titles and bullet text preserved and displayed in Outline view.

If you notice any slides in Outline view that seem to be missing information, that is a good clue that something in your slide might need to be adjusted or enhanced.

Check Your Color View

Another technique you can try is to engage the grayscale view option and see if any of your content becomes difficult to perceive.

Accessibility Checker

Finally, there is an accessibility checker in MS PowerPoint that can help you identify issues with your presentation that might cause problems for accessibility.

To start an accessibility check:

  1. Go to the “File” tab
  2. Click “Info”
  3. From the “Check for Issues” menu, choose “Check Accessibility”.

MS PowerPoint will process the slides in your presentation file and try to identify any content that might have issues.

MS PowerPoint Accessibility Checker
Accessibility Checker from MS PowerPoint

Be careful in interpreting the results from the Accessibility Checker. Automated accessibility testing is rarely able to identify more than 40% of issues that affect accessibility of content.

You will need to ensure adequate contrast and the reading order of the content in your slides, and of course you need to make sure that the content is easy to read and makes sense.

Convert to PDF

Sometimes the content of a PowerPoint presentation is not best suited for independent studying, and it can be made more appropriate by converting to PDF. Sometimes content in a slide that is interactive or problematic for accessibility can be better handled as a flattened image in a PDF.

If the instructional content of a PowerPoint presentation can be made accessible more easily as a PDF, or if the content will be easier to navigate and study as a PDF, then you should convert your presentation to a PDF and distribute it to your students.

Of course, you’ll need to make sure the PDF is accessible first. I’ll be covering that soon in a following post.

Meanwhile, you can start addressing the content in your PowerPoint presentations for accessibility with the above tips and techniques.

Thanks for reading!

MS Word Accessibility

As the most popular word processing program out there, it seems like a huge misstep to not address the basic best practices for creating accessible documents in MS Word.

Recognizing how much power is in MS Word, I am only going to address some of the big items with most impact on accessibility.

There is so much that MS Word can do, and so much that can be done to enhance accessibility in MS Word, that it deserves a week of its own posts.

For today, I want to show you how to:

  • Style text with headings and make them look the way you want them to look,
  • Add an alternate text description to an image,
  • Run the MS Word Accessibility Checker.

So let’s get busy!

Heading Styles in MS Word

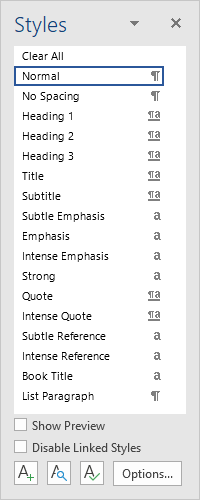
In MS Word there is a “Styles” panel on the home tab.

MS Word styles pane
MS Word Style Pane

When you have your cursor in a line of text and you click on one of the styles, it applies that style to your line of text.

Pretty easy.

However, I often hear people complain that they don’t like the way the default styles appear.

It is at this moment that I realize this individual doesn’t know about the Style Manager in MS Word.

If you press ALT + CONTROL + SHIFT + S you will open the Styles Manager.

MS Word Styles Manager
MS Word Styles Manager.

On the far right of each style is a pull-down menu toggle. In this menu is an option to “Modify Style”.

With the Modify Style window open, you can adjust the font, size, color, and a variety of formatting details.

MS Word Modify Styles window
MS Word Modify Styles window.

In this way you can adjust all the Heading styles to look however you like them to look.

Now the Heading styles can make your document accessible while not making your document unpleasing to the eye.

Alternate Text in MS Word

When you insert an image in MS Word, it is easy to associate an alternate text description for it.

Right-click on the image, and select “Edit Alt Text…” from the menu that appears.

MS Word Edit Alt Text option from the right-click menu.

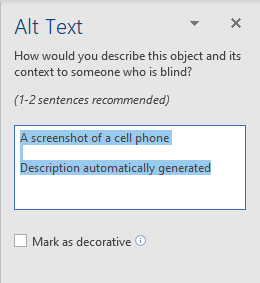
When the Alt Text pane appears, erase the automatically generated alt text.

MS Word Alt Text Editing window.

Provide a valid description of your image that will help someone understand what the image is communicating if they are unable to see the image.

MS Word Accessibility Checker

MS Word now includes an accessibility checker.

You can run an accessibility test on your document and have MS Word help you fix issues that might cause problems for some readers.

MS word Info screen with menu options highlighted to correspond with instruction steps for starting an accessibility check.
MS Word Info Screen with Accessibility Check initiating path highlighted.

To start an accessibility check:

  1. Go to the “File” menu and click on “Info”.
  2. From the Info screen, click on “Inspect Document”.
  3. Next, click “Check Accessibility”.

MS Word will process your document and alert you to any content that requires additional attention.

MS Word accessibility checker errors.

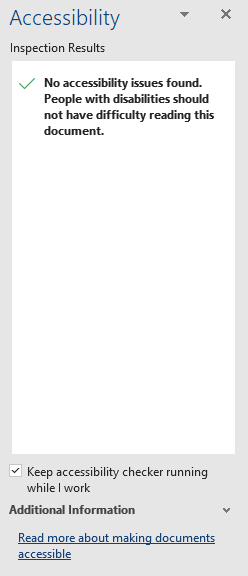
After you address any accessibility issues that were found, run the Accessibility Checker again. When you have addressed all the accessibility issues the Accessibility Checker is capable of finding, your results will tell you there were no accessibility issues discovered.

MS Word Accessibility Checker reporting No Accessibility issues were found.
Accessibility Checker with good results.

NOTE: While this is comforting, and a good start, you can not trust the Accessibility Checker to find all the accessibility issues in your document!

Automated accessibility testing can only find less than 40% of the issues that cause accessibility issues.

So you will have to continue to be aware and practice good authoring practices to make sure you are creating documents that are as accessible as possible.

But wait, there’s more!

We will be spending more time in MS Word in the coming weeks and looking more closely at some of the accessibility capabilities it has.

For now, consider your own style and how you might like to make your Heading styles appear, and take comfort that there is an accessibility checker in MS Word that has your back and will help keep you on the right track for creating accessible documents.

Incorporate these simple things into your MS Word workflow, and you will be creating more accessible documents as a normal part of your day to day routine.

In other words you will be adding value and increasing the effectiveness of your learning materials by ensuring they can be accessed and used by ALL your students.

Thanks for being that person, and thanks for reading!

For a Sunday: The Gospel of HTML

(or, “At the Crossroads of HTML and Daily Relevance for A11Y”)

(or, “Why should I care about HTML? I just use PDF documents!”)

Musician points towards the heavens as turquoise light shines down.
Photo by Adrian Linares on Unsplash

Good morning!

Have I told you lately what I think about HTML?

In terms of accessibility, if plain text is the most honest digital format, then HTML is the most powerful:

  • HTML enables both the content and the container to exist.
  • HTML binds and aligns technologies while presenting them as a unified whole.
  • HTML presents the message and at the same time it can know what it is talking about.
  • HTML enables the Internet to exist and allows for the thing we call Web Accessibility where people with disabilities can enjoy this rich capability to interact with the world.

For each of us here, HTML has allowed our individual capability to create, express, and experience the world to go far beyond anything previous generations have known or imagined.

At its best, HTML helps us be more fully aware and capable of maximizing our own potential.

And cat videos. HTML allows you to see more cat videos than anyone needs or could have dreamed possible.

Despite all of that, people tend to hate HTML code.

Two thumbs down and a frown from a brown-haired girl.
Photo by Thomas Park on Unsplash

With the obvious exceptions, most of the world will actively avoid the knowledge of HTML code and any activity that requires them to engage with text inside of brackets.

I get it- I’m not here to try and sell you on it.

But why does this matter?

Because anywhere you type digital text in your CMS you are creating HTML text.

This is something I thought you should know about, because I recognize you are really committed to the cause.

I can tell if there is an opportunity to enhance the access and usability of the communications you send students, you will be sure to make it most usable.

Because now you know- and you care.

That’s just beautiful…

Organizational Name-Calling

The thing about HTML that makes it special is the schema that allows for everything to be defined. This is the “ML” from HTML – MARKUP LANGUAGE.

The whole point of HTML is to define every part of the message by marking it up with a tag. There are a lot of tags available in HTML – but thankfully we don’t need to worry about all that.

We can get away with a handful of things to worry about because our CMS text editors are typically limited in what they make easily possible.

So without going crazy, or getting your hands nerdy, you can probably manage the a11y of HTML in your CMS.

Creating HTML in your CMS – all you need for now…

You should be able to influence these items within your CMS-based content editor:

  • Text and Background Color Contrast
  • Headings
  • Lists
  • Image descriptions
  • Table Header Rows
  • Link Anchors (the clickable text)

Text and Background Color

You need to make sure the text is legible and distinct from the background. Ensure your contrast ratio between foreground text and background colors satisfies the WCAG criteria –  7:1 for normal text and 4.5:1 for large text.

Tools for Colorful Creations

Here are some tools to help with color contrast:

  • Who Can Use – A tool that allows you to specify any color combinations for text and background, and then it tells you about the different use cases where the text would be problematic. You can learn about color contrast and different kinds of colorblindness as well.
  • Color Oracle – A colorblindness simulator that applies a full screen overlay over your work, allowing you to experience your content as someone with a colorblindness disability would.
  • ColorSafe – Enter your background color and font style, and ColorSafe will provide WCAG compliant colors for your text.
  • Khroma – This tool is amazing. If you are ever searching for that color combination to make your content pop, Khroma can be super helpful. Khroma asks you to pick 50 of your favorite color swatches, and then powerful AI derives countless combinations of WCAG compliant and artistically satisfying color combinations.

Your CMS text editor should have the ability to specify colors for the text and background. If you are unsure of how to specify colors with your CMS text editor, you need to contact your technical support person for assistance.

Headings

Every CMS text editor should have the ability to assign a heading style to text. Many will include styles labeled as “Heading 1” and “Heading 2”, others will simply call them “Heading” and “Sub-Heading”, or “Main” and “Sub”.

If your CMS text editor does not include this capability, you need to ask your system administrator how you are supposed to be able to create accessible content with the tools they are providing you. This is a serious question you need an answer to, and asking it might raise awareness and affect positive change.

While you wait for an answer from Tech Support…

Meanwhile, try creating your content in MS Word or another modern editing program with support for heading styles.

Once you finish creating your content, try to copy and paste it into your CMS text editor.

With the content pasted into the CMS text editor, save and view the page.

You can inspect the code for a heading style ( <H1>, <H2>, <H3>, etc. ) or use another tool such as the Wave Accessibility Checker to test whether or not the heading style was included in the copy and paste.

Heading styles are usually retained when you copy and paste from a serious word processor into your CMS text editor.

Lists

Your CMS text editor most likely has the ability to style content as numbered or bulleted lists. Look for something on the toolbar that looks like a stack of three lines with bullets or numbers on the left-hand side.

bulleted and numbered list tools from MS Word.
Bulleted and Numbered list tools from MS Word.

Image Descriptions

In many modern CMS text editors, you will be prompted to include an alternative text description of an image when you insert it into your document.

Here are some tips for providing good descriptions:

  • Be brief but descriptive of the core meaning of the picture relevant to the content it is appearing in.
  • If your CMS text editor doesn’t provide a way to give your images an alternate text description, then you should provide a textual description in your main text, and identify the image with an image caption.

If you are uncertain about whether or not your image has an alternate text description:
Try selecting your image and clicking on the Insert/Edit image toolbar button to bring up a dialog with image properties. If you’re lucky there will be a place to provide a text description.

Table Header Rows

Support for table header rows is pretty common, but it is not always easy to find the place to activate this formatting. Sometimes the toolbar will have a Table Properties button, or sometimes you will need to look in the individual cell formatting options, but somewhere in your CMS text editor should be the ability to define table header rows.

Link Anchors

Finally, when you use links in your content, make sure that the anchor (the clickable blue underlined text), is descriptive of the content that is being linked to.

Don’t use the phrase “click here”, or “more” or any other generic term used repetitively as a shortcut for inferring what will be coming if you click the link.

For Those Who Dare…

Man stands in a forest on a path that forks in two directions to go around a grove of trees.
Photo by Caleb Jones on Unsplash

Finally, and absolutely no pressure here – but if you find yourself wondering about the HTML code editing capabilities of your CMS editor, you can look for the toggle and see what sorts of options and power are unlocked…

Or you can be sure to avoid clicking anywhere near that toggle and get on with your life.

Nobody has to know either way, and no judgment.

I’m just glad you showed up and read this far. Thank you!

Accessible Content Containers

stacks of books piled from floor to ceiling
Photo by Glen Noble on Unsplash

Technology Focus: Content vs Container

When you share online content, your content will be presented through a browser to the end user. The browser can be seen as a container for your content.

There is a different set of keyboard controls and accessibility concerns for the browser, independent from your content, and sometimes the browser and content don’t work well together. Sometimes the browser can cause issues that make your content inaccessible.

You can find another layer of technology between your content and the browser, in the form of your Course Management System (CMS). The menus and structure for the CMS sit within the browser, and together the browser and CMS serve as the container for your content.

When dealing with digital information, you will frequently find your content being contained by another over-arching layer of technology. The issue for accessibility is whether or not these containers intercept or interfere the accessibility of your content.

You can format your content for accessibility, but you can’t reprogram everyone’s browser to make it work better or more accessibly. The best you can do is maximize the accessibility formatting of your content, and maximize the accessibility capability of your container.

Be aware of any issues that arise when your content is viewed through a particular browser – and if that happens, then recommend your students use a different browser.

Sometimes there will be a specific recommended browser and assistive technology combination for a content source to be accessible. This grows increasingly common with specialized forms of digital content such as STEM materials.

It can be challenging to keep up with the pace of modern technology, and sometimes even more difficult waiting for technology to improve. In the meantime, we must try to overcome limitations with our digital containers through clever content design.

CHALLENGE: Check your email using only the keyboard.

Orange @ symbol
Photo by Onlineprinters on Unsplash

A common example that illustrates the content vs container dynamic is email. The email message is the content, and the program you use to read your email is the container. The same content can be presented through a lot of different containers – and it usually works just fine.

If you use webmail, then you have an email program in a browser – or a container in a container.

Each container has its own keyboard commands and accessibility capability.

Try It!

You will have to look for your focus indicator to know what the keyboard is interacting with. The focus indicator should be a solid white outline in Windows. The focus indicator varies in Mac OS, but it is usually an obvious highlight or solid blue.

I have used the Chrome browser for this activity, but feel free to substitute your browser of choice.

Remember that adding SHIFT to TAB will make the sequential navigation go back the other direction.

Checking Gmail

You will need to first enable Keyboard shortcuts from the Gmail Settings menu if you want to use keyboard commands in Gmail.

Here are the complete instructions and keyboard commands for Gmail.

From Windows 10: Start the Chrome Browser

To start the Chrome browser from Windows 10 via keyboard commands:

  1. CTRL + ESCAPE to open the START menu within Windows.
  2. Press TAB twice to get the system focus to the Applications list.
  3. Press G for Google, and then use the DOWN ARROW key to move through the applications that begin with a G until you get to Google Chrome.
  4. When you get to Google Chrome, press ENTER.

From Mac OS: Start the Chrome Browser

To start the Chrome browser from Mac OS via keyboard commands:

  1. OPTION + COMMAND + SPACE to open the Finder window in “Searching This Mac” mode.
  2. Press COMMAND + SHIFT + A to open the Applications directory.
  3. Press G to go to the programs that start with a “G” and use the down arrow to find and select the Google Chrome application.
  4. Press ENTER.

Within Chrome

We begin our user experience within Chrome with the cursor in the address bar. This means we can begin typing right away – type “gmail.com” and hit ENTER.

Within Gmail

Once Gmail has loaded in your browser, you can use the following commands to navigate around the Gmail interface:

  • G + I takes you to the inbox.
  • Use the UP and DOWN ARROW keys to navigate through the inbox.
  • Press ENTER to open a message.

Within a Message

  • Press R to Reply to the message.
  • Press A to Reply All to the message.
  • Press F to forward the message.
  • Press G + I to return to the inbox.

Resources for Independent Remote Learning

Woman works on a laptop with an Android sticker.
Photo by Christina @ wocintechchat.com on Unsplash

In a perfect world, both our students with disabilities and our faculty would be properly supported with the resources they need to excel and thrive.

While our world might still be a work in progress, we are fortunate to be able to support each other as much as possible during these “interesting” times.

For those of you who may be teaching students with disabilities at a distance, I know there is never enough support, and now even less with students away from campus-based support services. I’m writing this post to cover some resources for accessibility that everyone should know about, but many don’t.

Computer OS Assistive Technology Capabilities

There are many different types of disabilities, and we have many corresponding forms of computerized assistive technology to help address the needs of individuals with these different disabilities. As modern computer operating systems have continued to evolve, they also have become more accessible through built-in assistive technology.

Most modern computer operating systems incorporate some level of assistive technology. Both Windows and Mac OS feature a set of assistive technology tools for magnification, screen reading, and speech recognition.

While the built-in assistive technology is rarely equal to dedicated assistive technology applications, it can be useful and sometimes provide adequate access in a pinch.

Here is a very brief look at some of the available assistive technology that your students might benefit from knowing about.

Windows Built-in AT

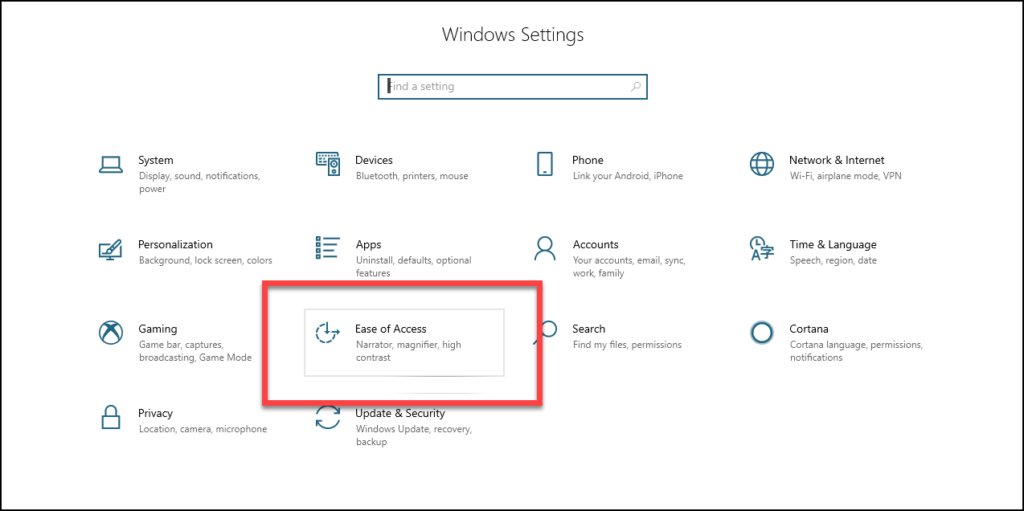
Windows 10 Settings with Ease of Access option highlighted.
Windows 10 Settings and Ease of Access.

Windows 10 provides a variety of options for customizing your computing experience. Visit the “Ease of Access” center from the System Settings to get started.

Assistance for Low Vision and Blindness

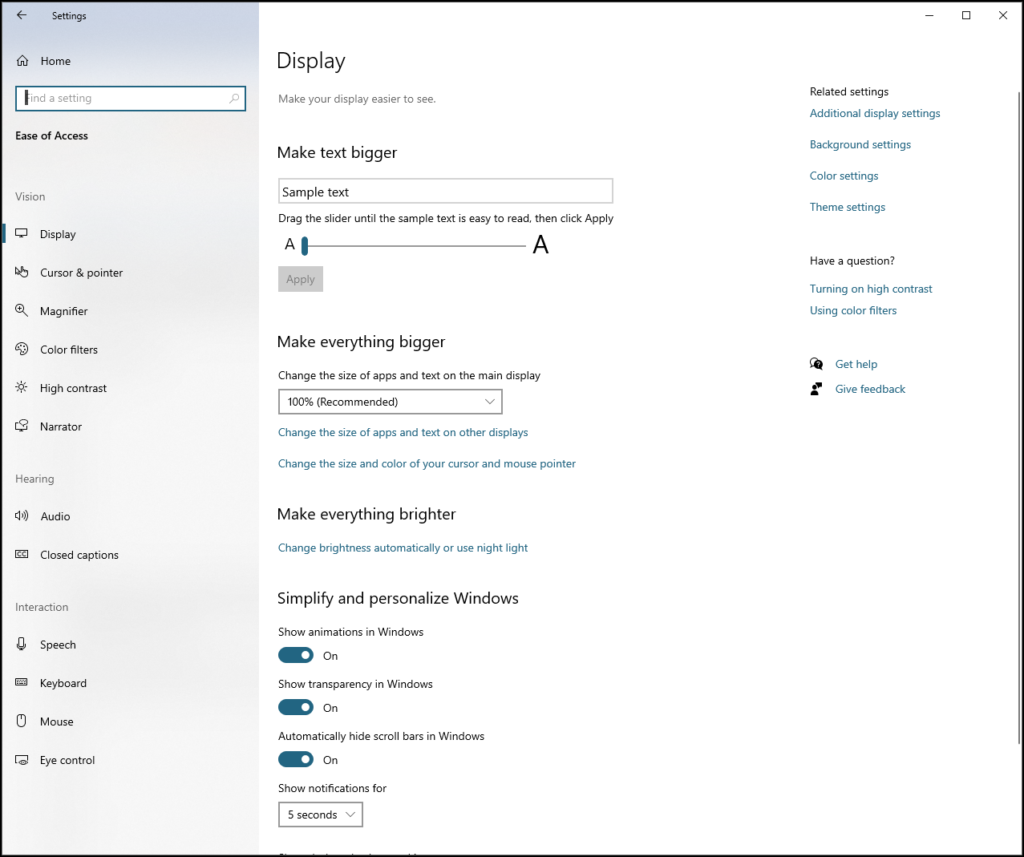
Windows features a variety of color and cursor configurations as well as other system schemes to make things easier to see.

Windows 10 Display options from Ease of Access settings.

There are two applications in the Windows 10 Ease of Use section dedicated to assisting individuals with low vision or blindness, Narrator and Magnifier.

Windows 10 Accessibility Keyboard Commands can be helpful when trying to use these different forms of AT as well as other aspects of your computer experience.

Narrator

Microsoft Narrator is a screen reading application that allows you to navigate around the Windows environment and read properly formatted documents.

The default keyboard command to start Narrator is WINDOWS KEY + CTRL + ENTER.

To configure the settings for Narrator, press WINDOWS KEY + CTRL + N.

Magnifier

Windows 10 Magnifier settings
Windows 10 Magnifier settings.

Magnifier is an application that can be turned on when you need to take a closer look at something on the screen.

Microsoft published a guide for using magnifier, including tips for customizing the way Magnifier behaves to suit your needs.

Once you have configured your preferences, it is very easy to use Magnifier whenever you need it and then turn it off again.

You can turn Magnifier on by pressing the WINDOWS KEY + PLUS.

Turn Magnifier off by pressing WINDOWS KEY + ESCAPE.

Speech Recognition

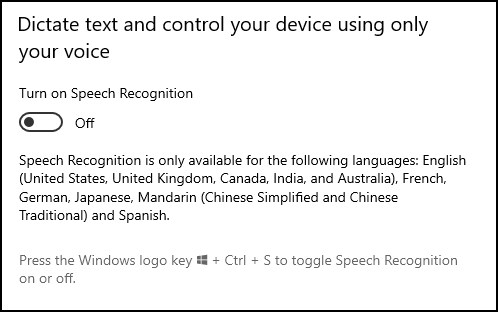
Windows 10 Speech Recognition settings.

Windows 10 allows you to use your voice to dictate rather than type, and to control your computer.

From the Ease of Use center, click on “Speech” from the Interaction category to learn more.

For best results you will need to spend a little time training Windows to recognize your voice before you can make serious use of speech recognition.

You can turn speech recognition for dictation on by pressing the WINDOWS KEY + H.

To toggle speech recognition on or off to control your device, press WINDOWS KEY + S.

Microsoft also provides a list of speech recognition commands you can use.

Mac OS Built-in AT

The Mac OS also has assistive technology available for users with disabilities.

You can find the Mac OS built-in assistive technology by selecting “Accessibility” from the System Preferences.

  • VoiceOver is the screen reader for Mac OS, and unlike Windows, there is no commercial alternative available. When you select VoiceOver in the Accessibility Preferences, you can access training and the VoiceOver Utility, which allows you to configure the behavior of VoiceOver.
  • Zoom is the screen magnification for Mac OS. Extremely convenient and easy to use, you can configure Zoom to work with keyboard commands or a combination of keyboard and trackpad gestures.
  • Dictation is a Mac OS feature many people are already familiar with. It is often apparent in the Mac OS menus for other programs as a system resource. Dictation for Mac OS allows you to both dictate and control the computer.

Free or Inexpensive Document Readers

There are a variety of free to low-cost applications available for reading digital text aloud with Text To Speech voices. They might not have all the bells and whistles of programs your school might maintain in the computer lab, but they can help fill the gap.

  • ReadPlease for Windows has been around since 2003. It is a no-frills reading window that allows you to hear what is written on the screen.
  • NaturalReader Software is downloadable Text To Speech desktop software that allows you to listen to Microsoft Word files, webpages, PDF documents, and emails.
  • Balabolka is a free Text To Speech program designed to have increased clarity, articulation, and overall quality of speech. Balabolka can support many file formats, including MP3, WAV, OGG, and MP4, as well as ODT, DOC, EPUB, RTF, PDF, and HTML files.

Additional Online Education Resources for Faculty

There are many efforts currently underway to provide assistance for educating students with disabilities. Here are a just a few I’m aware of.

  • Bookshare is an organization that provides ebooks for people with reading barriers. Bookshare has developed some amazing and innovative technology and is one of the biggest sources for a variety of ebooks.
  • WGBH Distance Learning Center provides a variety of educational resources.
  • The TechMatrix is a repository of datasheets on hundreds of educational assistive technology products. If you have questions about a product, this is a good place to start looking for answers.
  • The Learning Policy Institute has compiled a list of resources specifically for the COVID-19 crisis.
  • The National Disability Rights Network also has a collection of COVID-19 related resources and information for educators and parents of students with disabilities.

Hopefully the above information can provide some good starting points for helping your students with disabilities get access to the support and resources they need.

Thanks for reading!

How to Test Online Content for Accessibility

individual interacting with mobile device, surrounded by trails of blue light symbolizing digital information.
Photo by mahdis mousavi on Unsplash

Testing for accessibility can happen in many different ways, from quick and simple to in-depth and technically detailed. In the most general terms, I break accessibility testing into three categories: Automated, Manual, and Usability.

Automated vs. Manual Testing

As the name implies, automated testing is the least labor-intensive form of accessibility testing. Automated testing also typically discovers less than 40% of the issues that affect accessibility. A human brain is required to make several of the determinations that are required for an accessibility assessment.

Because of this limitation, most people who do accessibility testing will employ a combination of automated and manual testing.

Automated testing is a wonderful way to check for all of the programmatic issues that affect accessibility, and a great way to index all of the issues that need to be conformed with in order to satisfy a technical standard such as Section 508 or WCAG.

However, Manual testing is a required element for any thorough accessibility assessment.

Standards vs. Usability

Testing for conformance with accessibility standards is an easy task for automated tools. Testing for Usability is a more varied activity, often times it is best performed by an individual with a disability who regularly uses assistive technology.

For true accessibility you need to satisfy both the standards and the usability requirements that enable the content to be interacted with the same ease of use enjoyed by individuals without disabilities.

Quick and Cursory vs. In-depth and Detailed

For many situations, it is possible to do a quick and cursory test with your keyboard and reveal critical failures that prevent any need for more elaborate testing.

If an app or webpage is not keyboard accessible, it has already failed to conform with the standards and is demonstrably not usable.

AT and Usability Testing

When a student with a disability uses Assistive Technology, they are interacting with your content in different ways than you might expect. Sometimes content is structured in a way that will force students to work harder to engage with the content.

Different types of AT focus on a specific aspect of human communication, and it is not always obvious to people how approaching content from a different sensory perspective and with assistive technology can affect the meaning and understandability of the content.

For the best usability testing, it is recommended to find an individual with a disability who has a high degree of familiarity and comfort with assistive technology. An ideal candidate is someone who uses AT every day as a regular part of their life.

Browser Tools

Most modern browsers will allow you to inspect the code of the web pages you visit. If you are not put off by reading HTML code, the truth is out there and easy to uncover. Just right-click the content and select “Inspect” within the Chrome browser, or select “Inspect Element” within the Firefox browser.

However, for a lot of people, the idea of learning any amount of HTML and trying to read code is a complete deal breaker. That’s OK, you don’t need to get down and nerdy, there are a variety of tools that have been developed for Chrome and Firefox that make it a lot easier to inspect web pages for accessibility.

Here are a few popular options:

  • WAVE Extension: by WebAIM at Utah State University is a free tool for Chrome and Firefox that allows you to perform secure accessibility checks on content within your browser. WAVE applies a graphic overlay with different icons to identify the different types of issues with the content.
  • Color Contrast Analyzer: by North Carolina State University is an extension for Chrome that allows you to check the color contrast ratios of your content and make sure you are satisfying the WCAG 2.1 requirements for contrast.
  • Axe – Web Accessibility Testing from Deque: a free extension for Chrome and Firefox that is helpful in finding issues with content not conforming to the WCAG criteria.

There are many more extensions available in the Chrome Web Store and the Firefox Browser Add-Ons collection.

Try it Out! Keyboard Accessibility

Keyboard with blue and red lighting.
Photo by Jon Spectacle on Unsplash

There is one quick and easy way to do a very basic check of the accessibility of a web page – use the keyboard.

Most of us are so accustomed to using a mouse or trackpad that you might not be aware of how many keyboard commands are available for interacting with your computer. Following are just a handful of common keyboard commands you can start using to test accessibility.

Quick and Cursory

With the keyboard, you can quickly see if there is a basic ability to access interactive elements on a webpage. This is one of the most common accessibility requirements for digital content, and can be a red flag for additional more serious accessibility concerns.

Note: this technique only works if the webpage has interactive content.

Tab it Forward

Before you try this, click inside your internet browser to ensure the computer is focused on the browser.

  • Use the TAB key to move your computer focus from each interactive element on the web page to the next.
  • Try pressing TAB right now and see if you can identify the focus indicator. It is typically a dashed line, though the styling can be overwritten by the website you are visiting.
  • Once you have found the focus indicator, you can track the focus as you press TAB and move through the different interactive elements on the page.

Shift it Backwards

The SHIFT key can be used together with the TAB key to move backwards through the interactive elements on the page.

Interacting with Forms and Menus

If you get to an interactive element that allows you to choose an option, there are standard behaviors that respond to keyboard commands for interacting with the data.

If the content is accessible, you can use the following keys to interact with the options:

  • ARROW keys move between options.
  • SPACE: selects an option.
  • ENTER submits the option.

Considerations for Keyboard Testing

  • When you evaluate web content with the keyboard, consider the overall number of interactive elements.
  • Notice the sequence of interactive elements. Consider whether there are elements that seem like they should be presented sooner than they currently appear in the sequence.
  • Notice whether there is a “Skip to Content” link at the beginning of the page. This will typically take you past the menus for the website – which can take a lot of tabbing to get through.

Keyboard testing is not a conclusive or thorough way of testing accessibility. Also, it is not enough for web content to be keyboard accessible.

Keyboad accessibility is a good start, but there are many other additional considerations for ensuring access of digital content.

With the above information you can start practicing accessibility testing on the content you create and select for your online course.

Thanks for reading!

Customize your Workflow for Easy Access

Man writing on a whiteboard with the words Workflow Strategy at the top of an emerging workflow.
Photo by Campaign Creators on Unsplash

With the basic understanding of digital media access strategies and a handful of formatting tips to support accessibility, we are ready to incorporate this knowledge into your daily practice.

Simple Beginnings

Starting today, you can draw the proverbial line in the sand. Declare to yourself that you will, from now on, use the following formatting practices for accessibility when you create or edit your instructional content.

  • Use your Heading Styles.
  • Describe non-textual content.
  • Use friendly links.

Three things. Three super simple, easy things you can do to make a huge difference in the lives of students who are already struggling with way too much.

Thank you in advance for making your instructional content more accessible and effective.

Over time, all the materials you use will become more accessible as you edit and refresh your content each semester.

A simple practice for sustainable access.

Patterns of Access

Consider your weekly flow of information.

  • How many times do you send your students some form of communication?
  • How many files are they downloading from your course each week?
  • Do you send weekly welcome/organizational messages?
  • How many files are each student sending you per week?

Identifying patterns in these communications and exchanges can reveal opportunities to automate accessibility through the use of templates and other technology.

You can learn about areas where you might want to invest some time on professional development as well – for instance, if you realize you are sending a lot of PowerPoint files to your students, it might be a good idea to increase your accessibility skills in that area.

It is also good to find out if you can leverage an accessible template with your frequently used programs. With a template that begins as an accessible document, you can just continue doing what you do, but with the peace of mind that comes from having some level of “baked-in” accessibility.

Media Inventory

Towering structure of shelves containing books and media reaching over two stories high.
Photo by Ming Han Low on Unsplash

One of the core aspects of maintaining accessibility is having an organizational plan. If you find that you have a lot of different media being used in your course, it can be helpful to create a media inventory.

A media inventory can serve a variety of purposes in managing the accessibility of an online course, but chief among them is the ability to enlist help in addressing accessibility issues if you find an emergency need to provide accommodations.

Of course, the need to provide emergency accommodations largely be alleviated through the use of a media inventory to manage the accessibility of your content.

Track the Files

The simple idea is to get a basic listing of what kinds of media files your students are supposed to use each week. It is always good to identify what type of digital document files you are working with.

First, identify what type of document each file is, for example, Microsoft Word, PowerPoint, PDF, HTML, etc.

Next make note of the types of digital content inside each document – text, images, tables, interactive content like links or form fields.

Make note of content that resides on third-party websites, including YouTube and Textbook “companion” content packs from textbook publishers.

Track the Access

As you work through the content each week, ensure that the appropriate access strategy is in place for each type of content. Text should have headings, images should have text descriptions, tables should have header rows defined, links should be useful and descriptive, etc.

Here is a sample table to illustrate the concept, but feel free to use whatever system works best for you to track and monitor progress.

Media Inventory

Media File (Name and type)Date of UseTextHeadingsImage DescriptionsTable HeadersInteractive ContentNotes
Syllabus.docx9/1/20YesYesYesYesYes 
Week1intro.ppt9/1/20YesNoNoNoNA 
Chapter1.pdf9/2/20YesYesNoNoYes 
“History of the thing” (Youtube) https://youtu.be/HCU5jZeZKn89/4/20NANANANANoNeeds captions
Chapter 1 Practice Quiz9/5/20YesYesYesNAYes 
Above: An example of a simple media inventory.

You can begin tracking what you do in terms of creating and distributing information to your students each week.

Your inventory can also be used as a job aid to help keep track of the documents you have made more accessible, and those that still need attention.

If you are fortunate enough to get assistance with your course materials, your media inventory can make it easier to delegate and track the progress of your team.

Looking Forward

As you consider the digital content you are using in your course, hopefully you are identifying some trends and patterns in how you engage with your students.

It is good to identify the types of programs you use to create and update your instructional materials. Find out if you have the most current version of the software, and if not, try to update.

Great strides have been made in recent years towards making accessibility easier to create. Having the latest versions of the software can make life a lot easier when dealing with accessibility.

In the coming posts we will be covering some different programs commonly used by faculty to create instructional materials. Whenever possible, I will be sure to point out significant differences between versions of software, and any relevant work-arounds for people using older versions.

Meanwhile, consider how you can begin implementing the simple workflow tips for enhancing the accessibility of your content, and let me know if you find any questions as you go.

Thanks for reading!
Formatting Affects Usability of Digital Information

When you author digital content, there are some simple things you can do that have a significant impact on the user experience for your students who are using assistive technology.

When you take the time to format your content for accessibility, you enable different assistive technologies to better navigate and make use of your content. More often than not, you also tend to make your content easier to read for your students without disabilities too.

Start with Headings

Styles pane from MS Word

You may have heard that headings are important for accessibility. This is a point I completely agree with.

In fact, I’d go so far as to say Heading styles are one of the most important elements you can incorporate into your workflow.

Besides looking differently from the body text, the Heading style is a semantic element used in the digital definition of your document.

This means that Heading styles are a way of identifying the text at a programming level.

With this capability to be defined in the digital code of your document, your Headings can be referenced and used by other technologies such as search engines, auto-formatting tools, and assistive technologies used by students with disabilities.

But exactly why are Headings useful for accessibility?

Headings Help You Move Through Text

Headings from this blog being presented by the NVDA screenreader.

In the user experience of a student using assistive technology, the Heading styles serve as landmarks in digital content.

Different assistive technologies present the user with a list of headings that serves as a table of contents. The user selects the heading they want to go to, and the assistive technology focuses that part of the document for the student to read.

Headings allow for students to more easily move through the material, rather than always starting at the beginning and reading through the text linearly.

Headings Provide Context and Structure

When you look at a written page you are taking in the headings and layout to form an impression of what the document is communicating, all within your first glance.

A student without sight can make use of a list of all the headings in a document to get a similar basic overview.

Headings Are Good Instructional Design

Whether or not you have a disability, Headings are useful in providing structure, reinforcing key points, and indicating what is to come. The use of Headings serves an instructional purpose for all of your students who are seeking to understand what you are sharing.

How to Use Heading Stlyes

The basic principle of Heading styles is always start with Heading 1 as your first heading.

Sub-headings follow in a numerical fashion, so Heading 2 follows Heading 1, Heading 3 follows Heading 2, and you never skip a level of Headings.

However, the most important rule of Headings is to simply have them!

Text Formatting

Beyond the use of Heading styles, you can add more clarity to your digital text when you utilize the defined styles from your text editor.

Ordered and Unordered Lists

The use of Numbered (also called Ordered) lists and Bulleted (also called Unordered) lists is another example of digital formatting identifying text as unique at a programmatic level.

Much like headings, defined lists can be used by some assistive technologies as reference points, making them easier to identify and use.

Use Numbered (Ordered) lists to provide a sequence of steps or instructions that need to be followed in a specific order.

Use Bulleted (Unordered) lists to simply indicate a grouping of items with no specific hierarchy.

Describe Non-Textual Content

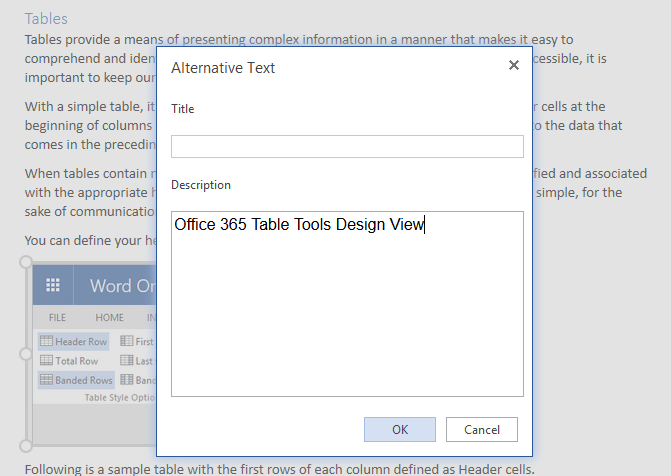
The Alternative Text Editing Window from MS Word

When you use images, charts, graphs, or other non-textual content, always provide a textual description of the main point that content is conveying.

Friendly and Meaningful Hyperlinks

When you include links in your materials, try to make them descriptive of the content they lead to. Avoid repetitive or meaningless text like “click here” or “more info”.

Link Properties dialog from MS Word

Links can be used in the same way as Headings by assistive technology, extracted from the main text and presented as a list of navigation points for the document.

When you have multiple links using the same text for the anchor, it makes the links confusing and useless when they are presented out of context by assistive technology.

Also, it is recommended you don’t present the raw URL of links as the anchor unless it is possible the content might be printed out and distributed in paper format.

Define Header Rows for Tables

When you use digital tables in your content, it is important to label the Header Row (and column, if appropriate).

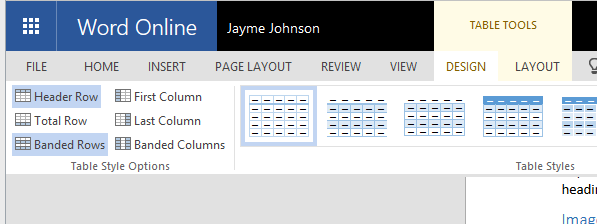
Table Tools for defining Header Rows in MS Word
The Table Tools in MS Word allow you to define a Header Row for your table.

Table Summaries should be provided for complex tables where an individual who is blind would need some sort of overview in order to understand the table layout and function.

A Good Start

These formatting tasks will not solve all of the accessibility problems your students might face, but when you perform them on your content, you will significantly improve the accessibility and usability of the content.

You can start incorporating these formatting tips into your workflow today, and have greater power in reaching ALL of your students.

Thanks for reading!
How it All Works – Digital Media Access Strategies

Backlit scene of a desk, with a letter A and a potted plant, alongside a rock, a child's wooden block, a cellphone, and a computer monitor and keyboard.
Photo by taner ardalı on Unsplash

In the world of online education, there is a wide-ranging spectrum of digital media being used to engage with students. Surprisingly, there is a simple and singular solution for multimedia accessibility.

The domains of knowledge that we can teach our students are comprised of facts, concepts, principles, procedures, and attitude/affectation. None of these types of information rely upon a specific type of media to be communicated effectively.

A primary concept of accessibility is that any message you are trying to communicate via digital media can either be enhanced or effectively communicated through alternate media formats. For example, if the medium was utilizing visual information, there can be a digital transformation to render the message into an audio or tactile media format for someone with no sight.

Ultimately, digital media is currently able to reliably communicate through visual, auditory, and tactile means. The senses of sight, hearing, speech, and touch determine our ability to perceive and transmit information through digital media.

When an individual has a different or limited ability of one of these senses, the delivery modality must either be enhanced, or communication must happen through one of the other sensory pathways.

The message doesn’t change, but the media form it is transmitted through does.

Different Media for Different Senses

A key aspect of digital accessibility is that the message is available and usable, even while the delivery medium is malleable.

Whatever type of media you originally create, your students can be interacting with an entirely different form of digital media while still getting the point of your communication.

Providing the message through a different media format than originally intended is referred to as using Alternate Media.

Alternate Media strategies rely on translating a message into different media formats based on the needs of the end user. Whatever senses your students may use, their technology will be able to use the digital media you create, as long as you have prepared the information appropriately.

This process relies on all digital content being represented as text at some point in the process. Digital text is the only form of electronic information that can be automatically rendered into visual, auditory, and tactile information – the sensory capabilities of our audience.

It may seem redundant to provide textual descriptions for multimedia, but this allows for the most effective materials to be used for all students.

Alternate Media Access Strategies for Digital Communication

Here are the essential access strategies for accessible digital media:

  • Text – Provide large, easy to read text, and apply structure through formatting, semantic styles, clear layout, etc.
  • Audio – Provide a Text Transcript.
  • Video – Ensure Captioning is in place.
  • Interactive – Section 508 standards and Web Content Accessibility Guidelines (WCAG)*
  • Complex/Combination – Use all of the above.

* Section 508 and WCAG are technology standards and guidelines for digital content on the World Wide Web that address the comprehensive considerations for complex and interactive media.

While digital accessibility requires textual descriptions to accompany multimedia, this doesn’t mean that accessibility is only text-based. There’s much more going on – and the goal is not to only use digital text.

Use all the media that is appropriate to engage and inform your students. Just make sure you don’t use one form of media exclusively.  

When you use an image, back it up with a text description.

If you use an audio file to share a moment of history, make sure there is also a text transcript available.

Videos can provide powerful instructional capability – just make sure they are also captioned and have narrative descriptions.

In essence, please use multiple media in your online teaching, and make your materials as interesting and engaging as you can. Just ensure that for each of your instructional materials, the core message is also represented as digital text.

The idea is to enhance and maximize the essential capabilities of every medium, so it can communicate optimally, and back it up with text as a failsafe.

Access Strategies for Interactivity

Child looking at photographer while holding the hand of a white robot wearing pink flower garlands.
Photo by Andy Kelly on Unsplash

When you design interactive online instructional materials, things get interesting quickly.

Whatever the specific interactive media might be, the access strategy is to ensure that every interactive control is labeled (yes, through digital text), and that the interaction is possible with the keyboard in addition to any other input devices such as a mouse, touchscreen, track-ball, custom switch, eye-tracker, etc.

Thankfully the Section 508 standards and the Web Content Accessibility Guidelines (WCAG) from the World Wide Web Consortium have done a great job of covering the different aspects of accessible interactive content.

Standards and Guidelines for Accessibility

Section 508 and WCAG represent the collective wisdom and effort of several decades of research and work to identify the best practices for creating electronic and web-based information that is accessible for individuals with disabilities.

Typically, the documents that comprise Section 508 and WCAG are not considered fun reading. Fortunately, the concepts and principles have been distilled and engineered into our technology to the point where you may never need to actually read the documents.

With most modern authoring tools, you can ensure the access strategies are fully implemented in your content just by using the tools properly.

This is because the manufacturers of assistive technology, and the manufacturers of your authoring tools, are also working according to the same standards.

This means that you can focus on creating the materials you need to teach with, and the technology used by the students will meet you halfway and deliver the media to the student as the student needs it.

You don’t have to know anything about the student and what technology they are using to interact with your content. When you create accessible media according to the standards and guidelines, you can create the way you want to, and all of your students are free to use whatever technology works best for their needs.

Equity and Perceptions of Disability

One of the liberating ideas of online education for students with disabilities is the idea of just being another student and not being defined by their disability.

It can be very discouraging and demoralizing to always be identified as “the blind guy”. People tend to discriminate and interact differently with people who are visibly or significantly disabled in some way, often unknowingly, and for a variety of reasons they might not even understand.

When you design your course materials to be accessible, you can help remove unintended and unwitting bias against students with disabilities.

When you do it right, you may never know if you have students with disabilities in your course at all – and that is exactly the point.

A wall of books is behind a woman sitting in front of a laptop with her arms raised as if in celebration.
Photo by Annie Spratt on Unsplash

Your students with disabilities may finally have the chance to interact with you and other students on equal terms, and to only be judged by their character, personality, and academic ability.

This can result in an educational experience that is more effective and rewarding for all involved, and with far-reaching benefits.

Thanks for reading!