Accessible Document Conversions – SensusAccess

First, a disclaimer: upon reading/editing this piece, I was a little bothered by how much it seemed like an advertisement for SensusAccess. I am not being paid or compensated in any way for the following post, I just honestly like what the technology does. It is also important to recognize that SensusAccess is not a miracle working technology, and it does not automagically add accessibility to a digital document. You still have to do some work.

Mural on a wall reads in two languages: Many small people who in many small places do many small things that can alter the face of the world.
Photo by Mark König on Unsplash

One of the best parts about formatting your digital content for accessibility is the ability to convert the content into alternate formats with the click of a button.

The work you invest in making a document accessible can yield ongoing benefits that are not always obvious at the onset.

In this way, little acts of deliberate behavior change can build the daily habits that sustain a long-term accessibility and usability benefit.

One of my favorite examples of this capability in action is in the technology and service provided by SensusAccess (https://sensusaccess.com/).

SensusAccess

SensusAccess is an automated technology for converting digital information into alternate formats. Educators and students can try SensusAccess for free at https://sensusaccess.com/.

With SensusAccess, you can take a wide variety of documents and convert them into tagged PDF’s, Ebooks, Audio files, and more.

Sensus is a company in Denmark, and they are continuing the work and growth of inclusive technology for the benefit of all humans.

The engine of SensusAccess is RoboBraille, an automated Braille and digital format conversion technology that has been in operation since 2004. RoboBraille is available for strictly individual, non-commercial use, and supports an amazing number of different languages.

Logo: RoboBraille.org in print and Braille, individual characters colored red, blue, green, and yellow.
RoboBraille.org provides free Braille conversion for education.

Today the technology has grown to support a wide range of digital information formats, and the fine folks at Sensus work with educational institutions around the world to improve accessibility of (and to) education.

You should check with your campus technology department to see if your school already has an arrangement with Sensus. Enhanced capabilities and options can be configured to meet your institution’s technology and service needs, including a variety of integrations that make accessibility happen by enhancing your workflow for greater automation.

Sensus is also continually working to increase the human languages they support, increasing the range of human to computer interaction capability of modern technology.

Perhaps best of all, even if your school is not currently working with Sensus, you can still use the basic technology for free.

Formatting for Accessibility in Action

With SensusAccess, you can see the power of accessibility formatting in the action of creating better quality alternate formats.

With amazing ease, you can yield the benefits of your accessibility formatting by generating a range of documents with enhanced accessibility support.

looking over the shoulder of someone reading on a Kindle device.
Photo by Maarten van den Heuvel on Unsplash

Even if you have the opposite of a formatted document, there is some help available.

A raw, unformatted document can be processed to glean whatever information might be available, and to create a minimalist structure for alternate formats.

Of course, you can see an obvious difference when you have edited/created the document with heading styles, described your images, formatted your tables with header cells, and identified your lists with proper list styles. The resulting documents from SensusAccess provide much better accessibility and usability than the raw unformatted document.

How to Use SensusAccess

There are several ways SensusAccess can be useful to an educational institution.

  • For faculty: creating more accessible and more effective instructional materials.
  • For students – create on-the-fly conversions of inaccessible materials into more usable materials for academic use.
  • For Disability Support staff – SensusAccess can be useful in a variety of contexts, depending on your digital toolkit and specific student needs you are responding to.

An obvious relevant context of 2020 is helping to avoid the limitations of campus-based licensing for your alternate media production system.

SensusAccess can be used to provide Optical Character Recognition (OCR) of documents. OCR is a critical step in getting from a raw scan to a usable digital document.

SensusAccess can help fill workflow gaps with basic capabilities that allow you to get a document conversion process completed, so the students with disabilities are not left without access to instructional materials.

Simple File Conversion

All it takes are four simple steps to convert your document to a wide range of alternate formats.

Here is how to convert your document:

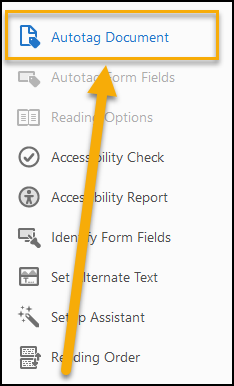
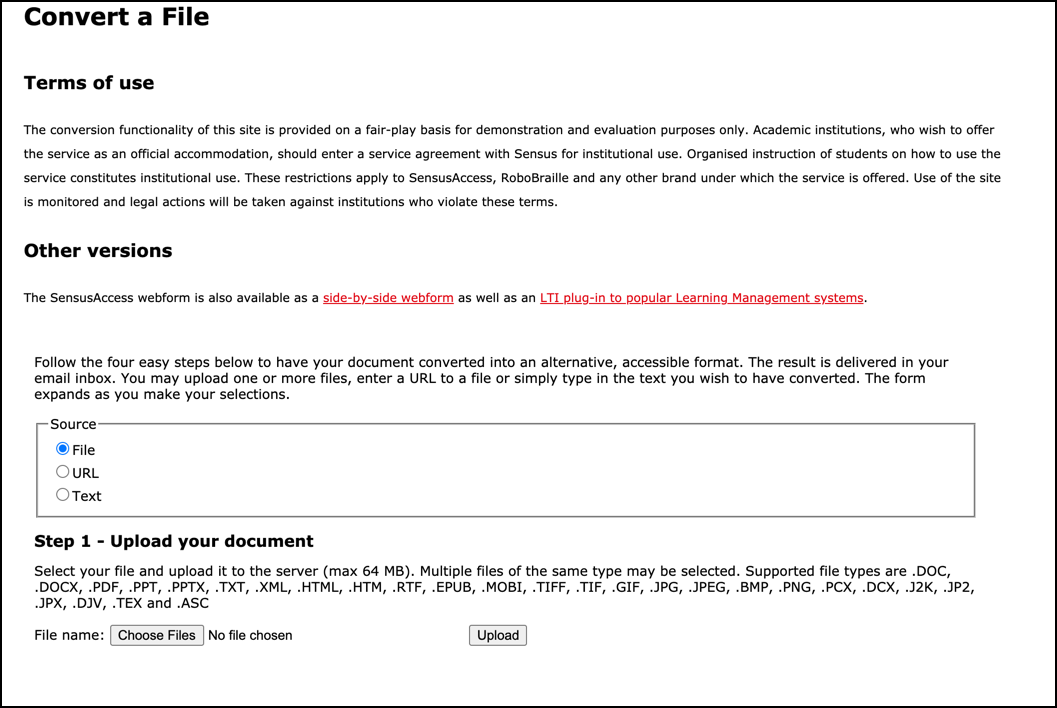
  1. Go to the SensusAccess Document Converting URL (https://www.sensusaccess.com/convert-a-file).
  2. Select the option for your source document. You can either upload a file, enter an URL, or directly type in text.
  3. Depending on the type of file you upload, you will be presented with a different workflow.
  4. Follow the prompts until the process is complete.

You will receive an email with a result notification and a link to download the converted file. Some files are sent to your email inbox as well.

Four Simple Steps

Step 1:

Screen capture of SensusAccess input form with Step 1, "Upload your document" of the conversion process.
Choose between uploading a file, entering an URL, or typing in text.

Step2:

Screen capture of SensusAccess input form with Step 2 "Select output format" of the conversion process.
Uploading an MS Word file provides the most options for output formats.

Step 3:

Screen capture of SensusAccess input form with Step 3 "Specify e-book options" of the conversion process.
Specify the details for your target format, in this case an e-book.

Step 4:

Screen capture of SensusAccess input form with Step 4 "Enter email address and submit request" of the conversion process.
You will get an email with a link to the finished file. For some formats, you will also receive the finished file as an attachment.

Some documents provide more options than others in terms of the variety of alternate formats they can generate. MS Word provides the most options for conversions, but ironically, it is not always the most accessible format for an individual’s specific needs.

MS Word has the most capability for defining digital information in a way that can be packaged and interpreted across different digital formats. But it might not be the best file format for a specific user’s technology needs.

This is when SensusAccess provides a great example of different digital containers and their capabilities to communicate a message across different digital technologies.

Now you can easily deliver your accessible documents to your student, and they can get it in the format that works best for their needs.

Thanks for reading!

MS Word to PDF via Acrobat Toolbar for MS Word

MS Word is a great authoring program, but sometimes you want the flexibility or security of a PDF document.

Here’s how you can author in MS Word and ensure that your accessibility formatting isn’t lost when you convert your MS Word document into a PDF document.

Accessibility Strategies

There is no magic accessibility technology that can replace your genius with formatting for accessibility. Be sure you have applied the appropriate access strategies to your digital content within MS Word before you set out to convert your document to PDF.

Acrobat Toolbar

When you buy qualifying versions of Acrobat, you will get an extension for MS Word that adds an Acrobat toolbar to the MS Word menus.

Acrobat toolbar for MS Word.

From the Acrobat toolbar, select the “Preferences” button so we can configure the output settings to preserve the accessibility formatting you’ve applied to your document.

Acrobat toolbar with Preferences option highlighted.
Acrobat toolbar Preferences

Settings

The first tab within the Acrobat Preferences is the “Settings” tab.

Acrobat Preferences Settings
Check Enable Accessibility and Reflow, as well as Enable advanced tagging.

From the Settings tab, make sure you have checked the option for advanced tagging and reflow.

Security

The second tab within the Acrobat Preferences is the “Security” tab.

Acrobat Preferences Security tab
Security tab from Acrobat Preferences.

The security tab allows you to lock down the PDF document and allows you to require a password to open the PDF.

By default, access for assistive technologies like screen readers is turned on. If you enable password protection, be sure to leave the option checked.

Word

The third tab in the Acrobat Preferences is the “Word” tab.

Acrobat Preferences word tab.
Word tab from Acrobat Preferences.

The Word tab allows you to specify whether or not your comments, footnote, and endnote links will be converted into PDF bookmarks.

Bookmarks

The final tab in the Acrobat Preferences is the “Bookmarks” tab.

Acrobat Toolbar Preferences Bookmarks tab.
Check the option in the “Bookmark” column next to a style you want to add as a bookmark in your PDF.

With the Bookmarks tab you can configure which styles are converted to bookmarks in your PDF.

The Heading styles are automatically selected to be headings. You can add any other style to be converted to a bookmark by checking the option next to the style name under the Bookmark column.

Create PDF

With the Acrobat Preferences set as indicated above, your MS Word document will be converted to a PDF with all of the accessibility formatting in place.

Simply click the “Create PDF” button from the Acrobat toolbar and your settings will be used to create a PDF from your word document.

Acrobat Toolbar
Once you set your preferences, simply click “Create PDF” to convert your accessible Word Document to an accessible PDF.

You should always test the PDF with the Acrobat Accessibility Checker to make sure there were no glitches in the conversion from MS Word to PDF.

Now you can create accessible content in MS Word and confidently distribute it to your students as an accessible Word document or as an accessible PDF document.

Thanks for reading!

Cleaning Up Other People’s PDF Accessibility

Let’s face it – sooner or later you are going to find yourself wanting to use a PDF in your online course that someone else created. You might already have one that you are getting ready to send out to your students right now.

No judging, I’m just saying I understand how common other peoples’ PDF’s tend to be.

More often than not, these PDF’s can be found alone, without the source document they were created from.

Wherever you may be finding these PDF’s without source documents, they likely have one thing in common: accessibility problems. Happily, there is something you can do to enhance the accessibility within Acrobat Pro.

Remember the “Make Accessible” Action Wizard from Day 1 of PDF Accessibility?

Well, now you do!

Engage the Action Wizard tool and select “Make Accessible”. Acrobat Pro doesn’t care that you didn’t author the PDF. Acrobat Pro won’t even ask if you have copyright clearance.

Once the “Make Accessible” action wizard has finished tagging and guessing what kind of content is in the PDF, you can now go through and correct any mistakes in content identification. You will perform this task with the Reading Order tool.

Introducing the Reading Order Tool

Reading Order tool from Acrobat Pro
The Reading Order tool.

The Reading Order tool in Acrobat Pro can be found in the Accessibility Tools panel.

The Reading Order Panel [A] found in the Navigation Pane, should not be confused with the Reading Order tool [B], launched from the Accessibility Tools.

Acrobat Pro Reading Order Panel and reading Order tool.
Remember the difference, it can be confusing at first.

The Reading Order tool can be used to identify different types of content, examine the reading order, and eliminating irrelevant data from the reading order.

NOTE: For best results, set your view to display one full page at a time.

Activate the Reading Order Tool

From the Accessibility Tools, click on “Reading Order”.

Reading Order tool button
Reading Order Button

The Reading Order tool will appear as a floating panel.

Acrobat Pro Reading Order tool
Acrobat Pro Reading Order tool.

Position the Reading Order tool so you can see your page content as well as the Reading Order tool.

Acrobat Pro with Reading Order tool engaged.
Reading Order tool engaged.

Notice the content is contained in boxes, and that these boxes are displaying either numbers (the reading order) or letters (content types) in the upper left hand corners.

You can switch between displaying reading order or content types in the bottom part of the Reading Order tool, by selecting the appropriate choice under “Show page content groups”.

Reading Order tool with Show page content groups area highlighted.
Switch between displaying content order or structure types.

Clean Up Your PDF

With the Reading Order tool activated, we are ready to begin identifying the content we want to keep and getting rid of the content we don’t want in the way.

In the following example, we have some empty paragraphs cluttering up the bottom of the page. We don’t want our students to waste time identifying and examining empty paragraphs, so we will use the Reading Order tool to identify the empty paragraphs as “Background/Artifact”.

miscellaneous empty paragraphs to be cleaned up.
Empty paragraphs should be assigned to Background/Artifact with the Reading Order tool.

Identifying content as Background/Artifact removes it from the reading order, so users won’t be bothered with it.

Identify Content Types

Sometimes Acrobat will mistakenly assign content with the wrong label, for instance, identifying text as a paragraph when it should have been identified as a Heading.

With the Reading Order tool, you can fix that.

Select the content chunk you want to re-assign by clicking the little while label in the upper left corner of the content chunk. You will notice that your cursor changes into a little hand when you place it over the label.

Selecting content with Reading Order tool engaged.
The white hand means you are clicking on the right spot.

With the content chunk selected, click on the appropriate content type from the Reading Order tool.

Content types highlighted on Reading Order tool.
With your content chunk selected, assign a content type from the Reading Order tool.

Notice the label change on your content chunk to reflect the new content assignment.

Edit Alternate Text

Another accessibility enhancement you can perform with the Reading Order tool is adding or correcting alternate text descriptions for images.

With the Reading Order tool activated, select an image (figure) in your PDF.

With the image selected, right-click on the content type label and select the “Edit Alt Text” option.

Edit Alternate Text option from right-click menu of an image.
Right-click the image to reveal the Edit Alternate Text… option.

Enter the alternate text description that is appropriate for the image, or else click the “Don’t Add Alt-Text” button to mark the image as decorative only.

Acrobat Pro Edit Alternate Text window.
The Alternate Text editing window in Acrobat Pro.

Work your way through each page of the PDF until all of the content is properly identified.

Check Reading Order

After you make changes to the content structure of a page by reassigning or removing content, you should check the reading order to make sure everything is flowing properly.

You can get a quick view of the reading order by switching the Reading Order tool from displaying “Structure Types” to “Page content order”.

Reading Order tool with structure type and content order options highlighted.
Choose Page content order or Structure types.

If the reading order needs to be adjusted, click the “Show Order Panel” button to open the Order Panel within the Navigation Pane on the left-hand side of the Acrobat Pro window. With the Order Panel open, you can drag the content into the correct sequence.

Run Accessibility Checker

It is always a good idea to run the Accessibility Checker after you finish editing your PDF.

If the Accessibility Check doesn’t discover any new issues, congratulations! You can save and close the PDF, knowing you have provided a level of accessibility that should allow most people to read the information you are sharing.

illustration of four people who are happy to be finished with this PDF accessibility lesson.
Happiness is being finished with PDF Accessibility!

Some PDF’s are Special Cases

Most simple PDF documents can be made accessible using the process we’ve just covered, but sometimes you will find a PDF with complicated layout and/or complex content, and those kinds of PDF documents can be very challenging to make accessible.

Sometimes it might be easier to come up with an alternate access strategy, or convert the PDF to a different type of document where the content can be communicated in an easier way.

Remember, PDF documents can come from many different places and technologies. Sometimes the source of the PDF simply does not create a data structure that can be made accessible.

Tomorrow I will cover how to ensure your data makes it out of MS Word and into Acrobat Pro with as little confusion or loss as is possible, and I will show you a free tool that might be able to help take your problem PDF and make it into something a little less problematic.

Until then – thanks for reading!

Check Your PDF Accessibility

Accessibility Checker Options from Acrobat Pro

You can launch an Accessibility Check at any time from the Accessibility Tools in Acrobat Pro.

Acrobat Pro Accessibility tools
The Accessibility Tools from Acrobat Pro.

The Accessibility Checker in Acrobat can do a good job of finding accessibility issues, and for the things it is unable to assess or determine, it can at least help you remember to address them.

A balance of testing agent and digital reminder, you can incorporate the Accessibility Checker as a standard part of your PDF workflow.

Make it your new habit, from now on before you share that PDF with the world, you should be conditioned to check it for accessibility.

It will probably take less than 5 minutes per document.

The good news is that if you have been practicing the simple tips and techniques of incorporating accessible formatting practices into your workflow, by the time you get to Acrobat, most of your work will likely have been taken care of already.

So you can end up with an accessibility check that is actually good news – like going to the dentist and not having any cavities!

Sound good?

OK, lets take a look at how the Accessibility Checker can help us create more accessible PDF documents.

Checking a Raw, Untagged PDF

Here are the results of an untagged PDF file.

Accessibility Checker results.

Notice the variety of issues:

  • red circles with an x in the middle are errors
  • green check marks are passes
  • blue question marks are issues you must investigate manually.

To address any of the issues you can right-click on the issue and choose an option from the menu that appears:

Accessibility Checker right-click options.
Right-click options let you choose how to address the issues in the Accessibility Checker.

Once you have addressed an issue, you can choose “Check Again” and if you were successful, the Accessibility Checker will replace the red circle with a green check mark.

Manual Checks

Typically, the manual check issues will be color contrast and logical reading order.

Color Contrast

The best way to address color contrast issues is in the source document.

Color Contrast Tools in Acrobat

Acrobat Pro features a tool to automatically change your color scheme with a high contrast scheme.

To activate the high contrast mode:

  1. Go to EDIT\Preferences
  2. Click on Accessibility
  3. Choose Replace Document Colors, and then choose “Use High-Contrast Colors
  4. From the pull-down list, choose the color combination you want and then click OK.

Logical Reading Order

You verify the reading order by using the reading order tool from the navigation pane.

Navigation Panel with Order tool outlined with red rectangle.
The Order Tool from the Acrobat Pro Navigation Panel.

When the Order tool is engaged, each page of your PDF will become covered in numbered boxes.

PDF document with Order tool engaged.

The numbers on the boxes correspond to the numbers in the Order tool inside the Navigation Panel.

The numbers indicate the reading order of your content for someone who is not able to see the document.

Traditional western-world reading order starts in the upper left corner and goes across the page left to right, and from top to bottom.

To change the sequence of which content is presented and in which order:

  1. Grab the numbered box that you want to move from the Reading Order tool.
  2. Drag the box to the place within the list where you want it to be.
  3. When you let go, the boxes will renumber to accommodate the change you have just made.

Notice the content on the page doesn’t move, but the numbering changes.

When you have the reading order established correctly, click on the Order icon to close the Order panel.

Continue addressing the issues from the Accessibility Checker by right-clicking each item and choosing the “Fix” or “Explain” option.

Right-click options from accessibility checker.

Continuing PDF Accessibility

There is much more that can be done for PDF accessibility, but these basic practices should be enough to help you handle most of the PDF documents you create for your course.

Remember, sometimes the best thing to do for a complicated PDF is to return to the original authoring program and address the accessibility and design issues there. If that is an option, always start there.

I hope this has been helpful, thanks for reading!

Accessible PDF

There are a lot of different PDF’s in the world.

Those of us who were around back when the Internet was invented can tell you horrible tales of how random and unpredictable digital information once was.

The advent of a file format that could provide a consistent layout across different computers, monitors, and printers – that was a huge deal.

illustration of three characters apparently celebrating  the same design appearing on 4 different screens.
PDF brought consistency to the early Internet.

Funny how quickly we can get used to something – but in the case of PDF, it is almost spooky how it gained such overwhelming dominance. There are so many ways to make a PDF that it is impossible to guess what the source might be for any unsolicited PDF file.

The PDF file format is one of the most powerful and popular digital containers around. I have found that the percentage of PDF files in any online course is usually higher than the percentage of HTML files.

Value of the Source Document

Most PDF documents tend to start as another form of information, such as an MS Word file, MS PowerPoint file, MS Excel file, Google Doc, Google Sheet, InDesign, Pages file, Photoshop, Illustrator, Chrome, Firefox, your copy machine in the corner, my flatbed scanner, your cellphone, and somebody probably has a toaster or refrigerator that can make a PDF.

I would not be surprised…

The tricky part is, if you don’t have the accessibility solutions in place within your original content, the PDF you create will also not have any of the access solutions you need.

Worst of all, it can sometimes be very challenging to apply the access strategies in Acrobat – assuming you own it.

Which reminds me, you need to own a Professional version of Acrobat to address the accessibility of your PDF documents. Get your school to buy you a copy if they haven’t already.

While you can create a PDF from pretty much anywhere, you still need to own a full version of Acrobat in order to edit and ensure accessibility is possible. I wish there was some less expensive option, but to the best of my knowledge, Acrobat still wins that category.

Access Strategies in Acrobat

Just like all the other digital formats in the world, our basic challenge is applying the access strategies for different types of digital content:

MEDIA TYPEACCESS STRATEGY
TextStructure (Headings, list styles, paragraph styles, etc.), clarity, legibility, contrast.
ImagesText descriptions and captions
AudioText transcript
VideoCaptioning and narrative description
InteractiveText labels, keyboard control, Section 508 & WCAG
Complex/CombinationAll of the above…
Digital Media Access Strategies

The easiest, most straight-forward and trouble-free approach is to start with a document that has all of the above access strategies in place before it was converted/saved to PDF.

Accessibility Tools

If this is your first time dealing with accessibility in Acrobat, it is most likely the case that your Accessibility Tools are not on deck.

Near the bottom of the toolbar at the right-hand edge of the program window, find and click the “More Tools” button.

More Tools button from Acrobat.

Acrobat will open the Tools inventory.

Acrobat Tools inventory.

Select Accessibility from the “Protect & Standardize” category and Action Wizard from the “Customize” category near the bottom of the list. You should now have the Accessibility and Action Wizard at the bottom of your toolbar.

Acrobat toolbar with Accessibility and Action Wizard tool options.

Click on the Accessibility Tool and you are ready to begin.

Tags or No Tags?

Before you can do anything with your PDF, it needs to be tagged. To view the tags tool, we need to open the Navigation Panel on the left-hand side. Find and click the expander handle to reveal the Navigation Pane.

Navigation Panel Expander Handle,

If this is your first time checking accessibility with this document, you will probably need to load the Tags tool into the Navigation Panel. Go to the “View” menu and select “Show/Hide, Navigation Panes, Tags”.

Menu path for adding the Tags tool to the Acrobat Navigation Pane.

Click on the Tags tool to reveal the Tags explorer.

If it says No Tags available, proceed to the next step.

Otherwise, if you’ve got tags, skip ahead to the last step: “ACTION WIZARD: Make Accessible”.

AutoTag Document

If you’re reading this step it is because your source document did not include the advanced formatting to tell Acrobat about your content.

But this is not a big problem!

illustration of woman sitting on orange sofa with laptop in a yellow room.
Acrobat will auto-tag your document if you need it to.

Now we will have Acrobat examine the document and do its best to figure out what kind of data the PDF is comprised of.

From the “Accessibility” tools on the right-hand side of the program window, select the first option, “Autotag Document”.

Autotag Document option from Accessibility Tools.

Acrobat will process your document and generate an “Add Tags Report” that typically includes any Accessibility concerns it could identify, such as images without Alt Text descriptions, questionable reading order, and various meta-information.

Issues such as discerning a logical reading order still require your attention to determine, as well as determining if alternate text descriptions are descriptive enough.

Now that your PDF is tagged, click the view control to make Acrobat display one page at a time. The Accessibility tools behave themselves better in single page view mode.

You are now ready to begin!

Illustration of man sitting with laptop, ready to get accessible.
Ready to begin!

ACTION WIZARD: Make Accessible

Choose the Action Wizard from the toolbar. An “Actions List” will appear.

The first action in the list is “Make Accessible” – click it and follow the directions to address basic accessibility issues, the sorts of things an automated testing algorithm can deal with.

The last process the Make Accessible routine will do is prepare an Accessibility Check of your document. Examine the parameters it is testing for, and then launch the check.

Once the Accessibility Check is finished it will create an Accessibility Report with any issues affecting the accessibility of the PDF.

You can click through the links for the different issues in the report and get individual instructions for any issues that need to be addressed.

Go ahead and see what you can figure out on your own. Run the test again after you have made the suggested adjustments and make sure you didn’t miss anything.

Save your PDF with a different name if you’re worried about making mistakes.

I’ll be covering the results from an Accessibility Checker scan of a simple document in tomorrow’s post, and show you how to resolve the common issues and how to do the human verification required for others.

Thanks for reading!