Sometimes you end up with a link that goes beyond a single line of text, and you need to make it accessible.
What is the problem?
Well, specifics can always vary, depending on the PDF. Having said that, typically a student’s assistive technology might repeat the word “link” in the middle of reading the link URL, causing confusion and irritation.
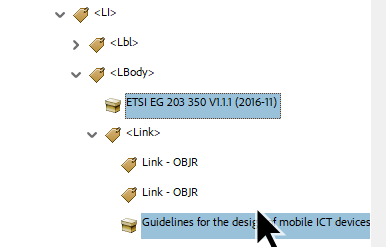
If we look at the document tagging structure, it becomes apparent why this happens – there are two OBJR tags for the link, one for each line of text.
This is just sloppy and wasteful. We only need one OBJR tag for this link.
However, getting rid of the extra OBJR is not as straight forward as you might hope.
You will have to completely remove the link, and then rebuild it the way you need it to be.
How to Fix Two-Line Links
With your tagged PDF open:
Select the link on the content page.
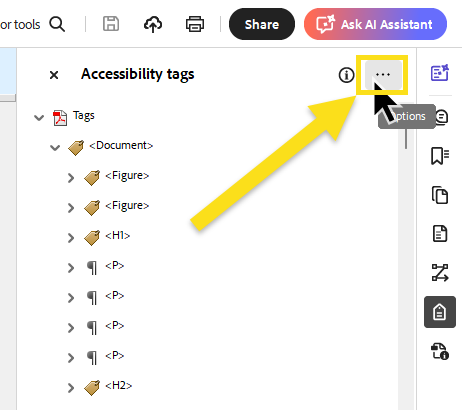
Open the Tags panel.
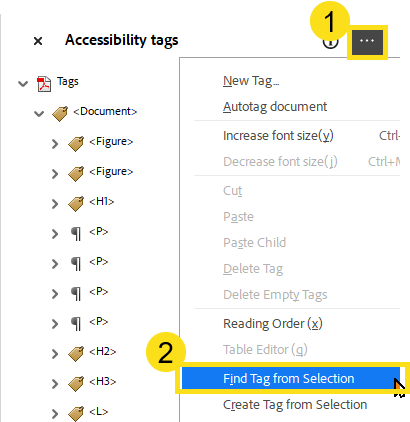
Click the Options menu from within the Tag panel.
Select the option to Find Tag from selection.
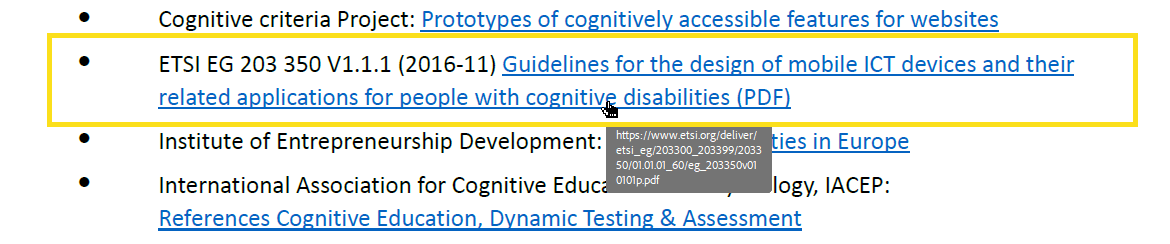
Make sure you have identified the correct tag for your two-line link. You will notice there are two OBJR tags within the Link tag.
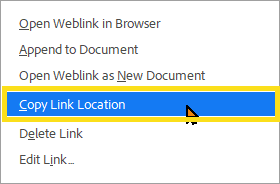
Now address the link within the PDF content. Right click the link within the content page, and copy the link location of the url.
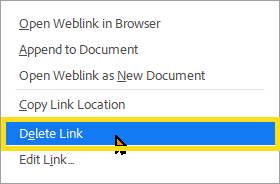
Now delete the link from the page content by right-clicking on the link text and selecting “Delete Link” from the context menu. Do this for the text on both lines of the link.
If the corresponding links did not disappear from the Tags panel, clean them by selecting and deleting them.
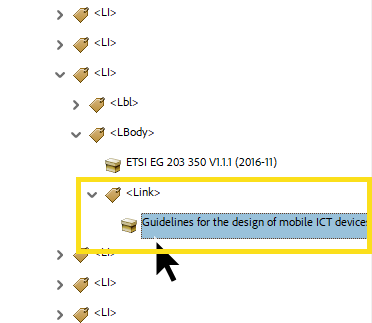
Your tag structure should be comprised of a tag for the link, and within that tag are paragraph/text containers that identify the clickable target of the link.
Now that we have successfully deleted the link from the page content and the tag structure, we will recreate the link so it is accessible.
NOTE: To be accessible, we must ensure that the link encompasses both lines of text within the content page and within the tag structure. We want our tag structure for the link to contain a single OBJR tag and a paragraph container for the clickable link target.
Create the Link
Within the Tags panel, Select the Link tag for the link we are working on.
On the PDF page, select the text which will be the anchor of the link.
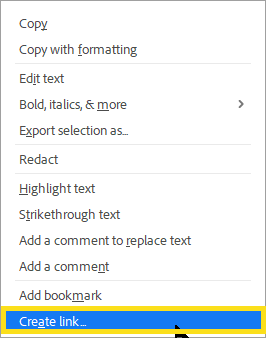
Right click the selected text, and choose “Create Link”.
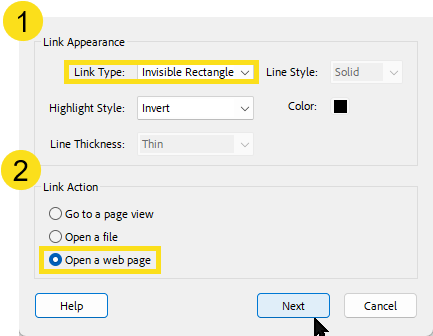
Set the Link Appearance to be Invisible Rectangle, and the Link Action is set to Open web page.
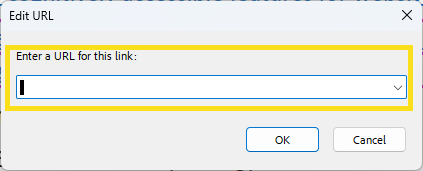
Next, the Edit URL dialog opens. Paste in the link you copied earlier.
Click OK.
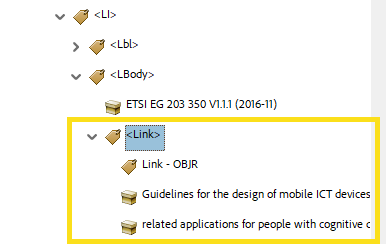
Now you should have a tag structure that includes a link with a single OBJR, and the text content that is the anchor.
The page with selected link and the tags panel open, showing the relationship between selected content and tag:
If you are lucky, this will resolve your problem. However, sometimes even after you follow the above steps, Acrobat will not create the OBJR tag you need. Read on to learn how to fix this situation.
When Acrobat Does Not Cooperate with the Above Process
Select the Link tag within the Tag panel.
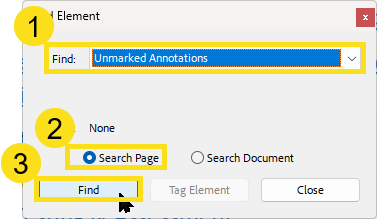
Open the Tag panel Options menu and select “Find”.
In the Find panel, open the drop down menu and select the option for “Unmarked Annotations”.
Find the unmarked annotation on the page.
When the link is found, open the Tag panel Options menu and select “Create Tag from Selection”.
Now you should have the OBJR tag within your Link tag.
For one specific course, I had enabled Guest access, but I wanted to change the settings. At one time I had required a password, and now I wanted there to be no password required.
However, for some reason I could not erase the password – and worse, it conflicted with the improved password requirements I was using for the site.
The end result was a paragraph of red text listing error complaints and warnings regarding password policy violations, whenever a guest user accessed the course.
It wasn’t a critical issue that would stop someone from accessing the course, but it was a source of potential confusion for users visiting my site.
This is contrary to the desired user experience, and a bit of an embarrassment.
I am happy to have since resolved the issue, it turns out there was a corrupted course, and I was able to set things right by copying the course.
Now I can share with you what I learned in the process, with the following simple steps of how to manage guest access to Moodle courses.
Also, full disclosure: this is for a limited audience of people who are managing, or thinking about managing, a Moodle instance.
Moodle Guest Password Policies
There are settings for Guest access both at the global system level and within each course itself.
First things first: establish the norms for your Moodle instance at a site-wide level, and them move on to the individual course settings.
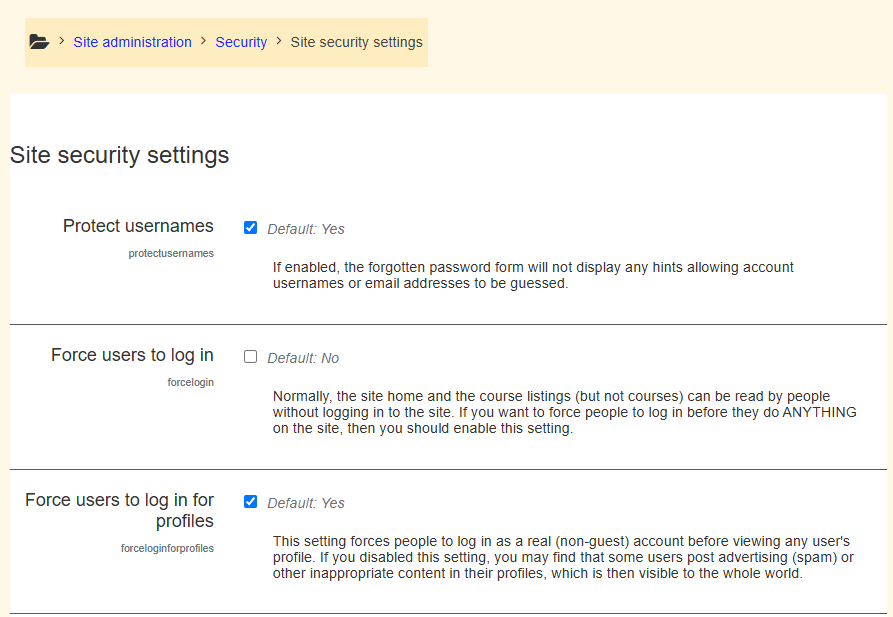
Navigate to Site administration\Security\Site security settings.
Require digits, uppercase, lowercase, and non-alphanumerics as needed.
Enable password expiration if required
Configure lockouts after failed logins (under Account lockout settings).
User Account Creation and Passwords
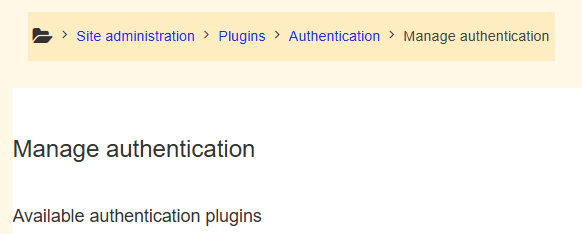
Navigate to: Site administration\Plugins\Authentication\Manage authentication
Enable email-based self-registration (if needed)
Set new user default role
Force password change for pre-created accounts.
Guest Access to Courses
Enable Guest access globally:
Navigate to Site administration\Plugins\Enrollments\Guest access.
Enable Guest Access for a course:
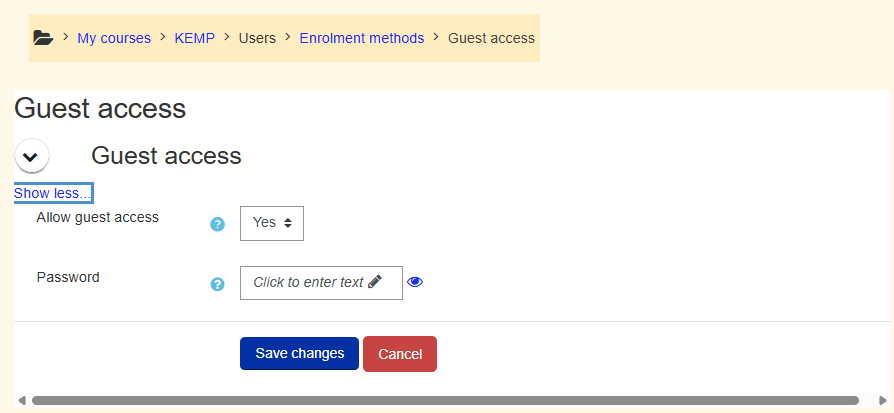
Navigate to: Course\Participants\Enrollment methods\Add method\Guest access
Allow guest access: Yes
Set a guest password (optional)
TIP: Leave password blank to allow public access.
Best Practices
Consistent design patterns and management of user policies are a curricular level concern that needs to be communicated and maintained through policy, and ongoing faculty professional development efforts, in combination with IT training and support assignments.
Depending on what you are using Moodle for, you might want to have a variety of resources that are freely available, as well as others that are password protected.
Here are some tips to keep in mind:
Test guest access using an incognito or logged-out browser
Use course visibility settings to hide sensitive courses
Regularly audit accounts and login attempts (under Reports).
You start with a transcript of the audio. Always. If you do not have a transcript of the audio, read this quick article on how to get a transcript, and then come back and join the party.
BASIC Aegisub Workflow
Begin with your transcript saved in plain text file (.txt), or in subtitle file (.srt) format:
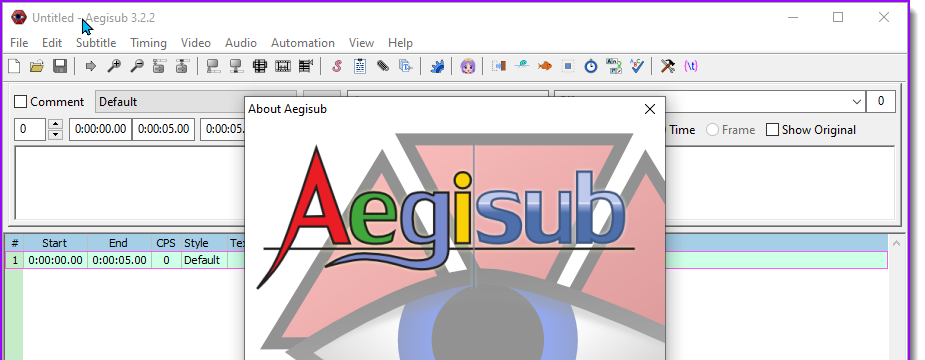
Open Aegisub.
With the Aegisub editor open, select “File\Open Subtitle” to import a subtitle file or plain text file.
Navigate to the location your transcript is saved, select the file and click “Open”.
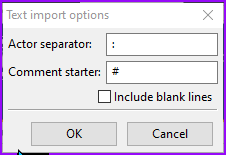
The Text Import Options window prompts you for characters to separate different actors, and a character to denote comments in the subtitle file (comments do not appear onscreen). Enter characters if your transcript is formatted with them, otherwise ignore.
Click “OK” and the file loads.
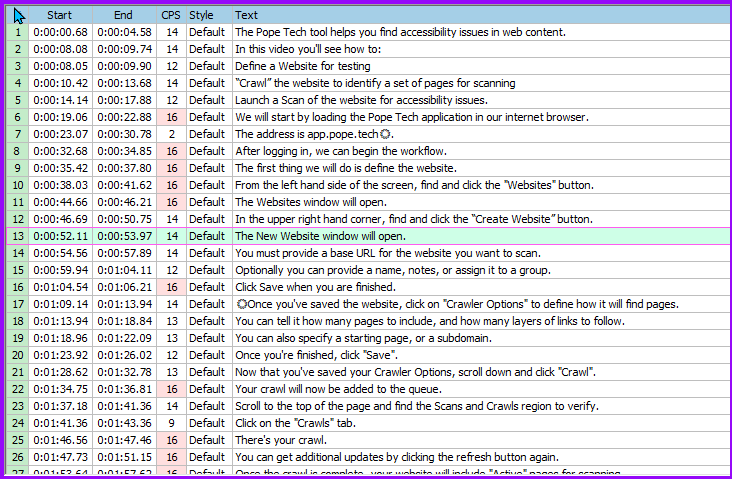
The text grid populates with the contents of your subtitle/text file.
Select the first row, and that subtitle will appear in the Subtitle Edit window.
Edit the subtitle as appropriate for grammar and line length.
Adjust the timing for the subtitle by moving the blue and red lines within the Audio editing window. Blue is the beginning, red is the ending. Other subtitles are represented with gray lines.
Press ENTER when the subtitle is formatted and the timing is set. Aegisub will register the timing for your subtitle and move to the next subtitle line in the Text Grid.
Repeat this process until all of the subtitles have been formatted and properly timed to appear on screen.
That’s the essential workflow, continue reading to learn about optimizing your workflow, setting preferences, and how to format your subtitles so they are easier to read and understand.
Set Your Aegisub Options
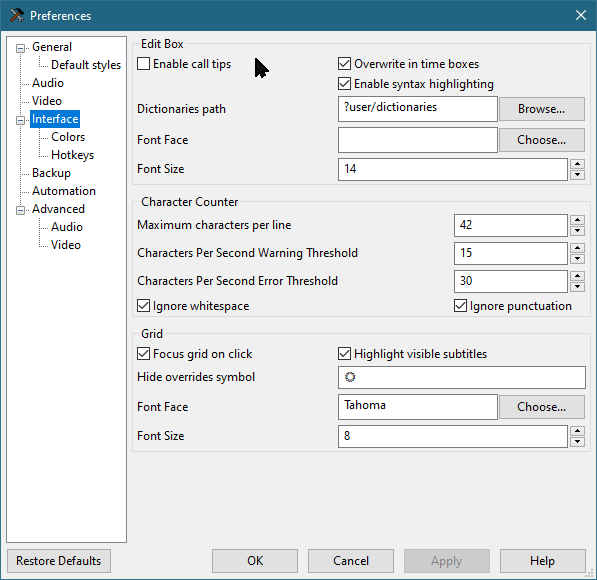
Goto “View\Options…” and select the “Interface” option to set the preferences for how many characters per line, characters per second warning threshold, and characters per second error threshold.
I set my preferences to 42 characters per line, 15 characters per second warning threshold, and 30 characters per second error threshold.
Click “Apply” when you are finished.
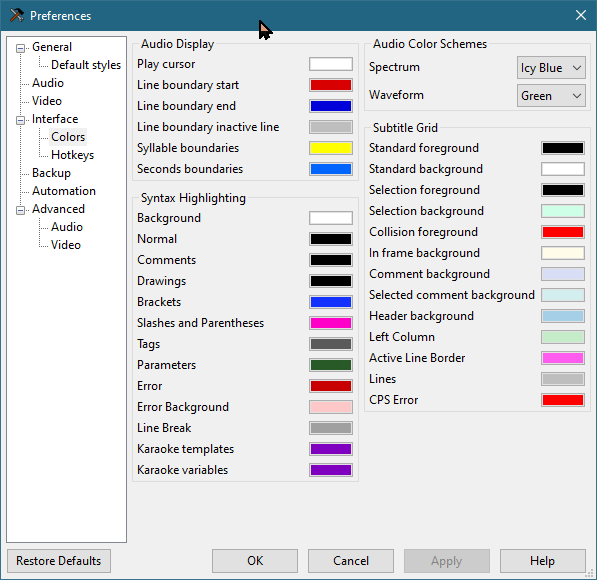
Colors
From the Options menu, click the “Colors” option under “Interface” and adjust the different colors used within the Aegisub interface.
When finished adjusting your preferences, click “Apply” to activate your settings.
Click “OK” to close the Options panel.
Video Window
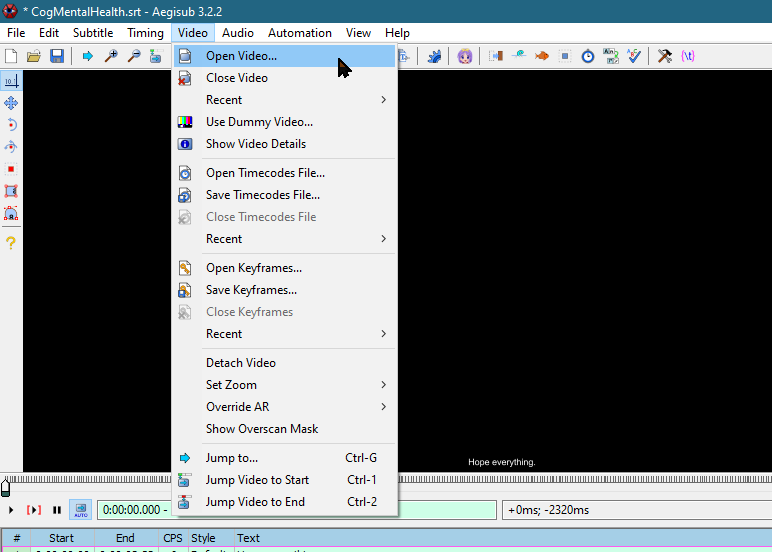
Go to the “Video” menu to open the video you are subtitling.
You can enlarge or reduce the size of the video window by hovering the mouse over the video and using the mouse scroll wheel.
There are multiple playback modes. Playback can be limited to the current subtitle line, or playback can proceed through the remainder of the video from the current subtitle line forward.
Audio Window
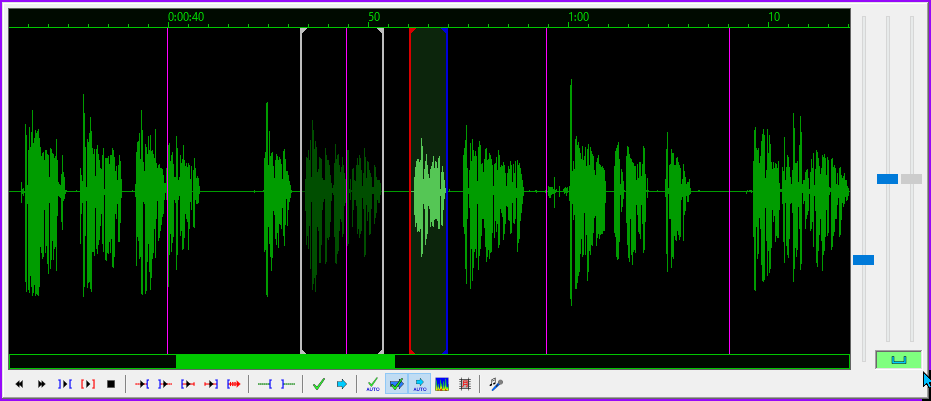
The Audio window displays the waveform for the audio. The area of the waveform between the red and the blue lines is the audio content corresponding to the current line of subtitles.
You can easily adjust the timing of each subtitle line by dragging the start or end lines within the audio window.
Editing Audio Timing
Within the Audio Window:
Move the BLUE line to the beginning of your subtitle audio.
Move the RED line to the end of your subtitle audio.
Press SPACEBAR to play the audio for the current subtitle.
Ensure the display time for the current subtitle corresponds with the selected audio.
Press ENTER when you are satisfied with the timing.
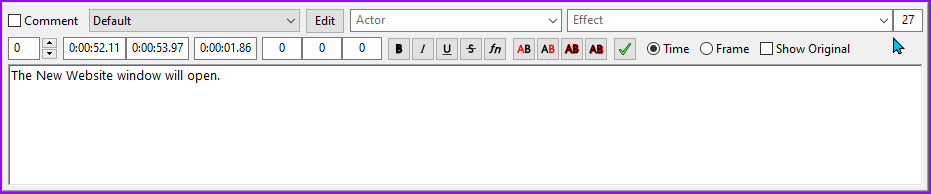
Text Editing Window
Immediately beneath the Audio Window is the Text Editing window.
When you select a line of subtitles in the Text Grid, that subtitle will be displayed in the Text Editing window for editing.
Right click within the Text Editing window to access options for adjusting line length and splitting subtitles.
Use NUMPAD 5 to play the audio currently associated with the subtitle being edited.
Editing the Captions
Edit the subtitles according to the rules for editing captions, as described in the “Captioning Key” resource from the Described Media and Caption Program (DCMP).
Use the Captioning Key for full details of how to format different types of information, as well as how to style your captions for maximum readability.
There are many considerations for formatting subtitles to enhance their readability and understandability. Check out the Captioning Key for a complete explanation of how to format different types of information. In general, the following guidelines should always be followed:
Never split a prepositional phrase when breaking a line of subtitles.
Do not split a descriptor from the object it is describing when you break a line of subtitles.
Do not mix numerals with numbers spelled out in words. Choose either numerals or words and maintain consistency.
Do not separate a person’s title from their name when breaking a subtitle into two lines.
Include sound effects in brackets, such as: [car tires screeching],
or [gun firing] BANG! BANG!…
Audio occurring offscreen should be italicized.
Maximum Line Length
It is important to format your subtitles so they do not form excessively long lines of text.
It can be difficult to read long lines of text and also pay attention to the video that is being shown. Best results are achieved when subtitles are around 42 characters per line. It is OK to exceed this by a few characters, but try not to go over 50 characters per subtitle line.
The Text Grid displays each line of subtitles with a column that displays the Characters Per Second (CPS). This column turns red when the characters per second meets or exceeds the levels you set in the Interface options, making it easy to see at a glance where you need to make adjustments to line length.
Using the Characters Per Second column, you can quickly identify any lines of subtitles that are too long for the amount of time they are being displayed. The Characters Per Second warning color and the characters per second error color can be set in the Options pane under “Interface\Colors”.
Displaying Two Lines of Subtitles
If you want to display two lines of subtitles on the screen, you can manually split the subtitle line into two lines by pressing SHIFT + ENTER.
Pressing SHIFT+ENTER will place a new line code(\N) in your subtitle file, indicating where the line breaks. The new line code will not be displayed on screen with the rest of the subtitle.
If you break a line of subtitles using the new line code (\N), the Characters Per Second displayed will reflect whichever subtitle line is the longest.
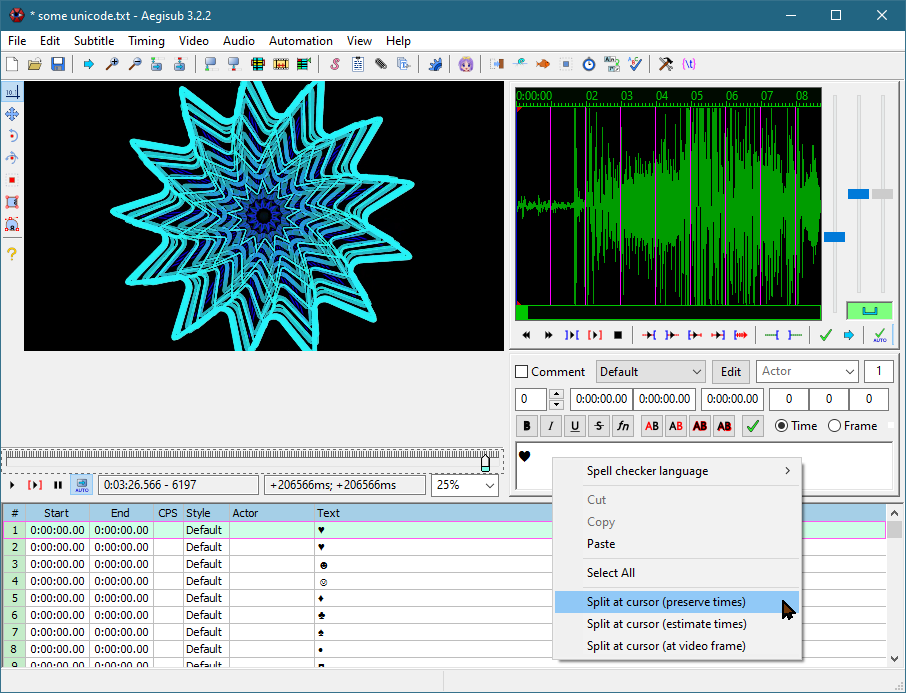
Splitting Long Lines of Subtitles
If you want to break a long line of subtitles into two separate lines of subtitles, use the Editing Window.
Place your cursor within the subtitle where you want the second line of subtitles to start, and click the right mouse button.
Choose “Split at cursor (estimate times)”, and the text spanning from your cursor to the end of the subtitle will be moved to a new subtitle line.
Conclusion
Follow the workflow at the beginning of this article until each line of subtitles has been formatted and optimized.
Save your .srt file, and use it with your video when you share it online or use the video in the classroom.
You can also download this job aid for the Aegisub Workflow for editing subtitles.
There are many ways to get a transcript of your video.
As an employee, my number one preferred solution is to contract with a professional to do my captioning.
However, as an independent business owner, I do not want to spend the money for captioning when I can do it myself and spend that money on something else. In fact, I’m even happy to take on your captioning chores for a small fee if you’re seeking help.
So I understand that for many small businesses the cost of paying someone else to caption your videos is a non-starter. There is a reason so many videos on YouTube have the “auto-craptions” instead of polished and helpful captions.
But I’m here to tell you there’s a better way than throwing the fate of your subtitles to the whims of YouTube.
As a wizened old nerd who has been playing with video since the days of VHS and video toasters, I can appreciate the amazing progress that has been made in the area of captioning support. There are many ways to get captions, including the aforementioned “auto-craptions” which are better than nothing, most of the time.
Even so, the work must continue, as the quality and accuracy of “auto-craptions” still leaves something to be desired.
Fortunately, captioning is not so much difficult, as it is a time-consuming task. However, one of the traditional bottle-necks in the process, transcribing audio, is being resolved by robots.
Path of Least Resistance
With the explosion of AI, it is no wonder that we have many options for transcribing audio. Many offer a “free” tier, but as is always the case, when a web-based service is “free” – you are the product being exploited – as in, your data.
Be aware of the fact that what you feed into any of these AI systems will likely be used to feed their training algorithm, and be used for who knows what. So choose wisely.
Personally, I like Otter.ai because I first encountered them in the Education technology space many years ago, long before AI became a “thing”. They do a remarkably good job of recognizing what is being said.
If you do not have a subscription to the Adobe Creative Cloud, then Otter.ai would be my next choice for automated transcript creation.
Premiere Pro
Even with the ease of Otter.ai, I can’t deny the immediate ease of using Premiere Pro’s new transcription capability.
Adobe has some impressive speech recognition capability, and since I have already sold my soul in order to have the Creative Cloud subscription, I can rationalize the feeding of the Adobe AI.
Adobe, my toxic valentine, co-dependency is the mask for your vile exploitation and my despicable lust for your bright shiny broken things…
Anyway – please excuse my venting, and let’s get back to the regularly scheduled programming…
I find that getting a transcript from Premiere Pro is a simple and powerful way to begin the captioning process.
Premiere Pro Workflow
Getting a transcript in Premiere Pro starts at project creation when you import your source clips. Set the ingest settings to automatically transcribe your clips at project creation, and Premiere Pro will create transcripts of all audio and video clips.
So far, it does a better job than YouTube. YouTube has flat-out refused to process several recent videos, I suspect due to the length of the videos.
After Premiere Pro finishes processing your clips, you can open the Transcription window to edit the results.
You can easily create captions/subtitles with your transcripts within Premiere Pro, and you can export the subtitles as an .srt file for uploading to YouTube or editing in Aegisub (see below).
Aegisub Subtitle Editor
If you are working on a long video, you will probably find the process of editing your subtitles to be a lot more enjoyable and efficient when working in Aegisub, the free subtitle editor.
I don’t receive any financial compensation for recommending Aegisub, I just like the program enough to recommend it.
Check out my tutorial on using Aegisub to take your audio information from transcript to powerful and perfect captions.
As the world has been dealing with the Coronavirus pandemic, Zoom meetings have entered our popular culture as both a means of conducting business and maintaining contact with friends and family.
With all the use Zoom has been getting, I thought it might be helpful to share some of the accessibility features you can enable to make your Zoom meetings as inclusive as possible.
Pre-Meeting Preparation
There are some essential settings you will want to make sure are enabled before the meeting begins, and a few suggestions that can make your meeting more accessible, enjoyable, and worthwhile for all participants.
Zoom Settings
Zoom includes a group of meeting settings to enable features like Closed Captioning and different ways of interacting with meeting participants, such as polling and non-verbal feedback tools.
In order to use these features, the Zoom account holder will need to enable the settings at the account level. This means that if you work for a school where your Zoom account is managed by IT, you may need to get their help to make sure these settings are enabled.
Enabling Zoom Account Settings
From the Zoom settings in the main Zoom application window, you can access the Zoom account settings.
The Zoom account settings will open in your browser after you click the prompt at the bottom of the Zoom Settings window to “View More Settings”.
There are two groups of settings you want to enable from the “Meetings” tab.
First are the Meeting Reactions and Non-verbal feedback options under the “In Meeting (Basic)” settings:
Second are the Captioning settings found under the “In Meeting (Advanced)” settings:
Live Transcription
Notice that there is an option for a live transcription service, which utilizes speech recognition technology. This is NOT an acceptable replacement for a live captioner.
Do not enable Live Transcription unless all of the meeting hosts using the Zoom account have been made aware that it is not to be used in lieu of a live captioner when captioning is required by a participant.
While the live transcription feature is not accurate enough to rely on as an accommodation, it might provide a good start on a transcript that can be edited and corrected after the meeting. Your results may vary, depending on audio conditions and participants’ speaking voice.
Advance Agenda and Handouts
Another useful thing to do before the meeting starts is to send out the agenda and any handouts for the meeting. This also provides an opportunity to remind participants of any protocol for interacting during the meeting, and to ask if anyone requires any accommodations.
Remember to make the meeting agenda and any handouts accessible before you send them to meeting participants.
In-Meeting Accessibility
There are several considerations for ensuring a meeting is accessible for all participants. Be strategic and prepared in understanding the different tools in Zoom for sharing information and interacting with other participants.
Inter-personal Accessibility
As you manage the meeting, make sure to remind participants of the different tools you will be using to share information, ask questions, and interact with each other.
The following suggestions will help you increase the accessibility of your Zoom meetings:
Repeat questions that are asked verbally and through chat.
Describe images, charts, graphs and any other visual information of significance.
Speak in a relaxed pace and avoid making rapid movements with the mouse when you are sharing your screen.
When using annotations or the Whiteboard, always narrate the visual content you are creating.
If you are using an American Sign Language Interpreter, use the Spotlight tool in Zoom to keep the interpreter’s video window prominently displayed. Likewise, if you are using break-out rooms, manually create the breakout rooms so you can ensure the interpreter is placed in the correct breakout room.
Managing Captioning
The Zoom meeting host has the ability to share a lot of capabilities with selected co-hosts, but only the meeting host is able to manage closed captioning.
When the meeting host clicks on the closed captioning button, the captioning preferences window will be displayed.
You can assign the role of captioner to another meeting participant, or you can copy the API token to enable the use of a third-party captioning tool.
It is highly recommended that you do not try to caption the meeting while you are hosting it. It has been found that the quality of the meeting and the captions both suffer when the meeting host tries to be the captioner while also managing the meeting.
Keyboard Shortcuts
There are several keyboard shortcuts you can use within a Zoom meeting to make the experience easier to manage and more accessible to.
The following keyboard shortcuts are just a brief collection that can be useful for you in hosting a Zoom meeting. You may also want to share them with meeting participants before the meeting.
Change focus to Zoom meeting controls = CTRL + ALT + SHIFT
Mute or Unmute audio = ALT + A
Mute or Unmute audio for all except host (only available to Host) = ALT + M
Show or hide floating meeting controls = ALT + SHIFT + H
Cycle through Zoom program windows = F6
Increase or decrease chat display size = CTRL + PLUS or MINUS
Final Thoughts
While there are many possible scenarios you may encounter when hosting Zoom meetings, the best results will happen when you are well-prepared and able to adjust to new information.
Understanding how to use the Zoom tools for interacting with participants and managing a meeting can make a huge difference in your Zoom meeting experience. Being comfortable with using the different meeting tools in Zoom will allow you to better manage last-minute surprises and accessibility challenges.
The idea of representing math through sonic information might be a rather new and abstract concept for many.
For a lot of people, the meaning behind a sonic waveform is just the noise it makes. For instance, do you know what sin(x)+2 sounds like?
Can you provide an example?
By the end of this article, you will be able to answer yes to both of those questions.
Concepts of Sonic Data
For audio information, there are a number of issues that have historically been more constraining than liberating in terms of our ability to create and use it. Namely, a lack of tools and the related supporting culture of practice and use.
Most people have simply never encountered math deliberately represented through audio- or if they did, they probably didn’t realize it was happening.
Students and teachers need to have some preparation for using audio versions of math. Some overview of what is being represented, with context provided as to what the different sonic palettes represent, and how to interact with significant data.
The Evolution of Sound
Beyond live sound, our technological capability to record and produce sound continues to grow. We started in the world of analog audio, and ironically, many hipsters continue to return there…
An analog recording of sound is a direct and singular representation of something in the world. It is evidence of a unique moment in time, a direct translation of some event or data. It typically can not be reproduced without losing fidelity, making each use one time closer to the last time it will ever be usable.
Traditionally, there have been constraints related to the cost and complexity of analog audio recording technology that put audio-based math out of reach for most people.
Issues from recording equipment, barometric pressure, ambient temperature and humidity, the list goes on. Suffice it to say that there are many variables which combine into a very challenging situation when trying to re-create consistent representations of sound.
And don’t forget the talent, we need a source of the sound – a means of making noise. Cue the orchestra, or get out the xylophone, slide whistle, and kazoo.
For the longest time, in order to capture sonic information, the task required a range of expensive and sophisticated recording equipment (and audio engineers to operate it). This resulted in it being out of the reach of most teachers and students.
Happier Times
Today technology for making and distributing noise is ever-present. We carry the equivalent of a recording studio in our cell phones, as well as the means of distributing our noise across the globe. I give you the Internet as exhibit A.
The Internet has provided the means for a new paradigm where audio information is easy and affordable to record and share. We can even synthesize conceptual never-before heard sonic information according to our desires, with a variety of free tools.
Today audio technology enables us to create new kinds of sounds our grandparents would most likely not approve of.
And you can count on that…
Combining Sound and Sight for Superior Communication
A central tenant of media theory is that multiple means of representing information reinforces the message being communicated.
Today we have a unique capability to express information in a variety of ways. We combine multiple forms of media into much more engaging representations than formulas scribbled in chalk or dry erase markers.
For example, consider the complexities of data-sorting algorithms, and the need to compare the logic of the algorithm in a way that demonstrates efficiencies and differences in theoretical approaches.
Written in text. a lengthy tome of incredibly boring dimensions is the result. It could easily take an hour to read this explanation, while it is represented in a fraction of the time through this YouTube video “Fifteen Sorting Algorithms in 6 Minutes”.
Besides being slightly hypnotic, this video efficiently demonstrate a rather abstract concept and relationship between the techniques of different coding approaches (sorting algorithms) used in computer science.
As a lot of people figured out in the 60’s, it is easy to get absorbed into the engaging mixture of audio-reinforced visuals. Now we can tap into that power for teaching and learning Math.
History of Sonic Math
Audio Graphing is the term applied to the process for sonic rendering of mathematic information.
As an instructional technology, audio graphing provides an interesting capability for teaching and learning – though it is not as familiar to most of us as the visual representation of math.
Audio Graphing has remained a niche use for people with disabilities, or else individuals who were deep into the science of math or sound.
The main issue has been the lack of tools that made it easy for average people to create or use audio graphing.
The most popular and reliable tool for many years was an expensive technology relegated to the fringes of assistive technology for students who were blind and studying math. Costing several hundred dollars, it was an unfortunate stranglehold on a powerful capability.
There is one notable tool from the past that still deserves some attention both for capability and for the spirit of supporting education for everyone: MathTrax from the fine folks at NASA.
MathTrax is a great example of how audio graphing can help explain math functions and concepts. It is an accessible graphing calculator that allows for individuals with disabilities to create and listen to math. There are also built-in samples for exploring the physics and functions of rocket launches and roller coasters, and it is all accessible.
As cool as all that is, it is still a rather limited range of options and a very outdated interface.
Happily, the world has changed for the better in terms of our ability to create and study math with audio graphing capabilities.
Current Evolution of Sonic Math: Desmos
Home page for desmos.com.
Desmos is a company that provides a free suite of web-based math tools, which includes an impressive audio graphing calculator that is completely accessible, and it works across operating systems and devices.
Did I mention it’s free?
Desmos works to ensure their tools are accessible and available across operating systems and devices, as part of their mission to make math easier and more enjoyable to learn for everyone.
To use Desmos, go to www.desmos.com and create an account.
You need an account to save and share the content you make, but anyone can visit the URL for what you create – with no account required to view your content.
Before you begin, I recommend you read the page about how to best succeed in creating great digital math. It is really quite good advice.
Math Tools
Under the “Math Tools” menu you will find the different tools included in the free suite. There’s a lot of good stuff here, but today I’m focusing on the Graphing Calculator.
Desmos’ math tools, with Graphing Calculator highlighted.
Graphing Calculator
Click on the Graphing Calculator option from the Math Tools menu, and the Graphing Calculator opens in full-window mode.
An empty graph awaiting your math.
No ads to distract, no interruptions to sign up for the newsletter, just good old-fashioned, blast it out loud audio math.
That’s right – this ain’t your grandpa’s math. But actually, go ahead and turn up your speakers and let Grandpa learn something too.
Here is how you get it done:
First, click the big PLUS sign in the upper left-hand corner.
Adding content to your graph.
Choose “f(x) expression”.
Next, enter your expression via the keyboard or through the onscreen entry tool-pane.
When you have finished creating/editing your expression, press ENTER.
If your expression is a valid function, it will be added to the graph.
AUDIO Graphing
Here is how to play your math out loud:
With your expressions selected, press ALT + T to engage the audio graphing tool.
Press H to hear the entire expression.
Use TAB to navigate through significant points like intersections with other functions or axis markers.
Use the ARROW KEYS to navigate along the graph in either direction.
Share Your Math with the World
To show your work outside of Desmos, click on the “Share Graph” icon in the upper right-hand corner.
The Share Graph icon.
You can download a picture, send someone a link, or embed the code within an HTML page.
Exporting a graph as an image.
Following is the same information via an HTML embed code:
Using Desmos as a Student
Before unleashing your audio graphs on your students, you should introduce your students to the concepts of using audio graphs and the different keyboard commands for interacting with the audio graphing calculator.
Desmos provides a thorough overview of how they support accessibility, including technical information and instructions for using their product with different screen readers and assistive technologies, across different operating systems and devices.
In addition to being keyboard accessible, Desmos also provides a “Projector Mode” that makes the lines fatter and easier to see when displayed through a projector. Projector Mode also helps when a graph is being viewed on a mobile device outside, or when being viewed by someone with a visual impairment.
Desmos Unlocks the Potential of Math for Everyone
Desmos products are used by millions of students around the world, and they are unlocking the ability to find solutions to universal questions and problems while helping every student realize their individual potential, understanding, and mastery of math.
As if they weren’t already the coolest math company in the world, or maybe because they are, Desmos is sponsoring a Global Math Art contest. Please check it out, and enjoy the amazing visual and audio prize winning content – all created with pure math.
Visit the Global Math Art Contest page and see all the winners across different age categories, and share with anyone who ever tells you math is boring.
There are many tools related to captioning digital media, and Amara is an amazing example of captioning technology that inspires and supports a passionate community of inclusive media enthusiasts.
What is Amara?
Amara is both a captioning tool and a captioning service, and before we go any further, let me just say I am not getting paid or compensated in any way for this post.
Amara enables you to caption web-based video, which makes Amara the solution when you are wanting to use someone else’s uncaptioned video in your class. With Amara, you can caption web-based video for the good of the entire Internet community.
Speaking of community, if you’re lucky, that community might help you caption the videos you want to use – for free!
Amara as a Captioning Tool
Amara.org is the website where you can create captions/subtitles for web-based video, for free. Using their award-winning captioning tools, you can caption the video completely within your browser. No installation required.
When you are finished, your captioning work will become part of the ever-growing library of captioned media hosted by Amara.org.
You’re literally making the Internet more accessible when you do this.
If you’re fortunate enough to work for a company that pays for Amara’s premium tools, then you get the benefit of collaboration tools and enhanced support as well. I hear it’s pretty nice…
Amara as Captioning Service
Of course, my first rule for captioning is “If you can pay someone else to do it, then pay someone else to do it!” – Amara is also happy to help you with your captioning needs, for a fee.
Captioned Video Repository
Amara has been used by a lot of people to caption a lot of videos, meaning there are a lot of captioned videos available through Amara.org.
It is worth searching on some keywords related to your subject matter to see if some other educator might have captioned an excellent instructional video that might benefit your students – and save you some time in the process!
Volunteering – Captioning as a Public Service
Do you believe in community service? Captioning videos through Amara certainly counts as a community service, albeit for our global community of people who are deaf or hard of hearing.
At Amara, the community works on videos that need to be captioned for other people too. If you need videos captioned for your class, and you are willing to wait for the volunteers to get to your request, then you can add the video to a list of videos that volunteers will caption – eventually.
A huge number of educators make use of Amara.org, so you will also be supporting your own community of educators when you use Amara.org, whether you do the captioning or you ask volunteers to do it for you.
Extra Credit, Anyone?
Do you have the kind of class where you can award extra credit for public service? Amara.org is a great vehicle for tapping into students’ desire to help others and improve their own grade at the same time.
Even if you don’t have enough videos to keep your students busy, they can volunteer to caption other people’s videos through Amara.org.
Award-Winning Technology
Amara.org provides some of the most intuitive and easy to use captioning tools available. You will see why they have won so many awards around the world for their design and capability.
Using only three keystrokes, you can caption your web-based video with no hassle.
Amara Workflow
Before we begin, remember that your video must be live and available on the Internet to use Amara.org to caption it.
To begin the process, click on the “Amara Public Workspace” tab at the top of the screen, and click the “Add Video” button when it appears.
Click Add videos button to begin…
You will be prompted to enter the video URL, and specify the language of the video.
You will also need to specify your own language for your user profile within Amara. Amara allows you to specify 6 languages of proficiency, if you are so talented.
With your profile language(s) specified, you will be able to click the “Add/Edit Subtitles” button.
Click the Add/Edit subtitles button to begin the captioning workflow.
There are three basic steps to captioning a video with Amara:
Transcribe the dialogue and auditory information.
Synchronize the presentation of the captions with the sonic presentation.
Review the final product.
The Amara captioning workflow is really that easy.
That’s it!
Amara will make sure you have all the help and support you need along the way.
Amara support overlay explaining the interface for a first-time user.
Work through the video, using TAB to play/stop the video, and the UP and DOWN arrows to indicate the Start and Stop times for each line of captioning.
The final step.
When you finish the captioning process, Amara.org will include the captioned video as part of the public repository, and you can link to it or embed it in a page within your LMS.
Mission complete!
For Longer Jobs
If you are working on a long video, or if you get interrupted, there is a “Save Draft” button that will maintain your progress for when you are able to login again and resume your editing.
This video has incomplete subtitles.
You can come back at any time and finish your video captioning.
Now you know about the world’s largest community of caption/subtitle enthusiasts, and another option for dealing with inaccessible videos you find on the Internet.
If you just jumped in, we’ve been covering a workflow for captioning digital video.
We’ve talked about the formatting and stylistic concerns for caption files, as well as transcribing and assigning time codes for each line of captioning in a caption file.
Today I will tell you about a solution for viewing the captions and the video together in a single file.
Softsubs
The technology behind our solution is called Softsubbing. Like Closed Captions, Softsubs provide a way to turn the subtitles (captions) on or off.
The only problem is that there are many different video players out there, and they don’t all support softsubs.
Fortunately, this isn’t much of a problem, because we can refer students to a free video player that supports softsubs on Windows and Android operating systems. Any students using Mac or iOs devices can use the Quicktime player to watch the softsubs.
A Simple Solution for Students
With the following workflow, you will be able to add your caption file to your video file.
This means that instead of having your student sort and match the appropriate two files into their video player, you can just send them the video file and the captions are automatically packed inside.
Handbrake
The Handbrake Logo
Handbrake is a free program (with a tasty looking logo) for converting video from a wide range of formats to modern widely supported formats. It also happens to be an excellent and easy to use tool for adding captions and subtitles to videos as softsubs. You can learn more at the Handbrake website (https://handbrake.fr/).
Handbrake is available for Windows, Mac, and Linux operating systems.
Handbrake is very easy to use, with just a few steps you will have a self-contained captioned video file.
Load the Video
The starting screen for Handbrake.
To begin, select the video you want to add captions to.
You can either browse to a file on your local machine (option 1), or you can drag and drop a video file into the designated area (option 2).
Select a Preset
With the video selected, choose a Preset from the Preset Panel.
Handbrake Preset Panel.
You will see there are many presets available. Fast 1080 p30 is the recommended Preset setting for most videos.
Saving the Finished Video
Select your final destination for the completed video at the bottom of the Handbrake window.
Now that the video is loaded and the preset is selected, specify a destination on your hard drive for the finished video.
Add the Captions/Subtitles
Click on the Subtitles tab to reveal the subtitle settings to configure the settings for your captions.
Subtitles tab in Handbrake.
Handbrake is often used to process multiple subtitle tracks per video, and as part of an automated workflow. Because of this, it starts with a default subtitle track. We don’t need the default subtitle track, so you can go ahead and delete it.
Delete the subtitle track with the little gray X at the right end of the track.
Click the “Import Subtitle” to select your caption file.
Import Subtitle button.
Verify your language and character coding are correct.
If you need to make hardsubs (or Open Captions), click the BURN IN option for Open Captions that are always on.
For Softsubs (or Closed Captions) leave the BURN IN option UNCHECKED. Your video will have Softsubs (Closed Captions) that the student can turn on or off.
Encode the Video
With the subtitle settings configured, you are ready to finish the video.
Click “Start Encode” and Handbrake begins processing your video.
Start Encode button.
Processing speed will vary based on the strength of your computer and the length of your video.
Watching the Softsubs
VLC media player, free and open source.
The VLC player is a free video player your students can use to watch your finished captions when the video is finished.
Now you have a complete solution for creating and distributing your own captioned video, using free and open source solutions, including a free and open source video player for students that supports a wide range of formats and media, such as DVD’s, audio CD’s, VCD’s, and various streaming protocols.
Aegisub Advanced Subtitle Editor is an open source tool for editing and creating digital subtitle/caption files. Providing support for editing, styling, and positioning subtitles, Aegisub supports many different subtitle file formats.
Aegisub provides an interesting way to assign the start and stop times of subtitles, with an audio waveform display that makes it easy to visually find the points in the timeline where sonic information is happening. This allows you to click in directly where the audio is happening instead of listening in real time.
There are Aegisub versions for both Windows and MacOS, with different versions written in 27 different languages.
Aegisub can produce subtitles in most languages in use today, across a range of character encoding that enables Asian and Cyrillic fonts as well as traditional western fonts.
In addition to being used by professional media production companies, Aegisub also has a huge user base in the fansubbing community, where it is used to create unofficial subtitles for videos.
Aegisub also features styles for creating karaoke videos.
It is recommended to use the 32 bit version, as the 64-bit version is slower and does not provide the same range of supported technologies as the 32 bit version.
Using Aegisub to Create Captions
Aegisub is a powerful tool that allows for advanced workflows that include automation and sophisticated styling.
Fortunately, it is also easy enough to use that hobbyists and educators alike can use it for simple subtitling.
Start Aegis
After you’ve downloaded and installed Aegisub, start the Aegisub application.
The Aegisub application will open.
Aegisub Application.
Open Subtitles
To begin, we will open your subtitle file.
Go to the File menu and select “Open Subtitles”You can also use Aegisub to transcribe your video, if you prefer (choose “New Subtitles” if you are going to transcribe your video in Aegisub.
Aegisub will open subtitles in the following formats:
.txt
.srt
.sub
.mkv
.mka
.mks
.ass
.ssa
Choose your Text import options, and click OK.
Leave unchanged and click OK for simple productions.
Your subtitles will be loaded into the text grid.
Aegisub text grid.
Open Video/Audio
Go to the Video or Audio window and choose the option you prefer for determining the timing for each line of captions.
In either case you will notice the wave form editor will display the audio information on a timeline.
Aegisub with subtitles and video file loaded.
Audio Display
Go to the Audio menu and select “Waveform display” if it is not already selected. This makes the audio information more distinct and easy to identify the start and stop points.
Aegisub audio display.
There are fader controls at the right of the audio display to control the horizontal and vertical zoom of the audio display.
Adjust the display so you can easily see when audio is beginning and ending.
Font Styling
Within the Line Editor window, you can format the font face and size, as well as the colors for outline, fill, and shadow (if you’re making karaoke, you can also format the karaoke timing colors).
Aegisub line editor.
It is recommended you do not use smaller than 20 pt fonts. Depending on the format of your video, you may want to use larger font sizes.
For best results, it is recommended you test the playback of your subtitles and be sure you are able to easily read them.
From within the Line Editing window, you can also format subtitles from multiple speakers, as well as create comments.
Edit Text to Size
Edit your text to make sure none of the lines are excessively long.
Aegisub provides a wide range of keyboard commands for editing text, splitting, and adding lines.
Aegisub will highlight in pink the field next to the Effect pull-down menu when a line of captions has too many characters.
Associate Timing
You need to assign a presentation time for each line of subtitles that defines a starting and ending time.
In the text grid, select the line of subtitles you want to assign a start and stop time for.
In the audio window, left-click where the subtitle begins, and right-click where the subtitle ends.
Editing subtitle presentation timing with the audio display.
Aegisub will place a red line at the starting point in the audio window, and a blue line at the end time.
Press “R” to play the currently selected range of audio to make sure you are capturing the correct portion of the audio waveform.
When you are satisfied with the timing, press ENTER and Aegisub will commit the time values and move to the next line in the text grid.
Proceed through the audio/video and text grid until each line of subtitles has a presentation time assigned.
Save or Export
When you have finished formatting and timing the subtitles, you can use Aegisub to preview your work and make sure the subtitles are properly synchronized with the spoken audio.
When you are satisfied, you can save the subtitles as an Advanced Alpha Substation (.ass) file, or else you can choose the Export option from the File menu to generate an .stl, .sub, .ssa, .ttxt, .txt, encore .txt, and .translation.txt.
Additional Resources
Aegisub is supported by an in-depth online manual that includes tutorials for getting started and delving into the advanced uses if you choose to go there.
As the largest video repository on Earth, it is somewhat surprising for videos to NOT show up on YouTube. It is a pretty safe bet that everyone knows about YouTube, and in fact, you probably already have an account.
However, if you’ve never uploaded a video to YouTube, you might be surprised at the tools available for enhancing your videos. Among these tools is a robust set of captioning tools.
Auto-Captions
Many people have encountered the auto-captions from YouTube.
A nifty novelty for most, a comic example of how AI and speech recognition can go wrong much of the time, the auto-captions of YouTube are certainly not a reliable solution for a student who is deaf or hard of hearing. The accuracy of the captions is too often too far off the mark to trust as sufficient means for a student who is deaf to understand what is being communicated.
However, YouTube makes it possible to edit the auto-captions it creates. Using the YouTube Subtitle tools, you can correct mis-recognized words, add punctuation and capitalization, and adjust timing and presentation for the captions.
YouTube Workflow for Captioning
YouTube provides a variety of options for adding captions to your videos:
You can upload a caption file if you have one.
You can manually transcribe and then auto-sync captions for your video.
You can wait for YouTube to process your video and generate auto-captions.
Once you have caption files within YouTube, you can also download the caption file and edit or use it with your local video or captioning software.
YouTube Studio
YouTube provides a set of tools for managing and editing the videos you upload to the YouTube service. It is called the “YouTube Studio”
Upload Video
The first step in captioning a video on YouTube is to upload a video.
You can find the upload option in the upper right-hand corner of the screen:
Uploading video to YouTube.
Click on the camera icon with a white “plus” sign in the middle.
When the menu opens, select the option “Upload Video”.
Captioning Tools – Subtitles
When you have a video loaded into YouTube, you can select it from the “Videos” section of the YouTube Studio.
With the video selected, choose the “Subtitles” option from the left-hand menu.
Subtitles option from YouTube Studio menu.
The Subtitles screen will open, allowing you to manage the subtitles for your video.
If your video has been uploaded for at least an hour, it will likely have auto-captions generated, though the time required for generating auto-captions depends on the length and complexity of spoken dialog in your video, and how finicky the AI is behaving that day.
If you click the “Add” button, you will be presented with a menu of three choices for how you can add a subtitle track: “Upload a file”, “Transcribe and auto-sync”, and “Create new subtitles or CC”.
Subtitling methods available in YouTube.
Click on the menu for a subtitle to get a menu of options for editing that subtitle.
Individual subtitle editing options.
Clicking “Edit on Classic Studio” will open your video in caption editing mode, allowing you to adjust the captions and the timing of their presentation on screen.
Classic Editor in YouTube.
Formatting Captions
There are a variety of considerations to keep in mind when formatting your captions. Refer to the Captioning Key for the complete set of formatting rules. Here are just a few you should know about and adopt into your workflow:
Fonts, Line Length, Presentation Rate, and Line Breaks
Traditional captions are formatted as white, mixed case fonts at approximately 32 characters per line.
Display each line of captions for at least 1.5 seconds, but no longer than 6 seconds.
Never break a line of captions between a modifier and the word it modifies, in a prepositional phrase, after a conjunction, or separating an auxiliary verb from the word it modifies.
Viewing Captions
With YouTube and any other video player, the ability to playback the captions you create is an important consideration.
CC and Gear icons from YouTube Player.
YouTube provides great support for captions. You can turn the captions on or off by clicking on the CC at the bottom of the Video Player. You can configure the captions and choose from different caption tracks (if available), by clicking on the gear icon next to the CC in the YouTube video player.
Downloading Captions
You can also download the caption files from YouTube as .vtt, .srt, or.sbv files to use with your local video player and/or editor.
This allows you to utilize the auto-caption function of YouTube to generate the beginnings of a text transcript/caption file. This can be a useful option when you need to distribute a video within your LMS.
YouTube Supports Captioning
Now you know YouTube offers a great captioning tool, especially at the price.
You can use the YouTube captioning tools to add or clean up the captions for your videos hosted on YouTube, or as an element of your workflow for generating captions for use in your school’s LMS.