Checking Other People’s Accessibility

Woman in white lab coat points at a screen of test results as a crowd of people watch approvingly.
Photo by National Cancer Institute on Unsplash

It is hard to imagine an online course without any links to other sources of content on the Internet.

Talk about a wasted opportunity – to have the whole world wide web at your disposal as an instructional resource, and to not tap into that power?

Again, hard to imagine.

What We Know Now

We’ve covered the basic aspects of web accessibility this month, and if you’ve followed along, you should have a pretty good grasp on what it is we should be hoping to find in any accessible web content:

  • Headings with logical structure
  • Resizable text
  • Alternate text descriptions for imaged
  • Text transcripts for audio files
  • Captioned video in accessible video players
  • Color Contrast that ensures easy readability
  • Forms with labels and keyboard control
  • Page title and language – meta information matters
  • Visual focus and keyboard access
  • Strobing animations and blinking text

These are all simple aspects of web design that carry a significant impact on the accessibility of the content. There is more to consider before a web page can be considered completely accessible, but satisfying these criteria puts the web content into pretty good standing for being usable if not completely technically accessible.

So let’s look at some of the considerations for checking other people’s web content for accessibility.

We will be making good use of the WAVE tool for today’s activity.

The WAVE accessibility evaluation tool.
The WAVE accessibility evaluation tool is available at wave. webaim.org

Headings with Logical Structure

Of course we want to have headings in the web pages, but that is not enough. We also want those headings to be used properly in terms of their structure.

One of the quickest ways to evaluate the structure of headings in a web page is to run the page through the WAVE accessibility evaluation tool from WebAIM.

Paste the URL of the webpage you want to include in your course into the Web page address field and press ENTER.

When the WAVE report loads, click on the Structure tab to review the heading structure.

The report will provide an outline comprised of the headings.

If the results don’t look like a proper outline, you know there is a problem with the content.

Resizable Text

person holding a magnifying glass up to their eyes, which are covered with blue sunglasses.
Photo by Marten Newhall on Unsplash

Another issue that is commonly found in problematic content is that of text that does not gracefully change size.

When people with visual disabilities enlarge the web content to make it easier to see, poorly formatted text will present problems. Sometimes parts of sentences become invisible, or text will wrap on top of other text, or text can grow beyond the size of the layout and disappear.

There are two primary ways to enlarge web page content.

Page magnification enlarges everything, including images and layout elements like space between lines and paragraphs.

Text enlargement only increases the size of the text. It is with text enlargement where you tend to find the most egregious problems.

The specific instructions for text and page zoom vary from browser to browser. Consult your browser help section for guidance in adjusting your settings.

Alternate Text Descriptions for Images

There are two aspects to checking for alternate text descriptions for images.

First is the simple verification that there is any kind of alternate text present in the “alt” tag for the image.

Second is to make sure that if there is a description provided, that it is appropriate and effectively describes the image.

To check a webpage for alternate text descriptions, copy and paste the page URL into the WAVE accessibility checker.

Use the icons generated by the WAVE report to assess the status of the document’s alt text descriptions.

If there are images with missing alt text, WAVE will indicate this with a big red Alt icon, bearing a white stripe down at a diagonal.

If there are images with alt text present, WAVE identifies them with a big green Alt icon, with the word “Alt” written in white. For these results, check the description and make sure that it is accurate and effectively describes the image it refers to.

Visual Focus and Keyboard Access

Gray keyboard with red CONTROL key, Green ALT key, and blue COMMAND key.
Photo by scottishstoater on Unsplash

When you review third-party content to include in your course, always check for the visual focus indicator and do a keyboard check of the basic accessibility of the interactive elements of the page.

TAB between different interactive elements.

Use the ARROW KEYS to explore different options for menus and forms.

SPACEBAR will engage with most form fields that can be checked or activated, and allow you to select an option.

ENTER will activate the interactive element under your focus.

ESCAPE will cancel form entry for the currently focused form field.

Text Transcripts for Audio Files

If you find any audio files included in the content, check for the presence of a text transcript.

Depending on the audio file format, a transcript could be provided through an associated text file, or embedded into the Lyrics meta-information field.

At a minimum the audio should be accurately represented by the text file.

It is not required for accessibility, but usability is greatly enhanced when the transcript is provided as interactive timed text.

Captioned Video in Accessible Video Players

With digital video, you need to have proper captions that effectively describe the audio content via text.

Play any videos contained within the page and ,make sure there are captions available, and that they are actually representing the audio information accurately.

It is optimal for the captions to be capable of being toggled on or off, but it is acceptable to have captions that are always displayed.

In addition to the presence of captions, ensure that the video is presented through an accessible video player that is keyboard controllable.

Color Contrast for Easy Readability

Color contrast is one of those issues that can have a surprisingly large impact on a lot of different visual disabilities.

The WAVE tool provides a wonderful contrast check as part of it’s accessibility assessment.

Enter the page URL into the WAVE tool and click the Contrast tab to evaluate the color contrast ratio.

WAVE tool showing contrast results.

Forms with Labels and Keyboard Control

Form fields are interactive elements, and as such they must be operable via the keyboard.

Using the TAB key, you should be able to navigate to any form elements contained in the page.

Using the ARROW Keys, SPACEBAR, ENTER, and ESCAPE, you should be able to verify that the forms are in fact keyboard controllable.

In addition to being keyboard controllable, each form field needs to have a text label that describes the form field.

Sometimes it is possible to have a visual label appear next to a form without actually being associated with the form field. This is an accessibility problem, as someone without sight could end up not knowing what kind of data the form is expecting in that field.

Use the WAVE tool to reveal any forms that are missing labels.

Page Title and Language – Meta Information Matters

One of the invisible aspects of a web page that you need to verify is the presence of a page title and a declared language.

Once again, the WAVE tool makes it easy to find out if either of these elements is missing.

WAVE tool showing a page with missing title.

Look for a big red square with a white T in it for a missing page Title.

Missing Language will be indicated with a big red square containing a white globe icon.

WAVE tool showing a missing language error explanation.

Strobing Animations and Blinking Text

There is an unfortunate response to certain frequencies of animation that can cause seizures and narcoleptic reactions. It is important that you do not include any content that has blinking text, flashing text, or animations that create any kind of repetitive or strobe-like effects.

By ensuring the above accessibility concerns are addressed in the third party content you include as part of your online course, you help ensure that your students with disabilities are able to complete the assignments and gain the same educational opportunities as their non-disabled peers.

Thanks for reading!

Dynamic Content and Accessible Interaction

hands on a keyboard with a mouse, yellow watch, and cellphone on the periphery.
Photo by Damian Zaleski on Unsplash

Dynamic content is content that can change based on the interaction of the user. The difference between information that is simply read, and the content that is “clickable” comes down to a small group of interactive controls.

Interactive digital content is what makes the Internet the most amazing thing to ever happen to human beings since the opposable thumb – it enables a new potential for communication and connectivity between humans that is inspiring and life altering. Interactive content on the Internet is facilitating social and political revolutions around the world.

Now the revolution will not only be televised, it will be accessible to people with disabilities…

By allowing people to interact with each other through remote technology, the Internet has broadened the potential of humanity. The Internet helps people to embrace and celebrate knowledge of each other. Interactive media enables people to participate more fully in all the different aspects of modern life.

When created properly, this is especially true for people with disabilities.

Amazing.

Here is one big takeaway: when you create opportunities for your audience to interact with you or your content, follow the standards for accessibility to ensure that your interactive content lives up to its potential and is not missed by those with differing abilities.

Another big takeaway: when you select digital content to use as instructional materials, you can use the keyboard commands at the bottom of this post to evaluate the accessibility of the interactive content.

Standard Interactive Elements

Despite all the different websites and applications in existence, there are just a small number of interactive elements that make them possible.

Following is a list of common interactive elements found in digital media:

  • Auto-complete
  • Button
  • Checkbox
  • Dialog
  • Link
  • Menu – Complex
  • Menu – Simple
  • Menu -Tree
  • Radio Button
  • Select Menu (Drop Down Menu)
  • Slider
  • Tab Menu

Interactive Elements across the Internet

The interactive elements listed above are like building blocks for digital designers who create content and applications. These elements are expected to function the same way in MS Word, PDF, HTML, and your LMS, just to name a few examples.

Designers who create interactive elements that resemble the above elements in appearance but do not include the keyboard controllability described below are not accessible.

Keyboard Interaction

The process for interacting with each of the different elements via the keyboard should be the same across browsers and applications.

You can navigate to and among interactive elements by using the TAB key, or SHIFT + TAB.

When you are selecting interactive content to use as instructional materials, ensure the different interactive elements can be controlled via the following keyboard commands:

Interactive ElementKeyboard Control
Auto-completeStart typing to initiate the auto-complete suggestions.Use the ARROW Keys to navigate among the different options.Use ENTER to select an option.
ButtonENTER or SPACEBAR will both activate buttons.
CheckboxSPACEBAR will toggle a checkbox between checked or not checked.
DialogESCAPE will close dialogs.Modal dialogs need to retain keyboard focus and return focus to the element in the document that initiated the dialog when closed.Non-modal dialogs should close automatically when they lose focus.
LinkENTER will activate a link.
Menu – ComplexUP and DOWN ARROWS move between menu options.ENTER can expand a menu to reveal its items.ENTER will select a menu item that is not expandable.LEFT and RIGHT ARROWS will expand or collapse menus.
Menu – SimpleTAB will navigate between menu items.ENTER will select a menu item.
Menu -TreeUP and DOWN ARROW keys navigate between options.LEFT and RIGHT ARROW keys expand or collapse submenus/move up or down a level in the hierarchy.
Radio ButtonARROW KEYS move between options.SPACEBAR selects/toggles options.
Select Menu (Drop Down Menu)UP and DOWN ARROW to navigate between options.SPACEBAR expands menu.ENTER selects an option.
SliderARROW KEYS increase or decrease the value.HOME or END take you to the beginning or ending value for the slider.
Tab MenuTAB to enter the menu. ARROW KEYS navigate between the different tabs.
The keyboard commands to interact with data.

Limited Keys Bring Great Potential

The entirety of the Internet should be available via just a handful of keys.

Using just TAB, SHIFT, SPACEBAR, ENTER, ESCAPE, and the ARROW KEYS will allow you to interact with most accessible content.

Now you know how to test interactive content for keyboard access, and you can more effectively select appropriate content to include as part of your instructional materials.

Thanks for reading!

Captioning Styles and Files

Young man and woman editing film with razor blades and tape.
Photo by Austrian National Library on Unsplash

Captioning digital video is a straight-forward, if slightly focused process:

  1. Transcribe the dialog and relevant sound effects, music, and any other significant audio information,
  2. Format the captions into individual lines of captions that will fit onto the screen in a readable format,
  3. Apply specific formatting to the captions to reflect specific information and distinguish between dialog and other sonic information,
  4. Determine the timing for presentation of each line of captions,
  5. Adjust the positioning of each line of captions,
  6. Saving the caption file,
  7. Associating the caption file with the digital video file for playback.

Captioning takes time, just because of the nature of the activities involved. Once you have completed the above steps, you will most likely have watched the video at least three or four times. There is a lot of focused viewing and reviewing of the digital media as you create and edit the digital captions.

Fortunately, there are freely available resources to help explain and accomplish the task of captioning your instructional video, provided by the fine folks at the Described and Captioned Media Program (DCMP).

Described and Captioned Media Program (DCMP) Keys to Access

The DCMP is funded by the US Department of Education and administered by the National Association of the Deaf. The DCMP provides various services to assist students who are blind or visually impaired, and/or deaf or hard of hearing.

The DCMP is the authoritative source for all things related to captioning and describing media. The DCMP hosts a robust Learning Center that covers everything from explanations of how to caption and describe digital media, the laws and regulations surrounding captions and accessibility, as well as coverage of assistive technologies used by individuals with disabilities.

Two resources that are especially useful for captioning are the “Caption Key”( https://dcmp.org/learn/captioningkey) and the “Description Key” (https://dcmp.org/learn/descriptionkey)

Captioned and Described Video Relief for COVID-19

During the COVID-19 Pandemic, the DCMP is providing free memberships to teachers or families who have at least one student with a disability. This means free access to over 8,000 captioned and described high-quality instructional resources. More information about the program and resources can be obtained at the DCMP website (https://dcmp.org/).

Even if you don’t have a membership, the DCMP also provides many accessible videos that can be viewed by anyone.

Captioning Key: Basic Captioning Conventions for Instructional Video

The Captioning Key provides the style and formatting guidelines for captioning instructional videos.

The Captioning Key is a robust resource that covers the range of questions and concerns about captioning, including how to deal with language mechanics, presentation rate, identifying multiple speakers, sound effects and music, as well as resources for dealing with YouTube, captioning vendors, and different tools for creating your own captions.

The Captioning Key is free to use, and download. The DCMP also provides a printable version, for those of us who prefer a physical user manual.

The Description Key: Basic Guidelines and Resources for Describing Media

Just as the Captioning Key provides guidelines and information for captioning digital media, so too does the Description Key provide guidelines and information for describing digital media for individuals who are blind or visually impaired.

Describing media is a challenging task, requiring technical skills, recording and editing software and hardware, as well as a talent for voice acting and narration.

Happily, many faculty possess the equipment and software to record and edit narrative descriptions. Now with the Description Key, answers about what and how to describe are answered, as well as basic workflows, recommendations for technology, software, and equipment as well as best practices for getting a good quality recording.

Applying the Captioning Key and Description Key

In the coming days I will cover some captioning workflows and demonstrate some of the resources and guidance from the Captioning Key.

You will be able to provide completely accessible captioned and described media for your online courses, and increase the engagement and instructional capability of your online course.

Thanks for reading!

Video Accessibility

Instructional Capabilities of Video

As a digital medium, video combines the power of visual and auditory information in a way that can provide a deeply engaging and provocative experience for the viewer.

Video can be especially powerful as an instructional material as the synchronicity of auditory and visual information creates a stronger cognitive impact for the viewer, resulting in an ease and immediacy of understanding for many viewers.

The ability to structure layers of information lends itself to portraying complex information that can be comprehended in a more time-efficient way. Adding the elements of dramatic context and storytelling allows for the communication of attitude and emotions in a particularly powerful way.

The point for instructional video accessibility is to determine if any of these information channels carry significant instructional content.

In other words, “Will this be on the test?”

If so, it needs to be communicated explicitly across the auditory and visual channels.

Video is Complex

As a medium, digital video covers a lot of categories of communication. Most obviously, video can provide a visual demonstration of procedures, as well as principles and concepts spelled out in text and illustrated in motion. Audio information can supplement and reinforce the visual information, as well as provide additional information beyond what is being displayed. The subtle integration of visual information in background elements and scenery can also reinforce and supplement information while post-production graphic overlays, closed captioning, and narrative description also provide additional channels for communication.

Basic Production Concerns

The quality of video and audio production is an accessibility concern. Audible and visual static, noise, insufficient volume, or weak lighting can all exacerbate problems of perception for people with visual or auditory disabilities.

Access Strategies

The access strategies for video are easy to state, but can be rather varied in their application.

In a nutshell, to make a video accessible requires captions and narrative descriptions. Essentially, the spectrum of information for the visual sense is portrayed through audio narrative description and the spectrum of information for the auditory sense is portrayed through captions.

Caption Complications

Not all digital video formats are capable of supporting caption files, sometimes the captions need to be included as separate files that the video player combines in the final playback.

Closed vs Open Captions

Most people are aware of Closed Captions, but have you ever heard of Open Captions?

Open Captions are a thing. The difference between Open Captions and Closed Captions is that Closed Captions can be turned on or off, while Open Captions are always visible on the screen.

There is such variety in video playback options that some people use Open Captions to avoid any problem with a student not being able to turn captions on if they need them.

As technology continues to improve, using Closed Captions is the preferred solution. If possible, ensure your institution utilizes an accessible video player within your LMS so your students have an accessible option that supports closed captions.

Emerging Narrative Descriptions

Like captions, narrative description is not always supported with the native video file. It is a relatively new advent for most people as a form of accommodation, and is still relatively uncommon for a lot of small production studios.

In many cases, adding narrative descriptions to older videos can be extra problematic in terms of technology and in finding time to squeeze in the descriptions between the spoken dialog.

Like so many accessibility practices, narrative description is more easily handled when it is included in the video planning and production instead of being added as a post-production element.

Text Transcript

While the optimum access strategies for video are captions and narrative descriptions, the value of a text transcript can not be overstated. While a text transcript is not an acceptable substitute for captions, it can be very useful when studying material.

Captions vs. Subtitles

Traditionally there have been different technologies used for displaying captions and subtitles. The digital video revolution also added some variety and chaos to the industry.

There is also a technical distinction between subtitles and captions that makes a significant difference in the effectiveness of the two as an accommodation.

Captions portray all the dialog as well as sound effects, and they are always in the same language as the spoken dialog.

Subtitles only portray the spoken dialog, and they are usually in a foreign language.

This distinction was not always known or respected by the producers of DVD’s and Video, and sometimes the terms are used interchangeably. Sometimes you will find “Subtitles for the Deaf and Hard of Hearing” which are effectively captions.

Playback Support

There is still an issue for accessible video after the creation of captions and narrative descriptions, in the need for an accessible video player.

Not all video players support captioning or narrative description, making it impossible to turn the captions or description on.

In addition to limited support for captions and narrative descriptions, many video players are not keyboard accessible either.

Happily, there are a growing number of options for playing back accessible video with captions and narrative descriptions.

Two of my favorite options for playing accessible video:

Able Player – completely accessible and free HTML5 player.

Oz Player – completely accessible HTML5 video player.

Getting Accessible Video

Not surprisingly, it is possible to pay a vendor to provide captions and narrative descriptions for your instructional videos. If you have the means, I highly recommend it.

The time and effort that goes into creating captions and narrative descriptions can be surprisingly intensive. However, if you have the desire and the time, there are free tools available to do it yourself.

YouTube and Vimeo

When using other people’s video from the Internet, the same rules apply, plus copyright law. Using videos from YouTube and Vimeo still need to have captions and narrative descriptions. The auto-captions of YouTube are not done to a level of acceptable quality for a legal accommodation, but they can be edited and improved on.

I’ll be covering YouTube captioning and additional workflows for creating your own captions over the next couple of days.

Thanks for reading!

Accessible PDF

There are a lot of different PDF’s in the world.

Those of us who were around back when the Internet was invented can tell you horrible tales of how random and unpredictable digital information once was.

The advent of a file format that could provide a consistent layout across different computers, monitors, and printers – that was a huge deal.

illustration of three characters apparently celebrating  the same design appearing on 4 different screens.
PDF brought consistency to the early Internet.

Funny how quickly we can get used to something – but in the case of PDF, it is almost spooky how it gained such overwhelming dominance. There are so many ways to make a PDF that it is impossible to guess what the source might be for any unsolicited PDF file.

The PDF file format is one of the most powerful and popular digital containers around. I have found that the percentage of PDF files in any online course is usually higher than the percentage of HTML files.

Value of the Source Document

Most PDF documents tend to start as another form of information, such as an MS Word file, MS PowerPoint file, MS Excel file, Google Doc, Google Sheet, InDesign, Pages file, Photoshop, Illustrator, Chrome, Firefox, your copy machine in the corner, my flatbed scanner, your cellphone, and somebody probably has a toaster or refrigerator that can make a PDF.

I would not be surprised…

The tricky part is, if you don’t have the accessibility solutions in place within your original content, the PDF you create will also not have any of the access solutions you need.

Worst of all, it can sometimes be very challenging to apply the access strategies in Acrobat – assuming you own it.

Which reminds me, you need to own a Professional version of Acrobat to address the accessibility of your PDF documents. Get your school to buy you a copy if they haven’t already.

While you can create a PDF from pretty much anywhere, you still need to own a full version of Acrobat in order to edit and ensure accessibility is possible. I wish there was some less expensive option, but to the best of my knowledge, Acrobat still wins that category.

Access Strategies in Acrobat

Just like all the other digital formats in the world, our basic challenge is applying the access strategies for different types of digital content:

MEDIA TYPEACCESS STRATEGY
TextStructure (Headings, list styles, paragraph styles, etc.), clarity, legibility, contrast.
ImagesText descriptions and captions
AudioText transcript
VideoCaptioning and narrative description
InteractiveText labels, keyboard control, Section 508 & WCAG
Complex/CombinationAll of the above…
Digital Media Access Strategies

The easiest, most straight-forward and trouble-free approach is to start with a document that has all of the above access strategies in place before it was converted/saved to PDF.

Accessibility Tools

If this is your first time dealing with accessibility in Acrobat, it is most likely the case that your Accessibility Tools are not on deck.

Near the bottom of the toolbar at the right-hand edge of the program window, find and click the “More Tools” button.

More Tools button from Acrobat.

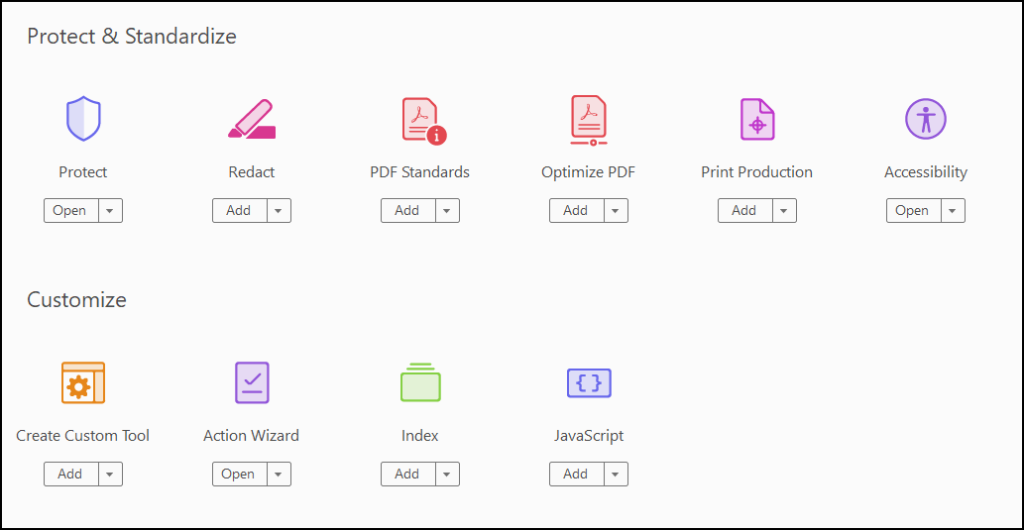
Acrobat will open the Tools inventory.

Acrobat Tools inventory.

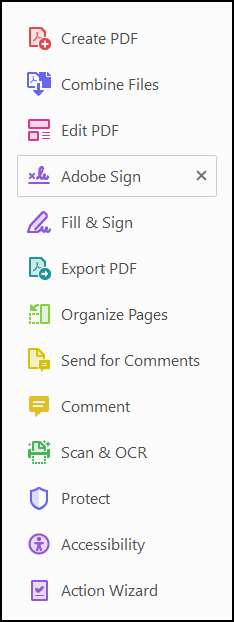
Select Accessibility from the “Protect & Standardize” category and Action Wizard from the “Customize” category near the bottom of the list. You should now have the Accessibility and Action Wizard at the bottom of your toolbar.

Acrobat toolbar with Accessibility and Action Wizard tool options.

Click on the Accessibility Tool and you are ready to begin.

Tags or No Tags?

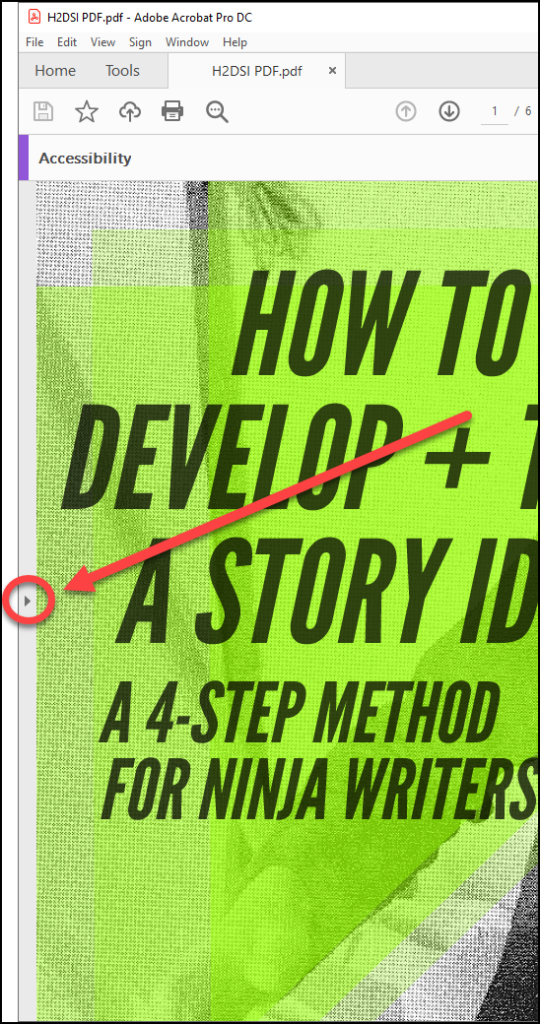
Before you can do anything with your PDF, it needs to be tagged. To view the tags tool, we need to open the Navigation Panel on the left-hand side. Find and click the expander handle to reveal the Navigation Pane.

Navigation Panel Expander Handle,

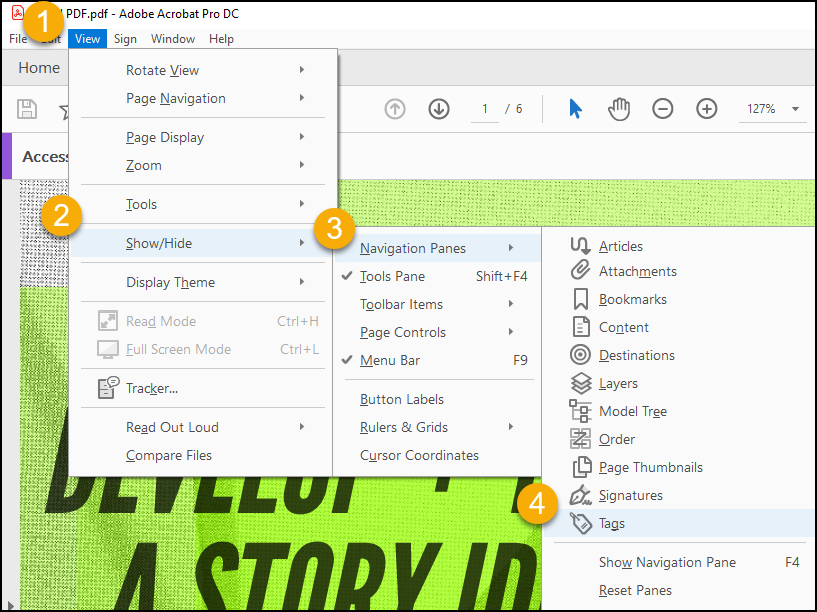
If this is your first time checking accessibility with this document, you will probably need to load the Tags tool into the Navigation Panel. Go to the “View” menu and select “Show/Hide, Navigation Panes, Tags”.

Menu path for adding the Tags tool to the Acrobat Navigation Pane.

Click on the Tags tool to reveal the Tags explorer.

If it says No Tags available, proceed to the next step.

Otherwise, if you’ve got tags, skip ahead to the last step: “ACTION WIZARD: Make Accessible”.

AutoTag Document

If you’re reading this step it is because your source document did not include the advanced formatting to tell Acrobat about your content.

But this is not a big problem!

illustration of woman sitting on orange sofa with laptop in a yellow room.
Acrobat will auto-tag your document if you need it to.

Now we will have Acrobat examine the document and do its best to figure out what kind of data the PDF is comprised of.

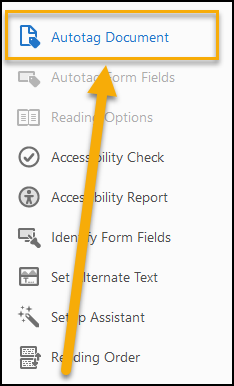
From the “Accessibility” tools on the right-hand side of the program window, select the first option, “Autotag Document”.

Autotag Document option from Accessibility Tools.

Acrobat will process your document and generate an “Add Tags Report” that typically includes any Accessibility concerns it could identify, such as images without Alt Text descriptions, questionable reading order, and various meta-information.

Issues such as discerning a logical reading order still require your attention to determine, as well as determining if alternate text descriptions are descriptive enough.

Now that your PDF is tagged, click the view control to make Acrobat display one page at a time. The Accessibility tools behave themselves better in single page view mode.

You are now ready to begin!

Illustration of man sitting with laptop, ready to get accessible.
Ready to begin!

ACTION WIZARD: Make Accessible

Choose the Action Wizard from the toolbar. An “Actions List” will appear.

The first action in the list is “Make Accessible” – click it and follow the directions to address basic accessibility issues, the sorts of things an automated testing algorithm can deal with.

The last process the Make Accessible routine will do is prepare an Accessibility Check of your document. Examine the parameters it is testing for, and then launch the check.

Once the Accessibility Check is finished it will create an Accessibility Report with any issues affecting the accessibility of the PDF.

You can click through the links for the different issues in the report and get individual instructions for any issues that need to be addressed.

Go ahead and see what you can figure out on your own. Run the test again after you have made the suggested adjustments and make sure you didn’t miss anything.

Save your PDF with a different name if you’re worried about making mistakes.

I’ll be covering the results from an Accessibility Checker scan of a simple document in tomorrow’s post, and show you how to resolve the common issues and how to do the human verification required for others.

Thanks for reading!

The Plain Truth of Accessibility

Magnifying glass lies on pages of opened bible.
Photo by Blake Cheek on Unsplash

Digital text is the foundation of accessible online communications. It is the primary structure of meaning that comprises the message being communicated.

Headings are then added to text, enhancing accessibility through increased usability.

Sure, but what does that MEAN?

To explore what this means, let’s take a trip back in time to when you were a seven year old child. Let’s pretend you’re writing a letter to Santa Claus in an effort to convince him you’ve been good this year.

The fact that you’ve been good and learning about accessibility is the essence of the message. This must get through, above all else.

However, the presentation of the letter matters too. Plain words can’t possibly convey the emotional significance of your message. You enhance your communication with sophisticated layout!

You might use colored markers or pencils – or both!

You could add glue and glitter, construction paper cut-outs, ribbons, stickers, gold stars and lipstick kisses. The creative arsenal of your seven year old self is truly impressive.

Whatever makes you happy – no judgment.

The point is that all manner of adornment could be added to your letter in an effort to make it more appealing, engaging, and ultimately successful at winning over Mr. Claus’ affection.

The one condition being, that at the root of it all is the meaning of your carefully worded message. The underlying meaning is something you want to be as simple, unmistakable, and straight forward as possible.

This way, when Santa runs all his mail through the new Anti-viral Sterilizer 9000 Spam Filter (with optional De-Glittering module), the main message remains intact.

Digital information can be styled to appear in many different ways, and the core of the message can be enhanced with semantic formatting and dynamic presentations, as long as at the root of it all the message is built on plain text.

The Honesty of Plain Text

Sign with the words "you are beautiful"
Photo by Gio Bartlett on Unsplash

If you open your information directly in a plain text application like Notepad on Windows, or TextEdit on MacOS, you see the entirety of the message in simple plain text. This is one of the most complete and unfiltered views of the text you can achieve.

One reason plain text is good for accessibility is because it has the least chance of getting screwed up in translation to other media.

If you take the plain text to a more substantial editing program, you set the stage for complex meaning. As you add styles and formatting to the text, your message begins to gather extra meaning. The words might still be the same, but they pack additional meaning.

Both behind the scenes and on the screen, your information is being loaded with potential to hold formatting information, semantic structure, alternate text descriptions, and interactive capabilities.

Accessibility vs Usability

There is a distinction between accessibility and usability when we consider digital information.

Sometimes a lack of usability is like dealing with a person who only tells you part of the story, withholding significant context and relational information that might affect how you perceive the message.

Some applications fail to support your content formatting, and they present a watered-down version of the data that appears fine visually, but is inaccessible to assistive technology.

Text without style and formatting might be something that you can load into your browser, but it is not always very much fun to try and make sense of.

Different Containers and Capabilities for Accessibility

Pure, yet limited, access is provided through Notepad – just the naked truth of your text. However, this is not a very usable option if you are using assistive technology.

Notepad does not allow for the formatting that makes your message usable. It is very accessible, but it is also very limited.

For usability, there is an important distinction between file format types, and the applications that create or present them. These applications are effectively different containers for your content. For example, there is Microsoft Word the program (CONTAINER), and there is a Microsoft Word File (CONTENT).

Microsoft Word the program has an accessibility capability as a container, allowing the user to effectively use the program with a variety of assistive technologies.

Microsoft Word the file format (.docx) has its own accessibility capability for defining your message – both within Microsoft Word the program, and other programs that are capable of opening a .docx file.

We understand that this .docx file will not have the same functionality if it is opened in a different program than Microsoft Word – but the message is capable of carrying the advanced meaning of its style and formatting. Many programs have the capability to read the content, even if they do not offer the same level of editing support as Microsoft Word.

Accessibility works the same way – not all combinations of file formats and programs provide the user with the tools to interact with the digital data – or in the same way.

The Most Accessible File Format

The question of what is the most accessible file format is answered through a measure of the capability to support access strategies for different types of digital information.

Perhaps not surprisingly, the answer starts simple and gets complicated very fast: HTML.

As a file format, there is very little that you can’t insert into an HTML file. In addition to an incredibly wide-open range of supported content, HTML also provides critical functionality for accessibility and usability.

HTML is also freely available, you can create HTML with the simplest of tools, and it is freely readable by many different browsers and other applications.

HTML is really hard to beat.

Two books next to a potted cactus, book titles: "HTML & CSS" and "Javascript & JQuery"
Photo by Greg Rakozy on Unsplash

And as you might know, it is also really easy to go down a deep rabbit hole with HTML.

I recognize that you are most likely an educator with a full load and you don’t have the time or desire to become an HTML expert. No worries, you don’t have to. You just need to use a modern CMS tool with the proper support – hopefully your institution has taken care of that.

Simple Best Practices for Accessible HTML

When you are creating HTML content, consider the tool you are using, and see if it can support the basic access strategies for digital media:

Access Strategies for Digital Media

Media TypeAccess Strategy
TextStructure (Headings, list styles, paragraph styles), Clarity, Legibility, Contrast
ImagesText descriptions and captions
AudioText Transcript
VideoCaptioning and Narrative Description
InteractiveText Labels, Keyboard Control, Section 508
ComplexAll of the above…
Above: Digital Media Access Strategies

The world is your oyster when it comes to HTML, and the more effort you apply, the bigger your pearl.

Sometimes a powerful tool can help make the impossible manageable, but too often we find that accessibility does not always make it into the awareness of the designers behind some of our favorite tools.

No sour grapes, HTML is wide open with potential.

When you find an inaccessible multi media construct, sometimes you can copy, paste, and redesign the content with the HTML tools of your CMS. This approach allows you to have a more accessible version of the content that lives in the CMS, and doesn’t require licensing fees or force students to buy a content pack.

Your only real limitations will come in the form of your CMS and its ability to support what you’re working with.

Thanks for reading!
Accessible Content Containers

stacks of books piled from floor to ceiling
Photo by Glen Noble on Unsplash

Technology Focus: Content vs Container

When you share online content, your content will be presented through a browser to the end user. The browser can be seen as a container for your content.

There is a different set of keyboard controls and accessibility concerns for the browser, independent from your content, and sometimes the browser and content don’t work well together. Sometimes the browser can cause issues that make your content inaccessible.

You can find another layer of technology between your content and the browser, in the form of your Course Management System (CMS). The menus and structure for the CMS sit within the browser, and together the browser and CMS serve as the container for your content.

When dealing with digital information, you will frequently find your content being contained by another over-arching layer of technology. The issue for accessibility is whether or not these containers intercept or interfere the accessibility of your content.

You can format your content for accessibility, but you can’t reprogram everyone’s browser to make it work better or more accessibly. The best you can do is maximize the accessibility formatting of your content, and maximize the accessibility capability of your container.

Be aware of any issues that arise when your content is viewed through a particular browser – and if that happens, then recommend your students use a different browser.

Sometimes there will be a specific recommended browser and assistive technology combination for a content source to be accessible. This grows increasingly common with specialized forms of digital content such as STEM materials.

It can be challenging to keep up with the pace of modern technology, and sometimes even more difficult waiting for technology to improve. In the meantime, we must try to overcome limitations with our digital containers through clever content design.

CHALLENGE: Check your email using only the keyboard.

Orange @ symbol
Photo by Onlineprinters on Unsplash

A common example that illustrates the content vs container dynamic is email. The email message is the content, and the program you use to read your email is the container. The same content can be presented through a lot of different containers – and it usually works just fine.

If you use webmail, then you have an email program in a browser – or a container in a container.

Each container has its own keyboard commands and accessibility capability.

Try It!

You will have to look for your focus indicator to know what the keyboard is interacting with. The focus indicator should be a solid white outline in Windows. The focus indicator varies in Mac OS, but it is usually an obvious highlight or solid blue.

I have used the Chrome browser for this activity, but feel free to substitute your browser of choice.

Remember that adding SHIFT to TAB will make the sequential navigation go back the other direction.

Checking Gmail

You will need to first enable Keyboard shortcuts from the Gmail Settings menu if you want to use keyboard commands in Gmail.

Here are the complete instructions and keyboard commands for Gmail.

From Windows 10: Start the Chrome Browser

To start the Chrome browser from Windows 10 via keyboard commands:

  1. CTRL + ESCAPE to open the START menu within Windows.
  2. Press TAB twice to get the system focus to the Applications list.
  3. Press G for Google, and then use the DOWN ARROW key to move through the applications that begin with a G until you get to Google Chrome.
  4. When you get to Google Chrome, press ENTER.

From Mac OS: Start the Chrome Browser

To start the Chrome browser from Mac OS via keyboard commands:

  1. OPTION + COMMAND + SPACE to open the Finder window in “Searching This Mac” mode.
  2. Press COMMAND + SHIFT + A to open the Applications directory.
  3. Press G to go to the programs that start with a “G” and use the down arrow to find and select the Google Chrome application.
  4. Press ENTER.

Within Chrome

We begin our user experience within Chrome with the cursor in the address bar. This means we can begin typing right away – type “gmail.com” and hit ENTER.

Within Gmail

Once Gmail has loaded in your browser, you can use the following commands to navigate around the Gmail interface:

  • G + I takes you to the inbox.
  • Use the UP and DOWN ARROW keys to navigate through the inbox.
  • Press ENTER to open a message.

Within a Message

  • Press R to Reply to the message.
  • Press A to Reply All to the message.
  • Press F to forward the message.
  • Press G + I to return to the inbox.

Resources for Independent Remote Learning

Woman works on a laptop with an Android sticker.
Photo by Christina @ wocintechchat.com on Unsplash

In a perfect world, both our students with disabilities and our faculty would be properly supported with the resources they need to excel and thrive.

While our world might still be a work in progress, we are fortunate to be able to support each other as much as possible during these “interesting” times.

For those of you who may be teaching students with disabilities at a distance, I know there is never enough support, and now even less with students away from campus-based support services. I’m writing this post to cover some resources for accessibility that everyone should know about, but many don’t.

Computer OS Assistive Technology Capabilities

There are many different types of disabilities, and we have many corresponding forms of computerized assistive technology to help address the needs of individuals with these different disabilities. As modern computer operating systems have continued to evolve, they also have become more accessible through built-in assistive technology.

Most modern computer operating systems incorporate some level of assistive technology. Both Windows and Mac OS feature a set of assistive technology tools for magnification, screen reading, and speech recognition.

While the built-in assistive technology is rarely equal to dedicated assistive technology applications, it can be useful and sometimes provide adequate access in a pinch.

Here is a very brief look at some of the available assistive technology that your students might benefit from knowing about.

Windows Built-in AT

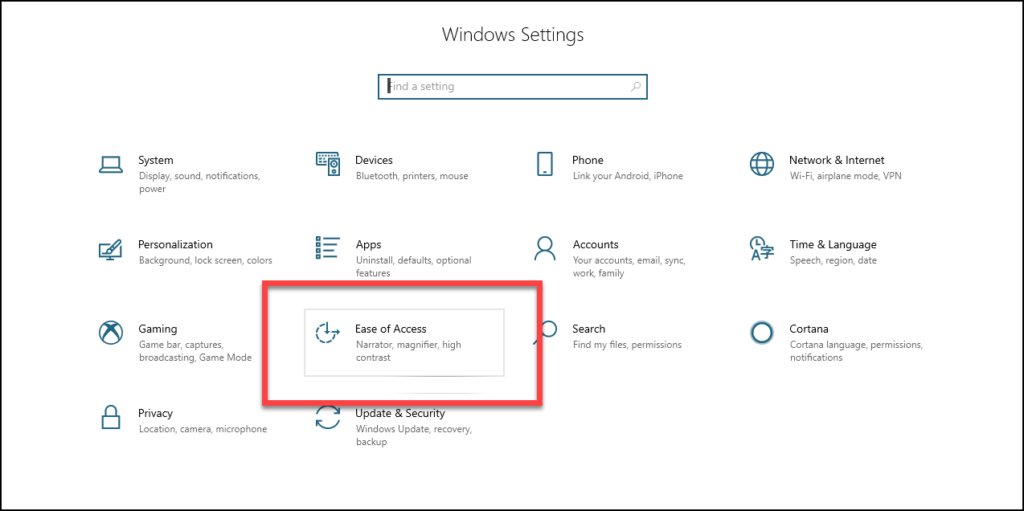
Windows 10 Settings with Ease of Access option highlighted.
Windows 10 Settings and Ease of Access.

Windows 10 provides a variety of options for customizing your computing experience. Visit the “Ease of Access” center from the System Settings to get started.

Assistance for Low Vision and Blindness

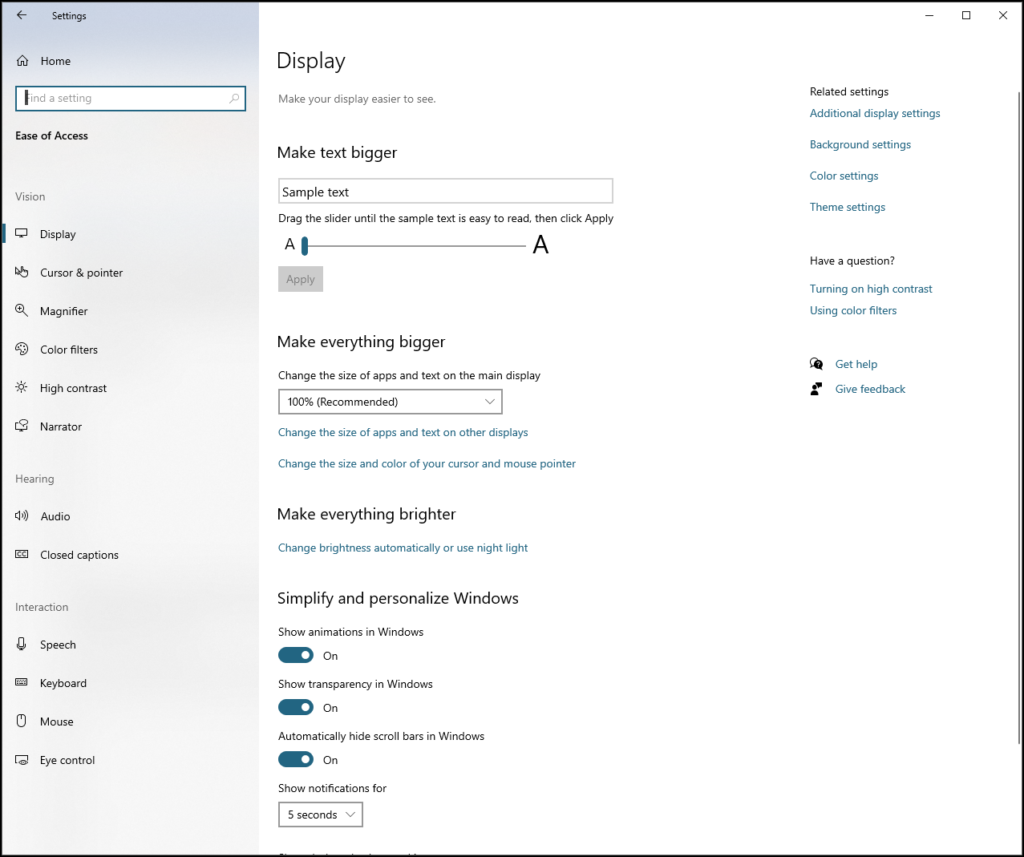
Windows features a variety of color and cursor configurations as well as other system schemes to make things easier to see.

Windows 10 Display options from Ease of Access settings.

There are two applications in the Windows 10 Ease of Use section dedicated to assisting individuals with low vision or blindness, Narrator and Magnifier.

Windows 10 Accessibility Keyboard Commands can be helpful when trying to use these different forms of AT as well as other aspects of your computer experience.

Narrator

Microsoft Narrator is a screen reading application that allows you to navigate around the Windows environment and read properly formatted documents.

The default keyboard command to start Narrator is WINDOWS KEY + CTRL + ENTER.

To configure the settings for Narrator, press WINDOWS KEY + CTRL + N.

Magnifier

Windows 10 Magnifier settings
Windows 10 Magnifier settings.

Magnifier is an application that can be turned on when you need to take a closer look at something on the screen.

Microsoft published a guide for using magnifier, including tips for customizing the way Magnifier behaves to suit your needs.

Once you have configured your preferences, it is very easy to use Magnifier whenever you need it and then turn it off again.

You can turn Magnifier on by pressing the WINDOWS KEY + PLUS.

Turn Magnifier off by pressing WINDOWS KEY + ESCAPE.

Speech Recognition

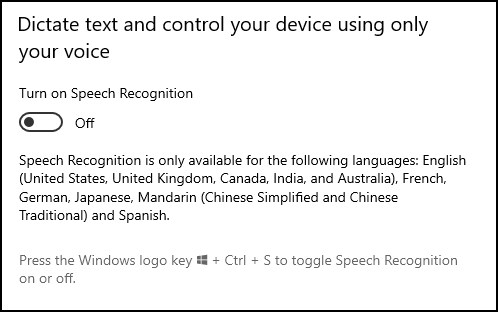
Windows 10 Speech Recognition settings.

Windows 10 allows you to use your voice to dictate rather than type, and to control your computer.

From the Ease of Use center, click on “Speech” from the Interaction category to learn more.

For best results you will need to spend a little time training Windows to recognize your voice before you can make serious use of speech recognition.

You can turn speech recognition for dictation on by pressing the WINDOWS KEY + H.

To toggle speech recognition on or off to control your device, press WINDOWS KEY + S.

Microsoft also provides a list of speech recognition commands you can use.

Mac OS Built-in AT

The Mac OS also has assistive technology available for users with disabilities.

You can find the Mac OS built-in assistive technology by selecting “Accessibility” from the System Preferences.

  • VoiceOver is the screen reader for Mac OS, and unlike Windows, there is no commercial alternative available. When you select VoiceOver in the Accessibility Preferences, you can access training and the VoiceOver Utility, which allows you to configure the behavior of VoiceOver.
  • Zoom is the screen magnification for Mac OS. Extremely convenient and easy to use, you can configure Zoom to work with keyboard commands or a combination of keyboard and trackpad gestures.
  • Dictation is a Mac OS feature many people are already familiar with. It is often apparent in the Mac OS menus for other programs as a system resource. Dictation for Mac OS allows you to both dictate and control the computer.

Free or Inexpensive Document Readers

There are a variety of free to low-cost applications available for reading digital text aloud with Text To Speech voices. They might not have all the bells and whistles of programs your school might maintain in the computer lab, but they can help fill the gap.

  • ReadPlease for Windows has been around since 2003. It is a no-frills reading window that allows you to hear what is written on the screen.
  • NaturalReader Software is downloadable Text To Speech desktop software that allows you to listen to Microsoft Word files, webpages, PDF documents, and emails.
  • Balabolka is a free Text To Speech program designed to have increased clarity, articulation, and overall quality of speech. Balabolka can support many file formats, including MP3, WAV, OGG, and MP4, as well as ODT, DOC, EPUB, RTF, PDF, and HTML files.

Additional Online Education Resources for Faculty

There are many efforts currently underway to provide assistance for educating students with disabilities. Here are a just a few I’m aware of.

  • Bookshare is an organization that provides ebooks for people with reading barriers. Bookshare has developed some amazing and innovative technology and is one of the biggest sources for a variety of ebooks.
  • WGBH Distance Learning Center provides a variety of educational resources.
  • The TechMatrix is a repository of datasheets on hundreds of educational assistive technology products. If you have questions about a product, this is a good place to start looking for answers.
  • The Learning Policy Institute has compiled a list of resources specifically for the COVID-19 crisis.
  • The National Disability Rights Network also has a collection of COVID-19 related resources and information for educators and parents of students with disabilities.

Hopefully the above information can provide some good starting points for helping your students with disabilities get access to the support and resources they need.

Thanks for reading!
How to Test Online Content for Accessibility

individual interacting with mobile device, surrounded by trails of blue light symbolizing digital information.
Photo by mahdis mousavi on Unsplash

Testing for accessibility can happen in many different ways, from quick and simple to in-depth and technically detailed. In the most general terms, I break accessibility testing into three categories: Automated, Manual, and Usability.

Automated vs. Manual Testing

As the name implies, automated testing is the least labor-intensive form of accessibility testing. Automated testing also typically discovers less than 40% of the issues that affect accessibility. A human brain is required to make several of the determinations that are required for an accessibility assessment.

Because of this limitation, most people who do accessibility testing will employ a combination of automated and manual testing.

Automated testing is a wonderful way to check for all of the programmatic issues that affect accessibility, and a great way to index all of the issues that need to be conformed with in order to satisfy a technical standard such as Section 508 or WCAG.

However, Manual testing is a required element for any thorough accessibility assessment.

Standards vs. Usability

Testing for conformance with accessibility standards is an easy task for automated tools. Testing for Usability is a more varied activity, often times it is best performed by an individual with a disability who regularly uses assistive technology.

For true accessibility you need to satisfy both the standards and the usability requirements that enable the content to be interacted with the same ease of use enjoyed by individuals without disabilities.

Quick and Cursory vs. In-depth and Detailed

For many situations, it is possible to do a quick and cursory test with your keyboard and reveal critical failures that prevent any need for more elaborate testing.

If an app or webpage is not keyboard accessible, it has already failed to conform with the standards and is demonstrably not usable.

AT and Usability Testing

When a student with a disability uses Assistive Technology, they are interacting with your content in different ways than you might expect. Sometimes content is structured in a way that will force students to work harder to engage with the content.

Different types of AT focus on a specific aspect of human communication, and it is not always obvious to people how approaching content from a different sensory perspective and with assistive technology can affect the meaning and understandability of the content.

For the best usability testing, it is recommended to find an individual with a disability who has a high degree of familiarity and comfort with assistive technology. An ideal candidate is someone who uses AT every day as a regular part of their life.

Browser Tools

Most modern browsers will allow you to inspect the code of the web pages you visit. If you are not put off by reading HTML code, the truth is out there and easy to uncover. Just right-click the content and select “Inspect” within the Chrome browser, or select “Inspect Element” within the Firefox browser.

However, for a lot of people, the idea of learning any amount of HTML and trying to read code is a complete deal breaker. That’s OK, you don’t need to get down and nerdy, there are a variety of tools that have been developed for Chrome and Firefox that make it a lot easier to inspect web pages for accessibility.

Here are a few popular options:

  • WAVE Extension: by WebAIM at Utah State University is a free tool for Chrome and Firefox that allows you to perform secure accessibility checks on content within your browser. WAVE applies a graphic overlay with different icons to identify the different types of issues with the content.
  • Color Contrast Analyzer: by North Carolina State University is an extension for Chrome that allows you to check the color contrast ratios of your content and make sure you are satisfying the WCAG 2.1 requirements for contrast.
  • Axe – Web Accessibility Testing from Deque: a free extension for Chrome and Firefox that is helpful in finding issues with content not conforming to the WCAG criteria.

There are many more extensions available in the Chrome Web Store and the Firefox Browser Add-Ons collection.

Try it Out! Keyboard Accessibility

Keyboard with blue and red lighting.
Photo by Jon Spectacle on Unsplash

There is one quick and easy way to do a very basic check of the accessibility of a web page – use the keyboard.

Most of us are so accustomed to using a mouse or trackpad that you might not be aware of how many keyboard commands are available for interacting with your computer. Following are just a handful of common keyboard commands you can start using to test accessibility.

Quick and Cursory

With the keyboard, you can quickly see if there is a basic ability to access interactive elements on a webpage. This is one of the most common accessibility requirements for digital content, and can be a red flag for additional more serious accessibility concerns.

Note: this technique only works if the webpage has interactive content.

Tab it Forward

Before you try this, click inside your internet browser to ensure the computer is focused on the browser.

  • Use the TAB key to move your computer focus from each interactive element on the web page to the next.
  • Try pressing TAB right now and see if you can identify the focus indicator. It is typically a dashed line, though the styling can be overwritten by the website you are visiting.
  • Once you have found the focus indicator, you can track the focus as you press TAB and move through the different interactive elements on the page.

Shift it Backwards

The SHIFT key can be used together with the TAB key to move backwards through the interactive elements on the page.

Interacting with Forms and Menus

If you get to an interactive element that allows you to choose an option, there are standard behaviors that respond to keyboard commands for interacting with the data.

If the content is accessible, you can use the following keys to interact with the options:

  • ARROW keys move between options.
  • SPACE: selects an option.
  • ENTER submits the option.

Considerations for Keyboard Testing

  • When you evaluate web content with the keyboard, consider the overall number of interactive elements.
  • Notice the sequence of interactive elements. Consider whether there are elements that seem like they should be presented sooner than they currently appear in the sequence.
  • Notice whether there is a “Skip to Content” link at the beginning of the page. This will typically take you past the menus for the website – which can take a lot of tabbing to get through.

Keyboard testing is not a conclusive or thorough way of testing accessibility. Also, it is not enough for web content to be keyboard accessible.

Keyboad accessibility is a good start, but there are many other additional considerations for ensuring access of digital content.

With the above information you can start practicing accessibility testing on the content you create and select for your online course.

Thanks for reading!

Customize your Workflow for Easy Access

Man writing on a whiteboard with the words Workflow Strategy at the top of an emerging workflow.
Photo by Campaign Creators on Unsplash

With the basic understanding of digital media access strategies and a handful of formatting tips to support accessibility, we are ready to incorporate this knowledge into your daily practice.

Simple Beginnings

Starting today, you can draw the proverbial line in the sand. Declare to yourself that you will, from now on, use the following formatting practices for accessibility when you create or edit your instructional content.

  • Use your Heading Styles.
  • Describe non-textual content.
  • Use friendly links.

Three things. Three super simple, easy things you can do to make a huge difference in the lives of students who are already struggling with way too much.

Thank you in advance for making your instructional content more accessible and effective.

Over time, all the materials you use will become more accessible as you edit and refresh your content each semester.

A simple practice for sustainable access.

Patterns of Access

Consider your weekly flow of information.

  • How many times do you send your students some form of communication?
  • How many files are they downloading from your course each week?
  • Do you send weekly welcome/organizational messages?
  • How many files are each student sending you per week?

Identifying patterns in these communications and exchanges can reveal opportunities to automate accessibility through the use of templates and other technology.

You can learn about areas where you might want to invest some time on professional development as well – for instance, if you realize you are sending a lot of PowerPoint files to your students, it might be a good idea to increase your accessibility skills in that area.

It is also good to find out if you can leverage an accessible template with your frequently used programs. With a template that begins as an accessible document, you can just continue doing what you do, but with the peace of mind that comes from having some level of “baked-in” accessibility.

Media Inventory

Towering structure of shelves containing books and media reaching over two stories high.
Photo by Ming Han Low on Unsplash

One of the core aspects of maintaining accessibility is having an organizational plan. If you find that you have a lot of different media being used in your course, it can be helpful to create a media inventory.

A media inventory can serve a variety of purposes in managing the accessibility of an online course, but chief among them is the ability to enlist help in addressing accessibility issues if you find an emergency need to provide accommodations.

Of course, the need to provide emergency accommodations largely be alleviated through the use of a media inventory to manage the accessibility of your content.

Track the Files

The simple idea is to get a basic listing of what kinds of media files your students are supposed to use each week. It is always good to identify what type of digital document files you are working with.

First, identify what type of document each file is, for example, Microsoft Word, PowerPoint, PDF, HTML, etc.

Next make note of the types of digital content inside each document – text, images, tables, interactive content like links or form fields.

Make note of content that resides on third-party websites, including YouTube and Textbook “companion” content packs from textbook publishers.

Track the Access

As you work through the content each week, ensure that the appropriate access strategy is in place for each type of content. Text should have headings, images should have text descriptions, tables should have header rows defined, links should be useful and descriptive, etc.

Here is a sample table to illustrate the concept, but feel free to use whatever system works best for you to track and monitor progress.

Media Inventory

Media File (Name and type)Date of UseTextHeadingsImage DescriptionsTable HeadersInteractive ContentNotes
Syllabus.docx9/1/20YesYesYesYesYes 
Week1intro.ppt9/1/20YesNoNoNoNA 
Chapter1.pdf9/2/20YesYesNoNoYes 
“History of the thing” (Youtube) https://youtu.be/HCU5jZeZKn89/4/20NANANANANoNeeds captions
Chapter 1 Practice Quiz9/5/20YesYesYesNAYes 
Above: An example of a simple media inventory.

You can begin tracking what you do in terms of creating and distributing information to your students each week.

Your inventory can also be used as a job aid to help keep track of the documents you have made more accessible, and those that still need attention.

If you are fortunate enough to get assistance with your course materials, your media inventory can make it easier to delegate and track the progress of your team.

Looking Forward

As you consider the digital content you are using in your course, hopefully you are identifying some trends and patterns in how you engage with your students.

It is good to identify the types of programs you use to create and update your instructional materials. Find out if you have the most current version of the software, and if not, try to update.

Great strides have been made in recent years towards making accessibility easier to create. Having the latest versions of the software can make life a lot easier when dealing with accessibility.

In the coming posts we will be covering some different programs commonly used by faculty to create instructional materials. Whenever possible, I will be sure to point out significant differences between versions of software, and any relevant work-arounds for people using older versions.

Meanwhile, consider how you can begin implementing the simple workflow tips for enhancing the accessibility of your content, and let me know if you find any questions as you go.

Thanks for reading!