
Let’s face it – sooner or later you are going to find yourself wanting to use a PDF in your online course that someone else created. You might already have one that you are getting ready to send out to your students right now.
No judging, I’m just saying I understand how common other peoples’ PDF’s tend to be.
More often than not, these PDF’s can be found alone, without the source document they were created from.
Wherever you may be finding these PDF’s without source documents, they likely have one thing in common: accessibility problems. Happily, there is something you can do to enhance the accessibility within Acrobat Pro.
Remember the “Make Accessible” Action Wizard from Day 1 of PDF Accessibility?
Well, now you do!
Engage the Action Wizard tool and select “Make Accessible”. Acrobat Pro doesn’t care that you didn’t author the PDF. Acrobat Pro won’t even ask if you have copyright clearance.
Once the “Make Accessible” action wizard has finished tagging and guessing what kind of content is in the PDF, you can now go through and correct any mistakes in content identification. You will perform this task with the Reading Order tool.
Introducing the Reading Order Tool
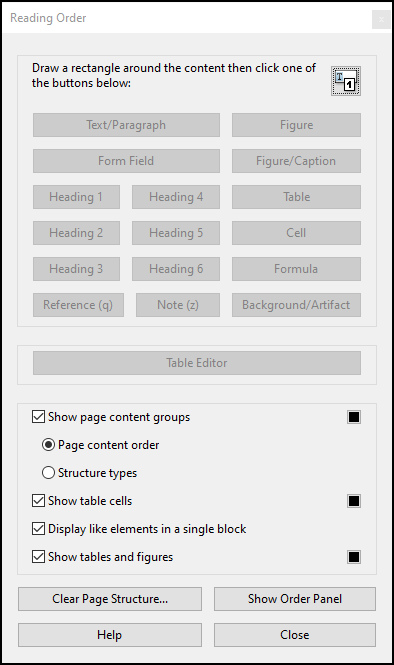
The Reading Order tool in Acrobat Pro can be found in the Accessibility Tools panel.
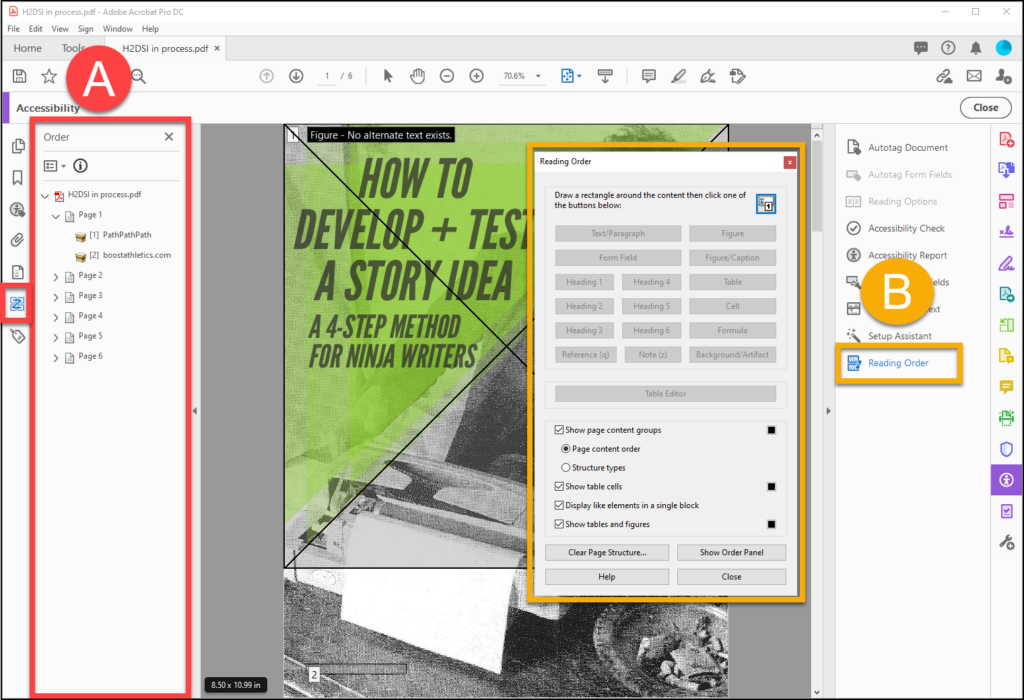
The Reading Order Panel [A] found in the Navigation Pane, should not be confused with the Reading Order tool [B], launched from the Accessibility Tools.
The Reading Order tool can be used to identify different types of content, examine the reading order, and eliminating irrelevant data from the reading order.
NOTE: For best results, set your view to display one full page at a time.
Activate the Reading Order Tool
From the Accessibility Tools, click on “Reading Order”.

The Reading Order tool will appear as a floating panel.
Position the Reading Order tool so you can see your page content as well as the Reading Order tool.

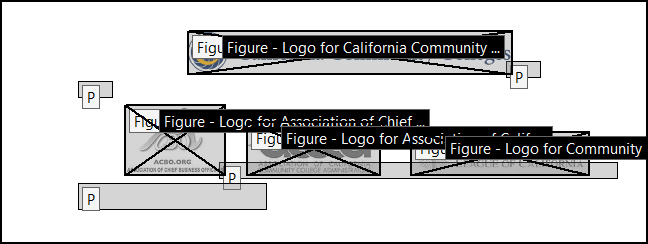
Notice the content is contained in boxes, and that these boxes are displaying either numbers (the reading order) or letters (content types) in the upper left hand corners.
You can switch between displaying reading order or content types in the bottom part of the Reading Order tool, by selecting the appropriate choice under “Show page content groups”.

Clean Up Your PDF
With the Reading Order tool activated, we are ready to begin identifying the content we want to keep and getting rid of the content we don’t want in the way.
In the following example, we have some empty paragraphs cluttering up the bottom of the page. We don’t want our students to waste time identifying and examining empty paragraphs, so we will use the Reading Order tool to identify the empty paragraphs as “Background/Artifact”.
Identifying content as Background/Artifact removes it from the reading order, so users won’t be bothered with it.
Identify Content Types
Sometimes Acrobat will mistakenly assign content with the wrong label, for instance, identifying text as a paragraph when it should have been identified as a Heading.
With the Reading Order tool, you can fix that.
Select the content chunk you want to re-assign by clicking the little while label in the upper left corner of the content chunk. You will notice that your cursor changes into a little hand when you place it over the label.

With the content chunk selected, click on the appropriate content type from the Reading Order tool.

Notice the label change on your content chunk to reflect the new content assignment.
Edit Alternate Text
Another accessibility enhancement you can perform with the Reading Order tool is adding or correcting alternate text descriptions for images.
With the Reading Order tool activated, select an image (figure) in your PDF.
With the image selected, right-click on the content type label and select the “Edit Alt Text” option.

Enter the alternate text description that is appropriate for the image, or else click the “Don’t Add Alt-Text” button to mark the image as decorative only.

Work your way through each page of the PDF until all of the content is properly identified.
Check Reading Order
After you make changes to the content structure of a page by reassigning or removing content, you should check the reading order to make sure everything is flowing properly.
You can get a quick view of the reading order by switching the Reading Order tool from displaying “Structure Types” to “Page content order”.

If the reading order needs to be adjusted, click the “Show Order Panel” button to open the Order Panel within the Navigation Pane on the left-hand side of the Acrobat Pro window. With the Order Panel open, you can drag the content into the correct sequence.
Run Accessibility Checker
It is always a good idea to run the Accessibility Checker after you finish editing your PDF.
If the Accessibility Check doesn’t discover any new issues, congratulations! You can save and close the PDF, knowing you have provided a level of accessibility that should allow most people to read the information you are sharing.

Some PDF’s are Special Cases
Most simple PDF documents can be made accessible using the process we’ve just covered, but sometimes you will find a PDF with complicated layout and/or complex content, and those kinds of PDF documents can be very challenging to make accessible.
Sometimes it might be easier to come up with an alternate access strategy, or convert the PDF to a different type of document where the content can be communicated in an easier way.
Remember, PDF documents can come from many different places and technologies. Sometimes the source of the PDF simply does not create a data structure that can be made accessible.
Tomorrow I will cover how to ensure your data makes it out of MS Word and into Acrobat Pro with as little confusion or loss as is possible, and I will show you a free tool that might be able to help take your problem PDF and make it into something a little less problematic.
Until then – thanks for reading!