
As the most popular word processing program out there, it seems like a huge misstep to not address the basic best practices for creating accessible documents in MS Word.
Recognizing how much power is in MS Word, I am only going to address some of the big items with most impact on accessibility.
There is so much that MS Word can do, and so much that can be done to enhance accessibility in MS Word, that it deserves a week of its own posts.
For today, I want to show you how to:
- Style text with headings and make them look the way you want them to look,
- Add an alternate text description to an image,
- Run the MS Word Accessibility Checker.
So let’s get busy!
Heading Styles in MS Word
In MS Word there is a “Styles” panel on the home tab.
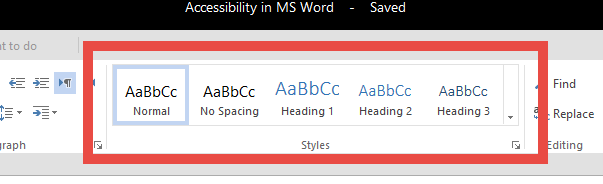
When you have your cursor in a line of text and you click on one of the styles, it applies that style to your line of text.
Pretty easy.
However, I often hear people complain that they don’t like the way the default styles appear.
It is at this moment that I realize this individual doesn’t know about the Style Manager in MS Word.
If you press ALT + CONTROL + SHIFT + S you will open the Styles Manager.
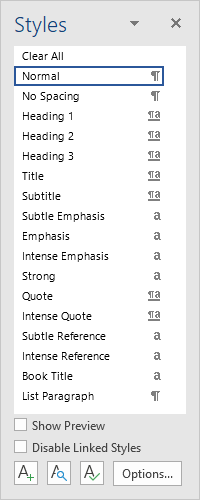
On the far right of each style is a pull-down menu toggle. In this menu is an option to “Modify Style”.
With the Modify Style window open, you can adjust the font, size, color, and a variety of formatting details.

In this way you can adjust all the Heading styles to look however you like them to look.
Now the Heading styles can make your document accessible while not making your document unpleasing to the eye.
Alternate Text in MS Word
When you insert an image in MS Word, it is easy to associate an alternate text description for it.
Right-click on the image, and select “Edit Alt Text…” from the menu that appears.

When the Alt Text pane appears, erase the automatically generated alt text.
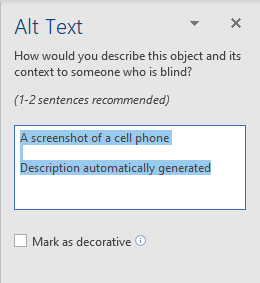
Provide a valid description of your image that will help someone understand what the image is communicating if they are unable to see the image.
MS Word Accessibility Checker
MS Word now includes an accessibility checker.
You can run an accessibility test on your document and have MS Word help you fix issues that might cause problems for some readers.

To start an accessibility check:
- Go to the “File” menu and click on “Info”.
- From the Info screen, click on “Inspect Document”.
- Next, click “Check Accessibility”.
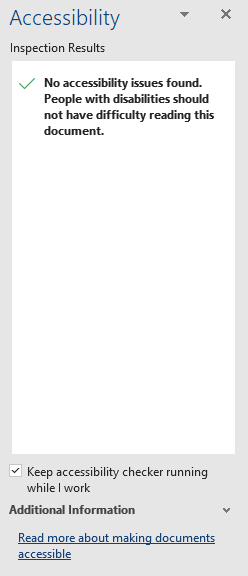
MS Word will process your document and alert you to any content that requires additional attention.

After you address any accessibility issues that were found, run the Accessibility Checker again. When you have addressed all the accessibility issues the Accessibility Checker is capable of finding, your results will tell you there were no accessibility issues discovered.
NOTE: While this is comforting, and a good start, you can not trust the Accessibility Checker to find all the accessibility issues in your document!
Automated accessibility testing can only find less than 40% of the issues that cause accessibility issues.
So you will have to continue to be aware and practice good authoring practices to make sure you are creating documents that are as accessible as possible.
But wait, there’s more!
We will be spending more time in MS Word in the coming weeks and looking more closely at some of the accessibility capabilities it has.
For now, consider your own style and how you might like to make your Heading styles appear, and take comfort that there is an accessibility checker in MS Word that has your back and will help keep you on the right track for creating accessible documents.
Incorporate these simple things into your MS Word workflow, and you will be creating more accessible documents as a normal part of your day to day routine.
In other words you will be adding value and increasing the effectiveness of your learning materials by ensuring they can be accessed and used by ALL your students.
Thanks for being that person, and thanks for reading!