Sometimes you end up with a link that goes beyond a single line of text, and you need to make it accessible.
What is the problem?
Well, specifics can always vary, depending on the PDF. Having said that, typically a student’s assistive technology might repeat the word “link” in the middle of reading the link URL, causing confusion and irritation.
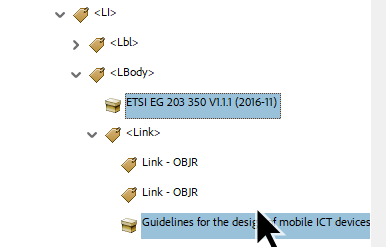
If we look at the document tagging structure, it becomes apparent why this happens – there are two OBJR tags for the link, one for each line of text.
This is just sloppy and wasteful. We only need one OBJR tag for this link.
However, getting rid of the extra OBJR is not as straight forward as you might hope.
You will have to completely remove the link, and then rebuild it the way you need it to be.
How to Fix Two-Line Links
With your tagged PDF open:
Select the link on the content page.
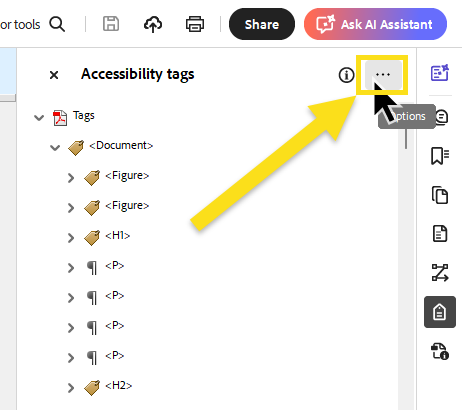
Open the Tags panel.
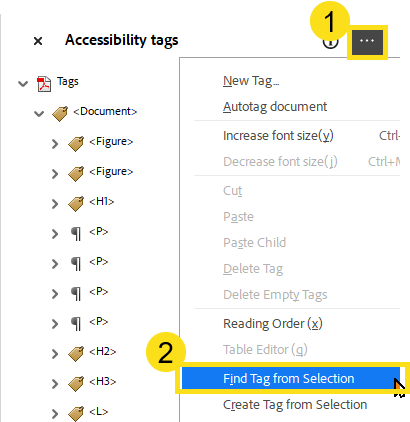
Click the Options menu from within the Tag panel.
Select the option to Find Tag from selection.
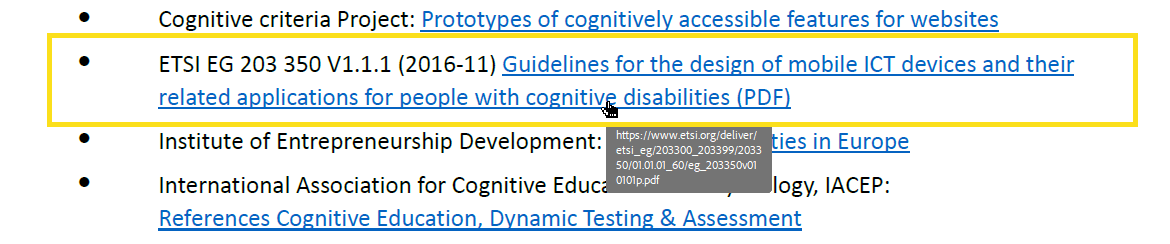
Make sure you have identified the correct tag for your two-line link. You will notice there are two OBJR tags within the Link tag.
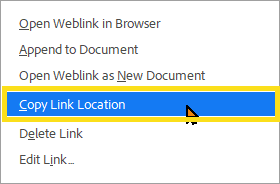
Now address the link within the PDF content. Right click the link within the content page, and copy the link location of the url.
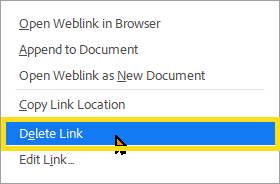
Now delete the link from the page content by right-clicking on the link text and selecting “Delete Link” from the context menu. Do this for the text on both lines of the link.
If the corresponding links did not disappear from the Tags panel, clean them by selecting and deleting them.
Your tag structure should be comprised of a tag for the link, and within that tag are paragraph/text containers that identify the clickable target of the link.
Now that we have successfully deleted the link from the page content and the tag structure, we will recreate the link so it is accessible.
NOTE: To be accessible, we must ensure that the link encompasses both lines of text within the content page and within the tag structure. We want our tag structure for the link to contain a single OBJR tag and a paragraph container for the clickable link target.
Create the Link
Within the Tags panel, Select the Link tag for the link we are working on.
On the PDF page, select the text which will be the anchor of the link.
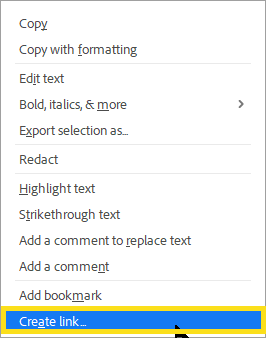
Right click the selected text, and choose “Create Link”.
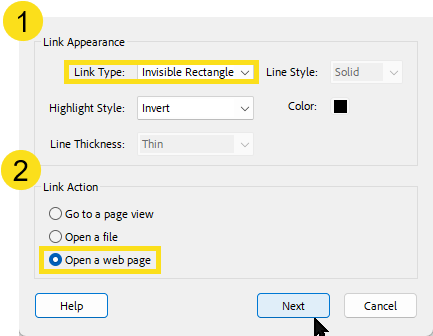
Set the Link Appearance to be Invisible Rectangle, and the Link Action is set to Open web page.
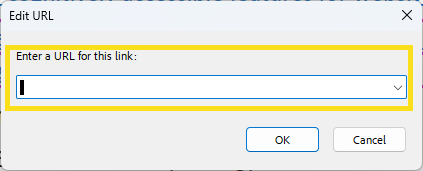
Next, the Edit URL dialog opens. Paste in the link you copied earlier.
Click OK.
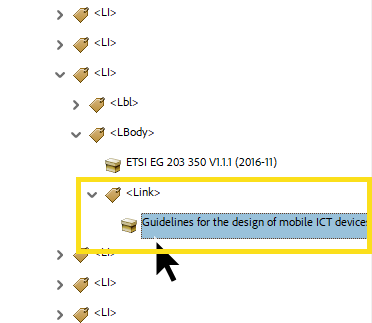
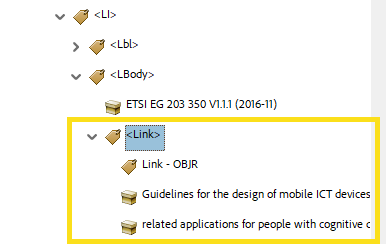
Now you should have a tag structure that includes a link with a single OBJR, and the text content that is the anchor.
The page with selected link and the tags panel open, showing the relationship between selected content and tag:
If you are lucky, this will resolve your problem. However, sometimes even after you follow the above steps, Acrobat will not create the OBJR tag you need. Read on to learn how to fix this situation.
When Acrobat Does Not Cooperate with the Above Process
Select the Link tag within the Tag panel.
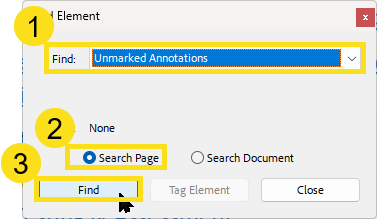
Open the Tag panel Options menu and select “Find”.
In the Find panel, open the drop down menu and select the option for “Unmarked Annotations”.
Find the unmarked annotation on the page.
When the link is found, open the Tag panel Options menu and select “Create Tag from Selection”.
Now you should have the OBJR tag within your Link tag.
For one specific course, I had enabled Guest access, but I wanted to change the settings. At one time I had required a password, and now I wanted there to be no password required.
However, for some reason I could not erase the password – and worse, it conflicted with the improved password requirements I was using for the site.
The end result was a paragraph of red text listing error complaints and warnings regarding password policy violations, whenever a guest user accessed the course.
It wasn’t a critical issue that would stop someone from accessing the course, but it was a source of potential confusion for users visiting my site.
This is contrary to the desired user experience, and a bit of an embarrassment.
I am happy to have since resolved the issue, it turns out there was a corrupted course, and I was able to set things right by copying the course.
Now I can share with you what I learned in the process, with the following simple steps of how to manage guest access to Moodle courses.
Also, full disclosure: this is for a limited audience of people who are managing, or thinking about managing, a Moodle instance.
Moodle Guest Password Policies
There are settings for Guest access both at the global system level and within each course itself.
First things first: establish the norms for your Moodle instance at a site-wide level, and them move on to the individual course settings.
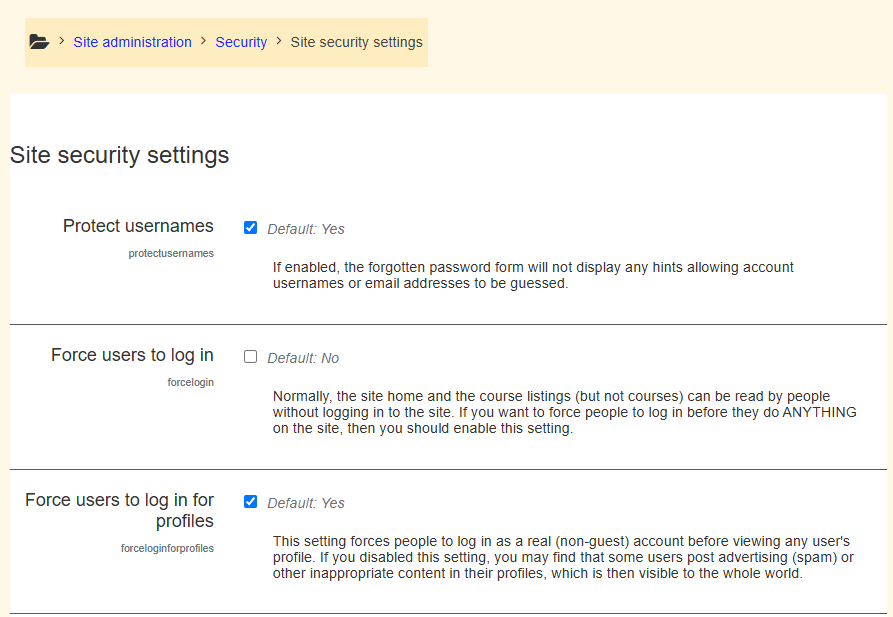
Navigate to Site administration\Security\Site security settings.
Require digits, uppercase, lowercase, and non-alphanumerics as needed.
Enable password expiration if required
Configure lockouts after failed logins (under Account lockout settings).
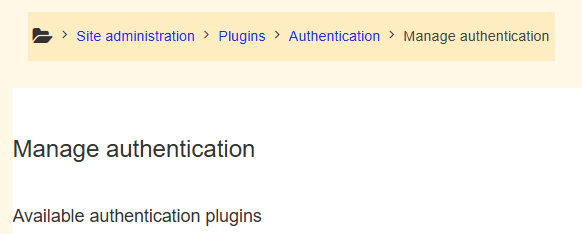
User Account Creation and Passwords
Navigate to: Site administration\Plugins\Authentication\Manage authentication
Enable email-based self-registration (if needed)
Set new user default role
Force password change for pre-created accounts.
Guest Access to Courses
Enable Guest access globally:
Navigate to Site administration\Plugins\Enrollments\Guest access.
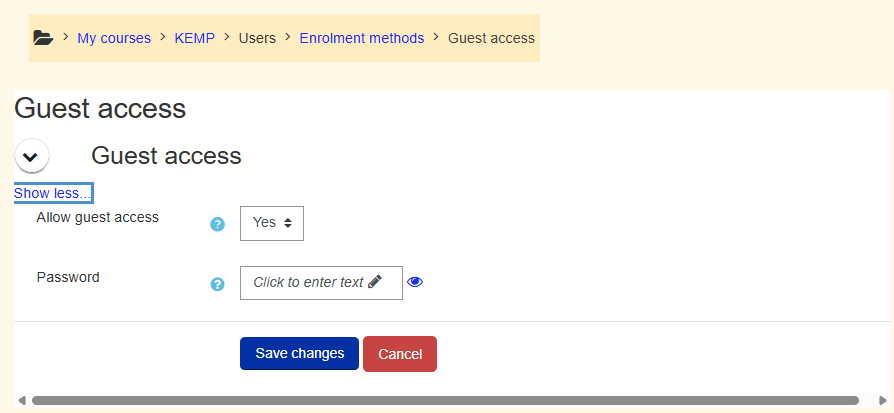
Enable Guest Access for a course:
Navigate to: Course\Participants\Enrollment methods\Add method\Guest access
Allow guest access: Yes
Set a guest password (optional)
TIP: Leave password blank to allow public access.
Best Practices
Consistent design patterns and management of user policies are a curricular level concern that needs to be communicated and maintained through policy, and ongoing faculty professional development efforts, in combination with IT training and support assignments.
Depending on what you are using Moodle for, you might want to have a variety of resources that are freely available, as well as others that are password protected.
Here are some tips to keep in mind:
Test guest access using an incognito or logged-out browser
Use course visibility settings to hide sensitive courses
Regularly audit accounts and login attempts (under Reports).
You start with a transcript of the audio. Always. If you do not have a transcript of the audio, read this quick article on how to get a transcript, and then come back and join the party.
BASIC Aegisub Workflow
Begin with your transcript saved in plain text file (.txt), or in subtitle file (.srt) format:
Open Aegisub.
With the Aegisub editor open, select “File\Open Subtitle” to import a subtitle file or plain text file.
Navigate to the location your transcript is saved, select the file and click “Open”.
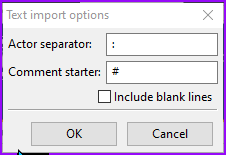
The Text Import Options window prompts you for characters to separate different actors, and a character to denote comments in the subtitle file (comments do not appear onscreen). Enter characters if your transcript is formatted with them, otherwise ignore.
Click “OK” and the file loads.
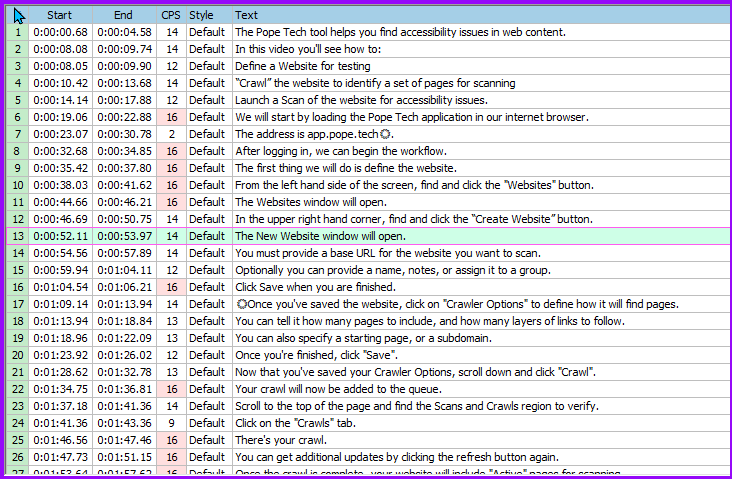
The text grid populates with the contents of your subtitle/text file.
Select the first row, and that subtitle will appear in the Subtitle Edit window.
Edit the subtitle as appropriate for grammar and line length.
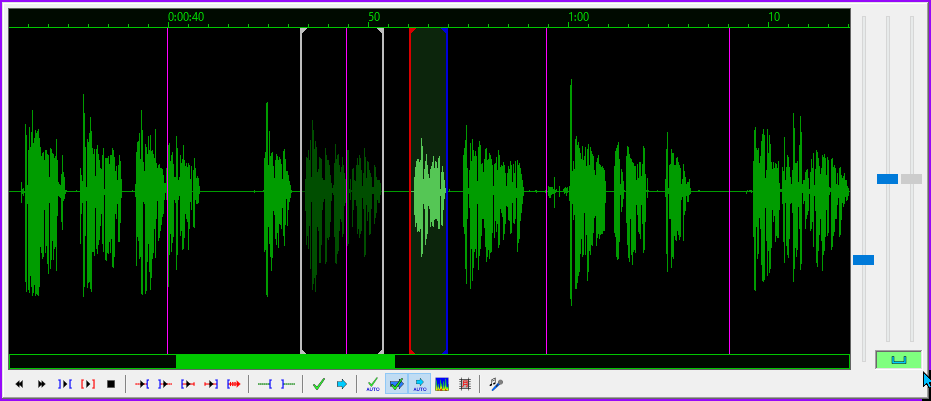
Adjust the timing for the subtitle by moving the blue and red lines within the Audio editing window. Blue is the beginning, red is the ending. Other subtitles are represented with gray lines.
Press ENTER when the subtitle is formatted and the timing is set. Aegisub will register the timing for your subtitle and move to the next subtitle line in the Text Grid.
Repeat this process until all of the subtitles have been formatted and properly timed to appear on screen.
That’s the essential workflow, continue reading to learn about optimizing your workflow, setting preferences, and how to format your subtitles so they are easier to read and understand.
Set Your Aegisub Options
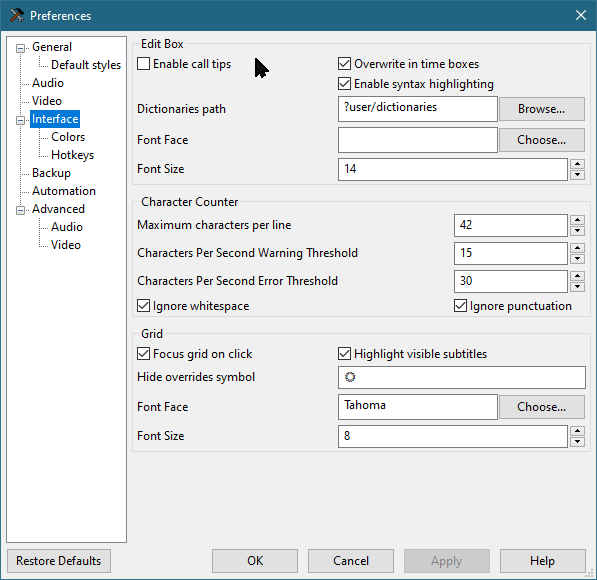
Goto “View\Options…” and select the “Interface” option to set the preferences for how many characters per line, characters per second warning threshold, and characters per second error threshold.
I set my preferences to 42 characters per line, 15 characters per second warning threshold, and 30 characters per second error threshold.
Click “Apply” when you are finished.
Colors
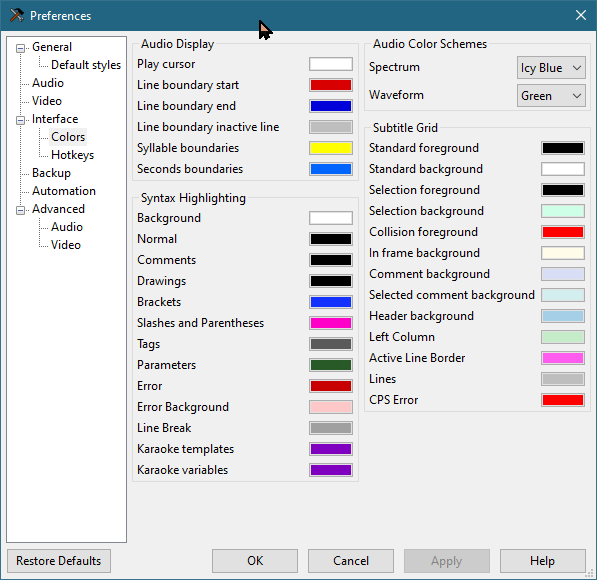
From the Options menu, click the “Colors” option under “Interface” and adjust the different colors used within the Aegisub interface.
When finished adjusting your preferences, click “Apply” to activate your settings.
Click “OK” to close the Options panel.
Video Window
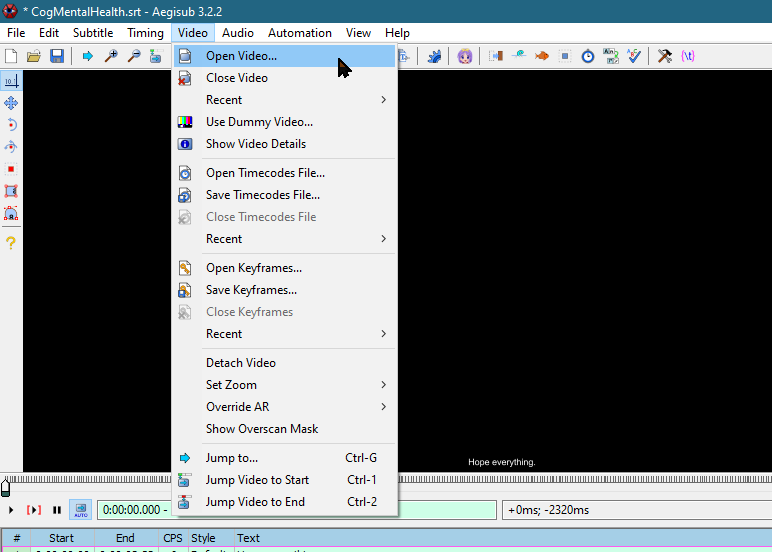
Go to the “Video” menu to open the video you are subtitling.
You can enlarge or reduce the size of the video window by hovering the mouse over the video and using the mouse scroll wheel.
There are multiple playback modes. Playback can be limited to the current subtitle line, or playback can proceed through the remainder of the video from the current subtitle line forward.
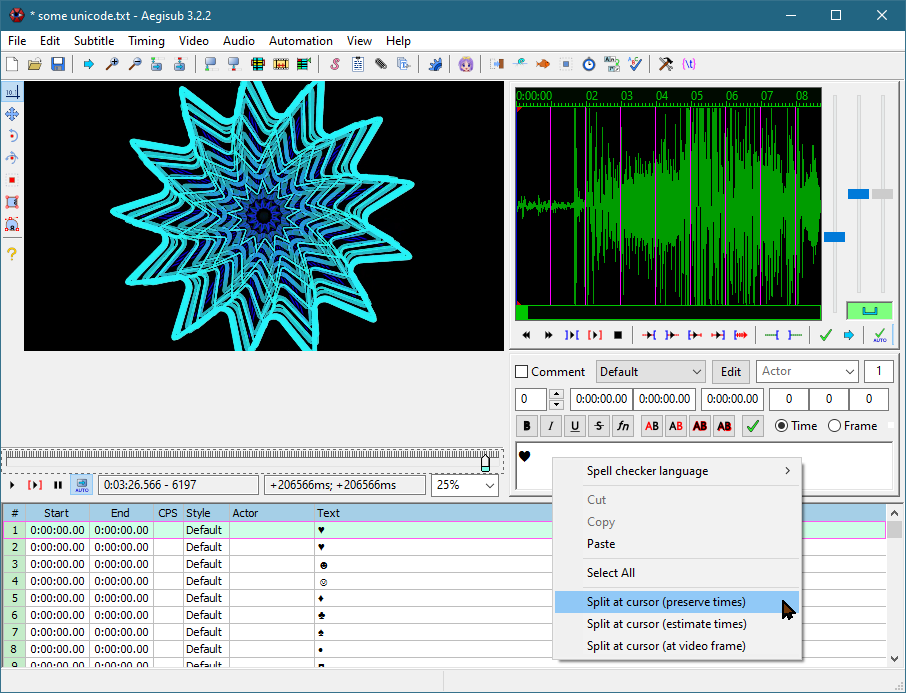
Audio Window
The Audio window displays the waveform for the audio. The area of the waveform between the red and the blue lines is the audio content corresponding to the current line of subtitles.
You can easily adjust the timing of each subtitle line by dragging the start or end lines within the audio window.
Editing Audio Timing
Within the Audio Window:
Move the BLUE line to the beginning of your subtitle audio.
Move the RED line to the end of your subtitle audio.
Press SPACEBAR to play the audio for the current subtitle.
Ensure the display time for the current subtitle corresponds with the selected audio.
Press ENTER when you are satisfied with the timing.
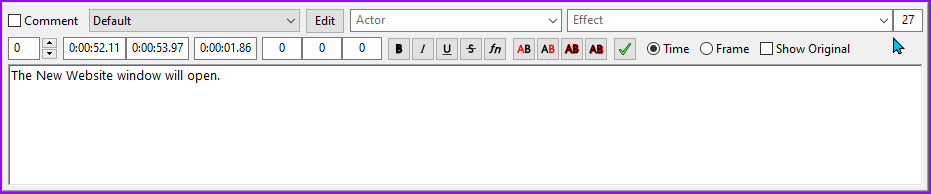
Text Editing Window
Immediately beneath the Audio Window is the Text Editing window.
When you select a line of subtitles in the Text Grid, that subtitle will be displayed in the Text Editing window for editing.
Right click within the Text Editing window to access options for adjusting line length and splitting subtitles.
Use NUMPAD 5 to play the audio currently associated with the subtitle being edited.
Editing the Captions
Edit the subtitles according to the rules for editing captions, as described in the “Captioning Key” resource from the Described Media and Caption Program (DCMP).
Use the Captioning Key for full details of how to format different types of information, as well as how to style your captions for maximum readability.
There are many considerations for formatting subtitles to enhance their readability and understandability. Check out the Captioning Key for a complete explanation of how to format different types of information. In general, the following guidelines should always be followed:
Never split a prepositional phrase when breaking a line of subtitles.
Do not split a descriptor from the object it is describing when you break a line of subtitles.
Do not mix numerals with numbers spelled out in words. Choose either numerals or words and maintain consistency.
Do not separate a person’s title from their name when breaking a subtitle into two lines.
Include sound effects in brackets, such as: [car tires screeching],
or [gun firing] BANG! BANG!…
Audio occurring offscreen should be italicized.
Maximum Line Length
It is important to format your subtitles so they do not form excessively long lines of text.
It can be difficult to read long lines of text and also pay attention to the video that is being shown. Best results are achieved when subtitles are around 42 characters per line. It is OK to exceed this by a few characters, but try not to go over 50 characters per subtitle line.
The Text Grid displays each line of subtitles with a column that displays the Characters Per Second (CPS). This column turns red when the characters per second meets or exceeds the levels you set in the Interface options, making it easy to see at a glance where you need to make adjustments to line length.
Using the Characters Per Second column, you can quickly identify any lines of subtitles that are too long for the amount of time they are being displayed. The Characters Per Second warning color and the characters per second error color can be set in the Options pane under “Interface\Colors”.
Displaying Two Lines of Subtitles
If you want to display two lines of subtitles on the screen, you can manually split the subtitle line into two lines by pressing SHIFT + ENTER.
Pressing SHIFT+ENTER will place a new line code(\N) in your subtitle file, indicating where the line breaks. The new line code will not be displayed on screen with the rest of the subtitle.
If you break a line of subtitles using the new line code (\N), the Characters Per Second displayed will reflect whichever subtitle line is the longest.
Splitting Long Lines of Subtitles
If you want to break a long line of subtitles into two separate lines of subtitles, use the Editing Window.
Place your cursor within the subtitle where you want the second line of subtitles to start, and click the right mouse button.
Choose “Split at cursor (estimate times)”, and the text spanning from your cursor to the end of the subtitle will be moved to a new subtitle line.
Conclusion
Follow the workflow at the beginning of this article until each line of subtitles has been formatted and optimized.
Save your .srt file, and use it with your video when you share it online or use the video in the classroom.
You can also download this job aid for the Aegisub Workflow for editing subtitles.
There are many ways to get a transcript of your video.
As an employee, my number one preferred solution is to contract with a professional to do my captioning.
However, as an independent business owner, I do not want to spend the money for captioning when I can do it myself and spend that money on something else. In fact, I’m even happy to take on your captioning chores for a small fee if you’re seeking help.
So I understand that for many small businesses the cost of paying someone else to caption your videos is a non-starter. There is a reason so many videos on YouTube have the “auto-craptions” instead of polished and helpful captions.
But I’m here to tell you there’s a better way than throwing the fate of your subtitles to the whims of YouTube.
As a wizened old nerd who has been playing with video since the days of VHS and video toasters, I can appreciate the amazing progress that has been made in the area of captioning support. There are many ways to get captions, including the aforementioned “auto-craptions” which are better than nothing, most of the time.
Even so, the work must continue, as the quality and accuracy of “auto-craptions” still leaves something to be desired.
Fortunately, captioning is not so much difficult, as it is a time-consuming task. However, one of the traditional bottle-necks in the process, transcribing audio, is being resolved by robots.
Path of Least Resistance
With the explosion of AI, it is no wonder that we have many options for transcribing audio. Many offer a “free” tier, but as is always the case, when a web-based service is “free” – you are the product being exploited – as in, your data.
Be aware of the fact that what you feed into any of these AI systems will likely be used to feed their training algorithm, and be used for who knows what. So choose wisely.
Personally, I like Otter.ai because I first encountered them in the Education technology space many years ago, long before AI became a “thing”. They do a remarkably good job of recognizing what is being said.
If you do not have a subscription to the Adobe Creative Cloud, then Otter.ai would be my next choice for automated transcript creation.
Premiere Pro
Even with the ease of Otter.ai, I can’t deny the immediate ease of using Premiere Pro’s new transcription capability.
Adobe has some impressive speech recognition capability, and since I have already sold my soul in order to have the Creative Cloud subscription, I can rationalize the feeding of the Adobe AI.
Adobe, my toxic valentine, co-dependency is the mask for your vile exploitation and my despicable lust for your bright shiny broken things…
Anyway – please excuse my venting, and let’s get back to the regularly scheduled programming…
I find that getting a transcript from Premiere Pro is a simple and powerful way to begin the captioning process.
Premiere Pro Workflow
Getting a transcript in Premiere Pro starts at project creation when you import your source clips. Set the ingest settings to automatically transcribe your clips at project creation, and Premiere Pro will create transcripts of all audio and video clips.
So far, it does a better job than YouTube. YouTube has flat-out refused to process several recent videos, I suspect due to the length of the videos.
After Premiere Pro finishes processing your clips, you can open the Transcription window to edit the results.
You can easily create captions/subtitles with your transcripts within Premiere Pro, and you can export the subtitles as an .srt file for uploading to YouTube or editing in Aegisub (see below).
Aegisub Subtitle Editor
If you are working on a long video, you will probably find the process of editing your subtitles to be a lot more enjoyable and efficient when working in Aegisub, the free subtitle editor.
I don’t receive any financial compensation for recommending Aegisub, I just like the program enough to recommend it.
Check out my tutorial on using Aegisub to take your audio information from transcript to powerful and perfect captions.
When I first began working with technical documents and foreign languages as part of my daily life, I fell in love with Alt Codes. I quickly memorized the core group of relevant characters and punctuation to make life easier, and moved on with things.
For those of you who don’t know what an Alt Code is, allow me to resolve the suspense: Alt Codes are a sequence of four characters entered while simultaneously holding down the Alt key (talking about the Windows OS).
Alt Codes make life much easier when you have to frequently use characters that aren’t included as part of the standard QWERTY keyboard. The Character Map in Windows is about the best you have, if it weren’t for Alt Codes, that is.
I recently came across a listing of Alt Codes at the Microsoft website, and I remembered my joy at first discovering these time savers. I decided to share their listing of Alt Codes with you here.
I am happy to announce the creation of a YouTube channel for hosting accessibility related videos. I will be adding tutorials, reviews, rants, and other information about accessibility and digital media.
The first video added was a proof of functionality, just a simple introductory clip of ten seconds, titles “Hello World”.
The next video is the first of an ongoing series of videos about accessibility, each video being about 60 seconds long. The content will be aimed at online teachers, but will be useful for anyone creating digital content.
Maturity Models have been around since the mid-80’s as a way of measuring an organization’s level of performance in terms of both formal capability and practices, from ad-hoc to policy-driven to a level of innovation and refinement. While Maturity Models were originally used in software development companies, they can be applied to a wide range of practices and industries.
Typical structure of maturity models include defined levels of maturity, essential processes, organization and strategy, goals and optimization. Even though many of the maturity models are presented in linear terms, it is not uncommon for an organization to be involved in several different areas concurrently. Accessibility Maturity Models are no exception in this regard.
From “Model” to “Process”
While the term “model” might infer a static state, Accessibility Maturity Models typically refer to an ongoing process for the institution employing the model. Typically, the models describe a process including the following five steps:
Initial awareness
Managed efforts
Defined strategy
Regularly Assessed/Adjusted
Optimization
Most organizations can define their practices according to one or more of these steps. Ultimately nobody really “matures” completely, as nobody can ever be completely optimized in the face of non-stop technological advances and the constant innovation in the digital information space.
Capability for Maturity
Truly, these models are actually measuring the CAPABILITY of your organization more than the current state of your digital accessibility maturity, as in what you could determine based on an audit of your digital media.
More than a measure of your product, it is an inventory of your tools, materials, policies, practices, quality control, training, research and development, and strategic plan and outlook. Your Accessibility Capability Maturity is a measure of your ability to function and perform as a member of your professional industry and community, as well as in modern society as a whole.
Measuring Your Own Maturity
The World Wide Web Consortium (W3C) provides a robust framework for an Accessibility Maturity Model, which encompasses many excellent considerations. They encourage organizations to make use of it as a starting point for their own models, customizing it to match your structure and needs. You can check it out at: https://www.w3.org/TR/maturity-model/.
Accessibility Capability Maturity Models will vary in specifics across organizations, but most will have levels similar to the following:
Initial/Ad Hoc
All organizations begin here, even if they are past this point when they learn about Accessibility Maturity Models. At this level results are sporadic and inconsistent, as are any efforts towards accessibility.
Awareness
At this stage organizations begin to recognize the significance and importance of accessibility. Some sort of effort to raise awareness is made, typically with some introductory training. Guidelines for accessibility might also be introduced.
Compliance
At this level, organizations begin to introduce accessible workflows and focus on satisfying the basic accessibility requirements of different legal and regulatory frameworks. Accessibility audits may be performed, as well as a focused formal effort to address accessibility concerns.
Integration
Accessibility is integrated into the organization’s processes, considered from the beginning of a project’s lifecycle. This is done through formalizing accessibility requirements into the design and development standards, developing the relevant accessibility testing procedures, and providing training to staff.
Optimization
Focusing on continuous improvements in accessibility across the board. Accessibility testing is thorough and robust, combining automated and manual testing with specific usability testing with individuals with disabilities. Accessibility metrics are tracked alongside proactive efforts to discover and address accessibility challenges.
Innovation
At the highest level of maturity, organizations are leading the way with accessibility practices, and go beyond the basic minimum requirements of legal and technical conformance. Organizations at this level seek innovative solutions to accessibility challenges and contribute to accessibility standards and best practices, continuously pushing the boundaries of accessible design and technology.
Benefits of Using an Accessibility Capability Maturity Model
By providing a roadmap for organizations to follow as they evolve from basic reactive approaches to accessibility challenges, the Accessibility Capability Maturity Model helps organizations achieve a more comprehensive, proactive, and effective approach to accessibility.
When an organization progresses through the stages of the Accessibility Capability Maturity Model, they can improve their digital accessibility, increase their customer base, enhance user experiences for people with disabilities, as well as mitigate legal and reputational risks associated with inaccessible content.
Applying the Accessibility Capability Maturity Model to Higher Education
There are many different methods of administration being practiced at the various higher education institutions in the U.S., but the needs of accessibility often lead to similar concerns and challenges.
While most higher educational institutions have unique considerations separate from those of software developers, there are many similarities which make following an Accessibility Maturity Model an effective way to achieve the same goals, and progress through the stages of accessibility improvement.
Following are some of the typical approaches followed by higher educational institutions.
Create Accessibility Policies
Most institutions have established policies requiring all digital content and electronic information systems to meet accessibility standards such as WCAG 2.1 and Section 508.
Providing Training
Faculty and Staff must be given accessibility training in an ongoing basis to ensure currency with new innovations in technology, and with legal standards as more accessibility cases make their way through the courts.
Accessible Procurement
Enforcing requirements for accessibility in the purchase of technology and digital media makes an enormous difference in the ability of an institution to satisfy the legal requirements for accessibility. Effective training on how to evaluate the accessibility of products and media allows institutions to avoid being suckered with a false or misleading VPAT. Establishing penalty structures for accessibility issues discovered in the first year after a purchase can be a great incentive for vendors to provide more accessible products and services.
Collaborate with Disability Services
Engage your local campus Disability Services Office. Most higher education institutions have a wealth of expertise and experience helping students with disabilities every day. Make sure their knowledge and expertise isn’t being ignored or wasted, include them in relevant efforts and activities, include them on procurement committees, accreditation reviews, strategic planning initiatives, etc. Get to know these people, take them out to lunch, listen to what they have to say.
Leverage Accessibility Standards
Most higher education institutions have some sort of legal requirements to follow accessibility standards. Even if they aren’t legally required to follow an accessibility standard, they probably still like to consider themselves as moral and ethical institutions, at the very least. Accessibility standards are not only a roadmap for testing and ensuring accessibility, the implication is that people who follow the standards are good people, and people who do not follow the standards are bad – and probably lazy, immoral, selfish, greedy, puppy-kicking monsters. Let’s be honest here.
Student Involvement
Another invaluable asset all higher education institutions have available to them are students. Students tend to be interested in opportunities to get experience, to make a difference, and to help people. Connecting students with your accessibility efforts is not only a great way to get cheap labor in exchange for valuable life-enriching work, it is a valuable way to increase the likelihood those student workers will carry forth their newly-gained knowledge and concern for accessibility, and spread it around as they live their lives. What a great life-long lesson.
Take-Aways
Awareness is the first step to maturity. With a little guidance, your natural desire to be excellent can lead you to new heights and empower you to make substantive changes that benefit everyone. Our world grows more wonderful and more worth living in, the more people take on the responsibility of doing good work and looking out for each other. Accessibility Capability Maturity Models are a great way to drive positive change in whatever type of organization you want to lead.
Where is Your Organization on the Accessibility Capability Maturity Model?
So you need an accessibility audit of your website?
Oh boy!
There are lots of ways you can approach an accessibility audit. Unfortunately, without knowing any better, lots of people approach it as an unpleasant task.
However, I have found that a good accessibility audit often reveals issues which can be addressed in a way that will improve the website and overall user experience.
The Importance of Web Content Accessibility Guidelines (WCAG)
At the most basic level, the WCAG are a set of criteria for measuring accessibility of web content.
However, the actual collection of WCAG documents goes a bit further than a simple list of rules.
Comprised of supporting documents to explain how to use the WCAG, explanations of success criteria, and the actual guidelines themselves, the WCAG is a robust collection of information designed to help alleviate doubt and misunderstanding about web accessibility.
Created by the World Wide Web Consortium (W3C), a non-profit collection of super smart people dedicated to maintaining the function and philosophy of the World Wide Web, there is no ulterior motive or profit driven agenda. The only interest of the W3C in creating and maintaining the WCAG is to help facilitate an accessible World Wide Web.
The WCAG is the definitive source and authority on measuring accessibility of web-based content.
At the highest level there are four guiding principles of the WCAG:
Perceivable
Operable
Understandable
Robust
These are the broad strokes that organize a lengthy delineated list of criteria. The complete WCAG criteria are organized into a hierarchy of three levels, Single A (WCAG A), Double A (WCAG AA), and Triple AAA (WCAG AAA).
The WCAG have undergone revision, and are currently on version 2.1. Version 2.2 is currently being reviewed, and is expected to be released sometime in the not too distant future.
Currently, WCAG 2.1 AA is the accepted standard identified by courts and governments around the world as an acceptable baseline for accessible web content.
Basic Process for Auditing with WCAG 2.1 AA
In a nutshell, an audit is conducted by assessing the various content of a website according to the relevant criteria from WCAG. Some tools can help automate part of the assessment, but there is always a need for manual testing.
While the WCAG provides a good baseline for determining accessibility, there are additional concerns under the category of Usability which also need to be considered when auditing a website for accessibility.
Here is the Standard Operating Procedure I employ:
Initial Survey of Site
Identify Representative Pages
Assess Pages (Automated)
Assess Pages (Manually)
Assess pages with NVDA
Consider Content
Consider Interactivity
Compile Report
Review Report with Client
Simple, straight-forward, and at the end of it all there is a report identifying each issues as a line item inventory, referenced to relevant WCAG criteria, and identified by code and line number from the source HTML file.
It’s everything you need to clean up accessibility errors, and it provides a chance to assess your workflow to find places where you can add best practices in an organic manner that will help you create accessible content going forward.
Initial Survey of Site.
The first thing I do is perform a quick assessment of the site scope and purpose. I quickly browse through the main menu items, take note of patterns and different types of page content, forms, modals, interactive elements, general size, and complexity of the site.
If there is an obvious business function the website is supposed to deliver, I see if I can initiate the process via the keyboard and pursue it until something critical breaks, or they ask for a credit card number.
Depending on the size and nature of the site, this can take anywhere from a few minutes to over an hour.
Identify Representative Pages.
After I have an understanding of the size and nature of the website, I identify a sampling of representative pages from the site for audit.
As most websites repeat basic layout patterns through templates and content management systems, it is often not necessary to test every single page. The issues you find on one page will likely exist on every page created from that template, and you end up finding the same type of issue over and over.
It is also common to find a category of accessibility issue which exists throughout a website due to a systemic design/development practice, or from issues contained in source templates and themes.
Gathering a subset of pages with layout and content types which are representative of the rest of the website allows for more efficient and effective testing.
Assess with automated and manual tests.
AI generated image of a man and robot assessing a website for accessibility.
There are several different tools available to help with accessibility testing. Some are dedicated software which monitor and report on accessibility over time, while others are on-demand scanners, providing a snapshot in time of the status of web content.
There are several free plugins for popular Internet browsers which can tell you whether a web page contains content out of conformance with the WCAG standards as well as other usability concerns.
It is important to remember that any automated tool is going to be limited in what it can determine.
Just like computers can’t identify an image with a crosswalk, traffic light, or bus, they also can’t determine all the accessibility issues which might be present on a web page.
Assess pages with NVDA screen reader.
There are many things which a computer can detect, but nothing beats the real-world test of using a screen reader. For best results with screen reader testing you should always employ the assistance of a blind individual if possible.
There are distinct and unique aspects of user patterns and behavior when approaching web content from a non-visual perspective. Getting beyond your ingrained habits (and limitations) as a sighted individual requires practice and dedicated awareness. It can be challenging, but it is not impossible.
Because I spent many years teaching people how to use screen readers, I know enough to be aware of common and typical usage patterns and expected behaviors for non-sighted interaction with digital content.
The end goal of all this is to identify usability issues beyond what can be detected from analyzing the underlying code.
However, I also know and admit freely that nothing compares with a bona fide usability test from individuals who use a screen reader every day as their sole means of accessing the Web. I know my abilities to use a screen reader are never going to be as robust, and I do not hesitate to enlist help from individuals who are blind when necessary.
Consider Content Issues.
The usage of different types of digital content brings an expectation of certain behaviors and capabilities. Specifically interactive content such as forms, audio and video, and web applications. End-users expect these things to function according to established design patterns. When the design pattern is not followed, the content effectively will not function for these individuals.
The World Wide Web, being designed to support a wide range of technologies and content, allows for great flexibility in how a person can design and present content. There are no requirements to follow any design patterns at all, which creates a wonderful sense of freedom for creators and a damning amount of chaos for end-users.
People being the ever-clever rule breaking upstarts that they are, continuously expand the envelope of how to mis-use, abuse, and generally confuse the expected paradigms, patterns, and procedures for delivering the many different types of content.
So it is that we end up needing to check certain types of content, much like a list of repeat offenders kept on the wall of a local police precinct.
As new content types emerge, accessibility specialists evaluate and determine authoring strategies to ensure accessibility of the content. These potentially problematic content types become known and tracked, a cause for concern wherever they turn up.
Tsk tsk tsk Mister Modal – back again, are we?
Consider interactive issues.
There are many ways an object can invite a user to interact with it. Unfortunately, without deliberately paying attention to the access strategies for interactive design, some content can fall short on their offer to deliver an interactive user experience.
Without expressly seeking to maximize the accessibility of your interactive elements, you can create expectations and disappointing user experiences without even knowing it. Effectively leaving your audience frustrated out in the cold as they see the party happening just beyond their reach.
Sometimes it is a case of missing identity where a critical piece of interactive content is present but not labeled, and is therefor invisible and unknown.
Other times a designer creates a widget that works wonderfully with a mouse, but it does not work at all with any other sort of input device.
Some interactive content is simply missing a required component, such as failing to provide captioning for digital video. These authoring failures can reveal ignorance, inability, or indifference on the part of the content creator.
Unless you are creating radical new content types, there is really no excuse for failing to deliver truly interactive content. There are known and documented approaches for ensuring accessibility with most known interactive content.
The solution to these interactive problems is usually pretty straight forward: get yourself to W3C and become informed about what you are trying to accomplish – so we can ALL go check it out.
Compile Report.
Understanding what to look for in an accessibility is only part of the challenge. Compiling the final report on what is found is where the ultimate value comes in.
More than a simple collection of issues to address, a web accessibility audit should present the issues in a way which facilitates the identification and remediation of accessibility concerns.
I always include a summary page with an overview of the different WCAG criteria which needs to be addressed, along with some helpful references to help explain the significance of the issue and how to address the issue to alleviate the accessibility concern.
I also provide a detailed inventory of issues for each of the representative pages I identify initially. Each occurrence of an issue is entered as a distinct line item, time and date stamped at time of audit, with corresponding WCAG criteria, severity of impact on accessibility/usability, source code and line number, and a link to an explanation of how to address the concern.
Additional data gathered from content, interactivity, and screen reader perspective are also aggregated and provided as separate categories.
With a detailed report of the accessibility audit, a designer/developer can effectively correct the accessibility and usability issues while also identifying the aspects of their workflow where accessibility can be addressed organically as a normal and ongoing part of quality control.
Review Report with Client
After the audit has been completed and the report has been compiled, I share the report with the client and schedule a meeting to go over the report and respond to any questions they might have.
This is typically adequate for addressing the accessibility concerns of most websites, though for some websites with greater complexity might require additional training.
While a good accessibility audit will reveal work to be done, it also provides peace of mind in knowing the extent of any issues affecting accessibility and usability.
Going through an accessibility audit the first time might be a little intimidating, but as you work through the issues, you are creating a quantifiable difference in your content, and eliminating potential cracks in the user experience where your audience might slip away.
After the first accessibility audit, additional recurring audits will find far fewer issues, and become much less exciting. Eventually, accessibility audits become part of the regular rhythm of a successfully designed and functional website, and ultimately become one less thing to worry about.
As the world has been dealing with the Coronavirus pandemic, Zoom meetings have entered our popular culture as both a means of conducting business and maintaining contact with friends and family.
With all the use Zoom has been getting, I thought it might be helpful to share some of the accessibility features you can enable to make your Zoom meetings as inclusive as possible.
Pre-Meeting Preparation
There are some essential settings you will want to make sure are enabled before the meeting begins, and a few suggestions that can make your meeting more accessible, enjoyable, and worthwhile for all participants.
Zoom Settings
Zoom includes a group of meeting settings to enable features like Closed Captioning and different ways of interacting with meeting participants, such as polling and non-verbal feedback tools.
In order to use these features, the Zoom account holder will need to enable the settings at the account level. This means that if you work for a school where your Zoom account is managed by IT, you may need to get their help to make sure these settings are enabled.
Enabling Zoom Account Settings
From the Zoom settings in the main Zoom application window, you can access the Zoom account settings.
The Zoom account settings will open in your browser after you click the prompt at the bottom of the Zoom Settings window to “View More Settings”.
There are two groups of settings you want to enable from the “Meetings” tab.
First are the Meeting Reactions and Non-verbal feedback options under the “In Meeting (Basic)” settings:
Second are the Captioning settings found under the “In Meeting (Advanced)” settings:
Live Transcription
Notice that there is an option for a live transcription service, which utilizes speech recognition technology. This is NOT an acceptable replacement for a live captioner.
Do not enable Live Transcription unless all of the meeting hosts using the Zoom account have been made aware that it is not to be used in lieu of a live captioner when captioning is required by a participant.
While the live transcription feature is not accurate enough to rely on as an accommodation, it might provide a good start on a transcript that can be edited and corrected after the meeting. Your results may vary, depending on audio conditions and participants’ speaking voice.
Advance Agenda and Handouts
Another useful thing to do before the meeting starts is to send out the agenda and any handouts for the meeting. This also provides an opportunity to remind participants of any protocol for interacting during the meeting, and to ask if anyone requires any accommodations.
Remember to make the meeting agenda and any handouts accessible before you send them to meeting participants.
In-Meeting Accessibility
There are several considerations for ensuring a meeting is accessible for all participants. Be strategic and prepared in understanding the different tools in Zoom for sharing information and interacting with other participants.
Inter-personal Accessibility
As you manage the meeting, make sure to remind participants of the different tools you will be using to share information, ask questions, and interact with each other.
The following suggestions will help you increase the accessibility of your Zoom meetings:
Repeat questions that are asked verbally and through chat.
Describe images, charts, graphs and any other visual information of significance.
Speak in a relaxed pace and avoid making rapid movements with the mouse when you are sharing your screen.
When using annotations or the Whiteboard, always narrate the visual content you are creating.
If you are using an American Sign Language Interpreter, use the Spotlight tool in Zoom to keep the interpreter’s video window prominently displayed. Likewise, if you are using break-out rooms, manually create the breakout rooms so you can ensure the interpreter is placed in the correct breakout room.
Managing Captioning
The Zoom meeting host has the ability to share a lot of capabilities with selected co-hosts, but only the meeting host is able to manage closed captioning.
When the meeting host clicks on the closed captioning button, the captioning preferences window will be displayed.
You can assign the role of captioner to another meeting participant, or you can copy the API token to enable the use of a third-party captioning tool.
It is highly recommended that you do not try to caption the meeting while you are hosting it. It has been found that the quality of the meeting and the captions both suffer when the meeting host tries to be the captioner while also managing the meeting.
Keyboard Shortcuts
There are several keyboard shortcuts you can use within a Zoom meeting to make the experience easier to manage and more accessible to.
The following keyboard shortcuts are just a brief collection that can be useful for you in hosting a Zoom meeting. You may also want to share them with meeting participants before the meeting.
Change focus to Zoom meeting controls = CTRL + ALT + SHIFT
Mute or Unmute audio = ALT + A
Mute or Unmute audio for all except host (only available to Host) = ALT + M
Show or hide floating meeting controls = ALT + SHIFT + H
Cycle through Zoom program windows = F6
Increase or decrease chat display size = CTRL + PLUS or MINUS
Final Thoughts
While there are many possible scenarios you may encounter when hosting Zoom meetings, the best results will happen when you are well-prepared and able to adjust to new information.
Understanding how to use the Zoom tools for interacting with participants and managing a meeting can make a huge difference in your Zoom meeting experience. Being comfortable with using the different meeting tools in Zoom will allow you to better manage last-minute surprises and accessibility challenges.
When it comes to the accessibility of online information, the standard is pretty high – and measurable. However, the path to an accessible institution is not always so obvious or easy to travel. This is fertile ground where inspired guidance can do a lot towards making inroads for positive change.
If you look at the entirety of what is required for accessibility in online education, it becomes clear that ensuring accessibility is beyond the scope of a single person. It takes a team to make online learning happen, even if it is just the teacher and parents working together.
For best results, accessibility requires a concerted effort from all the people involved.
I’m not saying that everyone needs to be an accessibility expert, but they should know how to perform their role correctly.
Every individual needs to be aware of how their job impacts accessibility, and how to perform their job in a way that makes that impact a positive one.
It is important to recognize this aspect of accessibility in order to provide the proper support and accountability required to affect awareness and change.
It is not fair, reasonable, and certainly not effective, to lay all of the responsibility for accessibility on the shoulders of teachers.
When everyone understands accessibility as a matter of basic quality control, accessibility simply becomes part of doing a good job.
When managed appropriately, accessibility becomes evidence of an organization that is trained, knowledgeable, well-resourced, and performing at an optimum level.
You might have recognized that accessibility happens across a spectrum of detail and capability.
There is a simple and essential accessibility in having the ability to open a digital file and perceive the contents. On the other end of the spectrum is a polished document with detailed formatting and consideration given to the concepts of universal design and equitable experience.
In the midst of an accessibility breakdown, the first priority is to establish reliable communications.
Ensure that the essential learning objectives can be taught accessibly, even if it is just through simple text.
Enhancing engagement becomes a secondary concern when a student can’t even access the information to try and engage with it.
Making your instructional content as accessible as possible for future cohorts of students is still a priority, it is just secondary to ensuring essential access.
Doing it Right the First Time Saves You Pain and Expense
The logistics of accommodating an individual who is not physically located at your institution present numerous challenges.
There are simply too many unforeseeable variables to provide effective accommodations in response to users in real time as they are notifying you they have a need.
We have to ensure effective access for all individuals in advance of courses being offered. This is the only way to avoid students with disabilities getting stuck in a situation where they need to be accommodated in order to proceed and succeed.
As challenging as it might be at times, the time and resources spent making content accessible in advance will always save you money when compared to the cost of responding to a legal complaint over inaccessible content.
Usability vs Technical Accessibility
Even though the two concepts are very closely related, there is a big difference between usability and accessibility in practice.
Usability is the determination of whether or not something is actually functional and useable by an individual with a disability.
Accessibility is a measure of quantifiable criteria, according to a specific standard.
Often the adoption of Accessibility standards will lead to usability, but not always.
Online accessibility needs to be established in concert with a high degree of verified usability in order to ensure effective access for individuals with disabilities.
Content that is not usable is unacceptable, regardless of how well it measures up to any technical standard.
100% Accessible is a Myth
The fact is, 100% Pure and Total Accessible does not truly exist in the wild.
Whatever content you create, given the extreme diversity and sheer mass of humanity occupying the planet, it is inevitable that someone can be found for whom your content will be unusable and inaccessible.
The truth is, we are making things adaptable when we say they are accessible. This is because often the specialized needs of one individual require content to be formatted in a way that makes the content inaccessible according to another individual’s specialized needs.
In designating something as accessible, there is an expected element of flexibility and adaptability that prevents anything being nailed down too rigidly.
Accessibility does not mean you deliver 100% usability so much as you deliver content that is as open to customization/personalization as possible.
Additional adjustments are expected by individual user technologies, and thus the final rendering of the information is not in your purview.
“Technology-Agnostic” content is a term for content that can be rendered accessibly across different hardware and software platforms. Well-formatted, technology-agnostic content is what is necessary for the greatest usability scenario.
Accessibility is Adaptability
In the social model of accessibility, it is not the individual who is “lacking” anything because of a disability. It is the environment that is lacking the appropriate design elements to make it usable by the citizenry.
The transferable idea for online learning is that technology can be managed in a way that provides the necessary customization of the digital landscape for each individual as needed.
It is understood that everyone will show up with their own unique skillset and abilities. We all meet in the middle, leveraging our technology to ensure access where necessary.
We don’t need to anticipate every potential usage scenario. We just need to maintain an environment with as few obstacles to people using it in the manner they need to.
We can deliver the most effective instruction when each individual is able to configure their interface and information delivery to meet their needs.
True responsive design happens when the content has the appropriate structure to provide consistent meaning while retaining the ability to flow into whatever specialized technology a student might be using.
For example, MS Word is a powerful editing tool for digital content. Even so, it is not always the best digital container to present information in.
However, the content created in Word can be styled and formatted in a way that enables it to be easily converted into any alternate format you need. It is easy to convert content from MS Word to be presented in many different digital frameworks.
This enables one source document to be created that can be delivered to an entire class of individuals with differing needs and specialized software, and each of the students will get the customized rendering of the content in the format they are able to interact with.
You don’t have to make any of these formats, you just make the one master file in a way that allows the technology to convert the information into the appropriate format for each student.
These capabilities are the result of technological standards such as Section 508 and WCAG (Web Content Accessibility Guidelines). These standards identify the essential considerations for making your content accessible enough to be usable in most conceivable situations.
However, even when you meet all the technical standards, your content is not 100% accessible. The best you can say is that your content is conformant with the Section 508 standards and WCAG.
There is always a chance that tomorrow some individual with a unique set of skills might show up to educate you further in the amazing diversity of humankind.
You Make the Difference
Leadership is the element that brings this vision to reality, and it is critical to realize that leadership is not reserved for management. Sometimes the most effective leadership is that inspiring example you provide by simply doing the best you can.
You have the ability to inform and inspire your colleagues by setting the right example, and by speaking up and sharing what you know.
If you are involved in governance committees at your institution, make sure that accessibility is discussed and addressed. Providing awareness of accessibility is the first step towards affecting change.
When the entire institution is informed and empowered to do their best work, accessibility can happen as a result of people simply doing their job right.
Informed and effective management can ensure employees are properly trained and held accountable. The creation, delivery, and maintenance of accessible infrastructure and processes becomes an accepted aspect of basic operations.
Remember that accessibility is not just the right thing to do according to the law, it is the right thing to do for delivering truly effective education, and the right thing to do for the people in your community.
Think about this – we all benefit when the education system is more accessible to the people who need it.
Thanks for doing your part, and thanks for reading!